Centos 7 with two different networks
I have a vm image with two nics in it. One to my 10Gb 192.168.70.0 network. This network is not on a switch but simply a DAC to my PC. So my PC is 192.168.70.5 and my ESXi is 192.168.70.90.
I also have another network in the vm inage on my 1Gb 192.168.10.0 network. This is my may main network, with a switch, and a route out to internet (192.168.10.1). So my PC is 192.168.10.5, ESXi 192.168.10.90, and router 192.168.10.1.
IP addresses for the vm image itself are:
192.168.10.22
192.168.70.22
Problem is when I have the 192.168.70.22 enabled I am not able to reach the internet. To remedy this I have the folowing /etc/sysconfig/network-scripts ifcfg files:
# cat ifcfg-ens192
TYPE=Ethernet
BOOTPROTO=none
DEFROUTE=yes
IPV4_FAILURE_FATAL=no
IPV6INIT=yes
IPV6_AUTOCONF=yes
IPV6_DEFROUTE=yes
IPV6_FAILURE_FATAL=no
IPV6_ADDR_GEN_MODE=stable-privacy
NAME=ens192
UUID=dcc2277d-a060-48a0-8829-350abf95e269
DEVICE=ens192
ONBOOT=yes
DNS1=192.168.10.1
IPADDR=192.168.70.22
PREFIX=24
#GATEWAY=192.168.70.1
IPV6_PEERDNS=yes
IPV6_PEERROUTES=yes
IPV6_PRIVACY=no
# cat ifcfg-ens224
TYPE=Ethernet
BOOTPROTO=none
DEFROUTE=yes
IPV4_FAILURE_FATAL=no
IPV6INIT=yes
IPV6_AUTOCONF=yes
IPV6_DEFROUTE=yes
IPV6_FAILURE_FATAL=no
IPV6_ADDR_GEN_MODE=stable-privacy
NAME=ens224
UUID=78e2b2a8-d444-4fd2-9751-bb108861392a
DEVICE=ens224
ONBOOT=yes
IPADDR=192.168.10.22
PREFIX=24
GATEWAY=192.168.10.1
DEFROUTE=yes
DNS1=192.168.10.1
IPV6_PEERDNS=yes
IPV6_PEERROUTES=yes
IPV6_PRIVACY=no
I then change the value of rp_filter to loose mode, value 2 with:
# sysctl net.ipv4.conf.all.rp_filter=2
net.ipv4.conf.all.rp_filter = 2
Restart network with:
# systemctl restart network
I can now ping internet (8.8.8.8), all nodes on 192.168.10.0, and all nodes on 192.168.70.0 (ESXi 192.168.70.90, PC 192.168.70.5 and the vm image of 192.168.70.22).
A quick reboot and re test of access and I am good.
I also want to tune the 10Gb interface as Im wanting to to test SSD disk caching on this image and need the fastest I can get. FYI My PC on 192.168.70.5 has m.2 512GB 950 Pro. I am using a 2.5" 512GB 850 Pro for cache on the vm image of 192.168.70.22. This 850 Pro is in the ESXi server.
So now tune the 10Gb image:
---turn off NetworkManage
systemctl stop NetworkManager
systemctl disable NetworkManager
systemctl stop NetworkManager-wait-online
systemctl disable NetworkManager-wait-online
systemctl enable network
chkconfig network on
systemctl start network
reboot and sanity check
systemctl status NetworkManager
systemctl status network
---end turn off NetworkManager
---tune 10Gb CNA
service irqbalance stop
service cpuspeed stop
chkconfig irqbalance off
chkconfig cpuspeed off
systemctl disable irqbalance
systemctl disable cpuspeed
systemctl stop irqbalance
systemctl stop cpuspeed
vi /etc/sysconfig/network-scripts/ifcfg-eth???
MTU="9000"
vi /etc/sysctl.conf
# -- tuning -- #
# Increase system file descriptor limit
fs.file-max = 65535
# Increase system IP port range to allow for more concurrent connections
net.ipv4.ip_local_port_range = 1024 65000
# -- 10gbe tuning from Intel ixgb driver README -- #
# turn off selective ACK and timestamps
net.ipv4.tcp_sack = 0
net.ipv4.tcp_timestamps = 0
# memory allocation min/pressure/max.
# read buffer, write buffer, and buffer space
net.ipv4.tcp_rmem = 10000000 10000000 10000000
net.ipv4.tcp_wmem = 10000000 10000000 10000000
net.ipv4.tcp_mem = 10000000 10000000 10000000
net.core.rmem_max = 524287
net.core.wmem_max = 524287
net.core.rmem_default = 524287
net.core.wmem_default = 524287
net.core.optmem_max = 524287
net.core.netdev_max_backlog = 300000
---end tune 10Gb CNA
Saturday, February 25, 2017
Thursday, February 23, 2017
Asterisk 14 on Centos 7.3
Asterisk 14 on Centos 7.3
After fresh of install of Centos 7.3 minimal.
cd /root
cp /etc/sysconfig/selinux /etc/sysconfig/selinux.bak
sed -i 's/^SELINUX=.*/SELINUX=disabled/g' /etc/sysconfig/selinux
cp /etc/selinux/config /etc/selinux/config.bak
sed -i 's/^SELINUX=.*/SELINUX=disabled/g' /etc/selinux/config
systemctl disable firewalld
systemctl stop firewalld
service iptables stop
service ip6tables stop
chkconfig iptables off
chkconfig ip6tables off
yum -y install bind-utils traceroute net-tools ntp* gcc glibc glibc-common gd gd-devel make net-snmp openssl-devel xinetd unzip libtool* make patch perl bison flex-devel gcc-c++ ncurses-devel flex libtermcap-devel autoconf* automake* autoconf libxml2-devel cmake sqlite* wget ntp* lm_sensors ncurses-devel qt-devel hmaccalc zlib-devel binutils-devel elfutils-libelf-devel wget bc gzip uuid* libuuid-devel jansson* libxml2* sqlite* openssl* lsof NetworkManager-tui mlocate yum-utils kernel-devel nfs-utils tcpdump git vim
yum -y groupinstall "Development Tools"
yum -y update
yum -y upgrade
cd /root
echo ':color desert' > .vimrc
reboot
cd /root
yum -y install epel-release
yum -y install stress htop iftop iotop hddtemp smartmontools iperf3 sysstat mlocate
updatedb
yum -y install gcc gcc-c++ php-xml php php-mysql php-pear php-mbstring mariadb-devel mariadb-server mariadb sqlite-devel lynx bison gmime-devel psmisc tftp-server httpd make ncurses-devel libtermcap-devel sendmail sendmail-cf caching-nameserver sox newt-devel libxml2-devel libtiff-devel audiofile-devel gtk2-devel uuid-devel libtool libuuid-devel subversion kernel-devel kernel-devel-$(uname -r) git subversion kernel-devel php-process crontabs cronie cronie-anacron wget vim
wget http://www.digip.org/jansson/releases/jansson-2.7.tar.gz
tar -xzvf jansson-2.7.tar.gz
cd jansson-2.7
./configure -prefix=/usr
make clean
make && make install
ldconfig
cd /root
wget http://downloads.asterisk.org/pub/telephony/asterisk/asterisk-14-current.tar.gz
tar xvf asterisk-14-current.tar.gz
cd asterisk-14.3.0
./configure -libdir=/usr/lib64
make menuselect
contrib/scripts/get_mp3_source.sh
make
make install
make progdocs
make samples
make config
systemctl restart asterisk
systemctl status asterisk
asterisk -r
Sunday, February 19, 2017
Broadsoft useful commands
Broadsoft useful commands
Backup servers:
bwadmin@ns1.whittenberg.domain$ locate bwBackup.pl
/usr/local/broadworks/NS_Rel_20.sp1_1.606/bin/bwBackup.pl
bwadmin@ns1.whittenberg.domain$ /usr/local/broadworks/NS_Rel_20.sp1_1.606/bin/bwBackup.pl NetworkServer /tmp/NetworkServer.bak
via the cli is:
NS_CLI/Maintenance/Tools> backupdb /tmp/NetworkServer.bak
Also see
bwRestore.pl
NS_CLI/Maintenance/Tools> restoredb
owncloud helpful commands
Add a trusted domain.:
http://192.168.80.100/owncloud/index.php/settings/admin?trustDomain=192.168.10.100
Clean trashbin/deleted files:
sudo -u apache /var/www/html/owncloud/occ trashbin:cleanup
sudo -u apache /var/www/html/owncloud/occ trashbin:cleanup user1 user2
Take out of maintenance mode:
vim /var/www/html/owncloud/config/config.php
<?php
$CONFIG = array (
'updatechecker' => false,
'instanceid' => 'oce24qfiihel',
'passwordsalt' => 'Dy+BHYATWwB+F4MYYBjPjYX44iXB3o',
'secret' => 'Bpf9UEgisK4XJecVxrL76ZAwg4n9NnG6RXWO2B4MKzpJNGMz',
'trusted_domains' =>
array (
0 => '192.168.80.100',
1 => '192.168.10.100',
),
'datadirectory' => '/myraid/owncloud/',
'overwrite.cli.url' => 'http://192.168.80.100/owncloud',
'dbtype' => 'sqlite3',
'version' => '9.1.4.2',
'logtimezone' => 'UTC',
'installed' => true,
'maintenance' => false,
'theme' => '',
'loglevel' => 2,
);
Friday, February 17, 2017
owncloud take out of maintenance mode
owncloud take out of maintenance mode
vim /var/www/html/owncloud/config/config.php
<?php
$CONFIG = array (
'updatechecker' => false,
'instanceid' => 'oce24qfiihel',
'passwordsalt' => 'Dy+BHYATWwB+F4MYYBjPjYX44iXB3o',
'secret' => 'Bpf9UEgisK4XJecVxrL76ZAwg4n9NnG6RXWO2B4MKzpJNGMz',
'trusted_domains' =>
array (
0 => '192.168.80.100',
1 => '192.168.10.100',
),
'datadirectory' => '/myraid/owncloud/',
'overwrite.cli.url' => 'http://192.168.80.100/owncloud',
'dbtype' => 'sqlite3',
'version' => '9.1.4.2',
'logtimezone' => 'UTC',
'installed' => true,
'maintenance' => false,
'theme' => '',
'loglevel' => 2,
);
Thursday, February 9, 2017
Install Linux Kernel 4.9 In CentOS
Install Linux Kernel 4.9 In CentOS
Ripped from: https://www.ostechnix.com/install-linux-kernel-4-9-centos-ubuntu/
To install the latest kernel, we need to add ELRepo repository.
First, let us add ELRepo GPG key:
rpm --import https://www.elrepo.org/RPM-GPG-KEY-elrepo.org
Then, add ELRepo in CentOS 7 / RHEL 7 / Scientific Linux 7 using command:
rpm -Uvh http://www.elrepo.org/elrepo-release-7.0-2.el7.elrepo.noarch.rpm
To Install ELRepo for CentOS 6 / RHEL 6 / Scientific Linux 6:
rpm -Uvh http://www.elrepo.org/elrepo-release-6-6.el6.elrepo.noarch.rpm
To Install ELRepo for CentOS 5 / RHEL 5 / Scientific Linux 6:
rpm -Uvh http://www.elrepo.org/elrepo-release-5-5.el5.elrepo.noarch.rpm
Enable ELRepo fastest mirror by installing the following package:
yum install yum-plugin-fastestmirror
Sample output:
[...]
Dependencies Resolved

================================================================================
 Package Arch Version Repository
 Size
================================================================================
Updating:
 yum-plugin-fastestmirror noarch 1.1.31-40.el7 base 32 k

Transaction Summary
================================================================================
Upgrade 1 Package

Total download size: 32 k
Is this ok [y/d/N]: y
Downloading packages:
No Presto metadata available for base
yum-plugin-fastestmirror-1.1.31-40.el7.noarch.rpm | 32 kB 00:02
Running transaction check
Running transaction test
Transaction test succeeded
Running transaction
Warning: RPMDB altered outside of yum.
 Updating : yum-plugin-fastestmirror-1.1.31-40.el7.noarch 1/2
 Cleanup : yum-plugin-fastestmirror-1.1.31-34.el7.noarch 2/2
 Verifying : yum-plugin-fastestmirror-1.1.31-40.el7.noarch 1/2
 Verifying : yum-plugin-fastestmirror-1.1.31-34.el7.noarch 2/2

Updated:
 yum-plugin-fastestmirror.noarch 0:1.1.31-40.el7

Complete!
We have added the ELRepo. Now, it is time to install Linux kernel 4.9.
Let us find out the current version details with command:
uname -r
Sample output:
3.10.0-327.22.2.el7.x86_64
So, the currently installed Linux Kernel version is 3.10.0-327.22.2.el7.x86_64.
Now, let us install Linux Kernel 4.9 by running the following command from Terminal:
yum --enablerepo=elrepo-kernel install kernel-ml
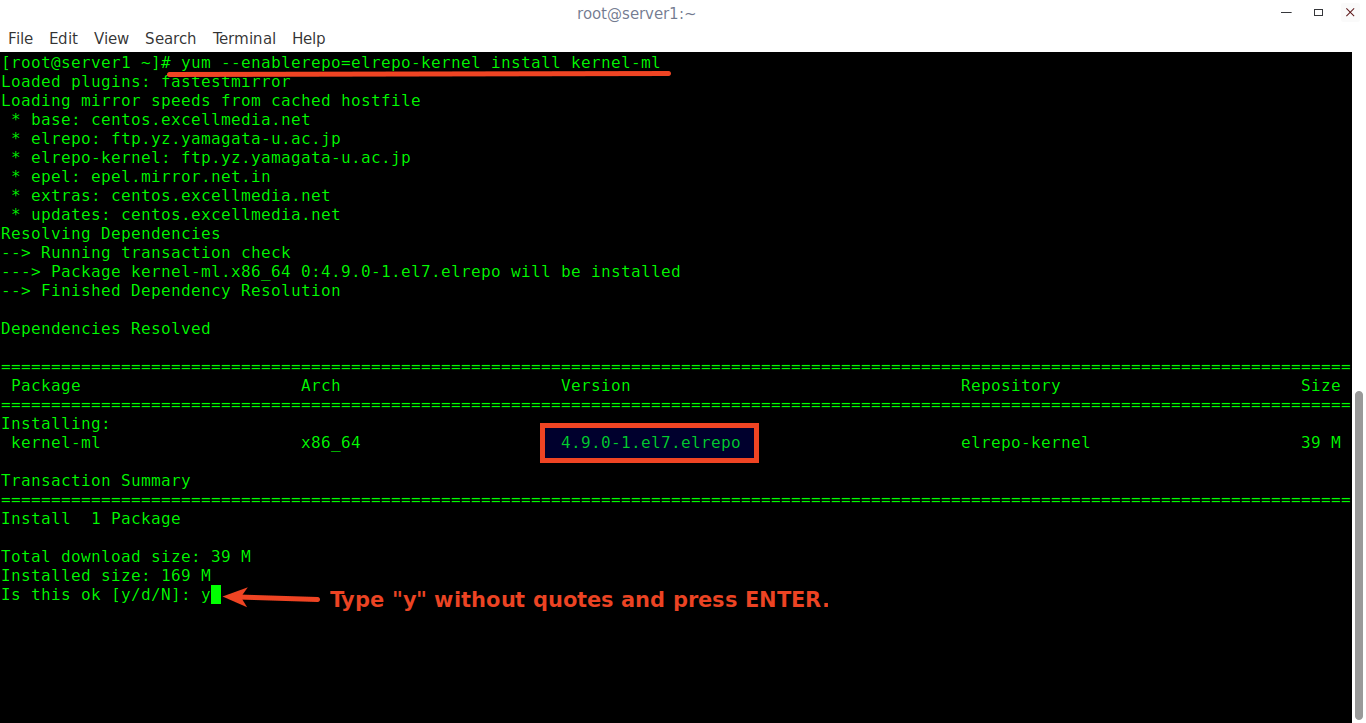
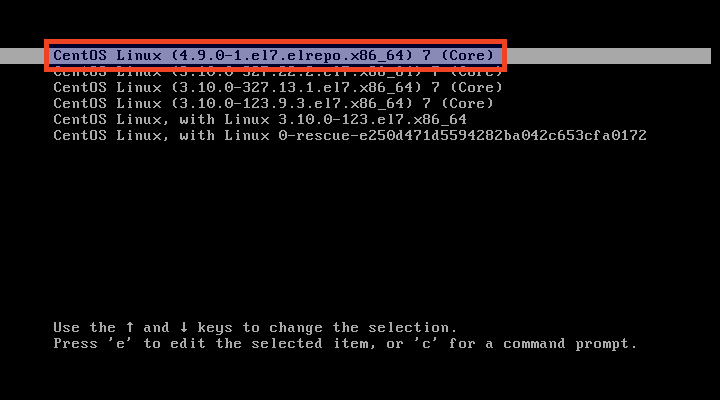
After installing the Kernel, Reboot your system and select the latest Kernel from the Grub boot menu.
Once you successfully logged-in to the system, run the following command to verify whether latest the latest Linux Kernel has been installed or not:
uname -r
Sample output:
4.9.0-1.el7.elrepo.x86_64
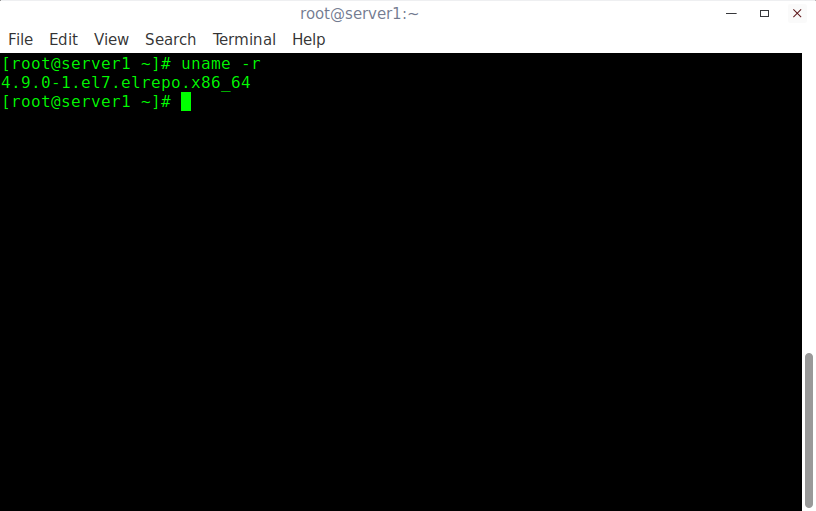
Congratulations! You have successfully updated the Linux Kernel. Now, your system is powered by most recent stable Linux Kernel 4.9 version.
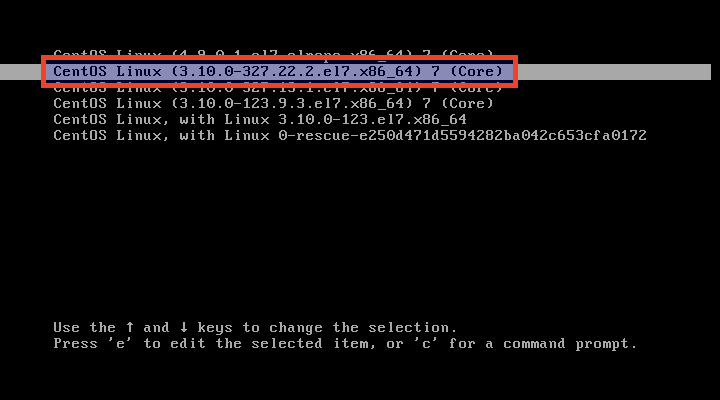
If have encountered with any problems after installing the new Linux Kernel? No worries, reboot your system. Select your previously working Kernel from the Boot menu.
Finally, remove the newly installed Kernel using command:
yum remove kernel-ml
That’s it.
Subscribe to:
Posts (Atom)