Why?


Search This Blog

Friday, August 5, 2016

Increase A VMware Disk Size (VMDK) Formatted As Linux LVM without rebooting


Stole this from https://ma.ttias.be/increase-a-vmware-disk-size-vmdk-formatted-as-linux-lvm-without-rebooting/
Increase A VMware Disk Size (VMDK) Formatted As Linux LVM without rebooting
Mattias Geniar, Friday, August 27, 2010 - last modified: Sunday, July 24, 2016

To increase the size of your VMware Virtual Machine, you need to do 2 major steps. First, you need to increase the disk's size in your vSphere Client or through the CLI. This will increase the "hardware" disk that your Virtual Machine can see. Then, you need to utilize that extra space by partitioning it. If you're interested in just resizing your Linux LVM, please proceed to step 2.
In this example, I'm increasing a 3GB disk to a 10GB disk (so you can follow using the examples).
I would advise you to read the excellent documention on Logical Volume Management on tldp.org.
Just a small note beforehand; if your server supports hot adding new disks, you can just as easily add a new Hard Disk to your Virtual Machine. You can increase the LVM volume without rebooting your Virtual Machine by rescanning the SCSI bus, more on that later in this article.

1) Checking if you can extend the current disk or need to add a new one

This is rather important step, because a disk that has been partitioned in 4 primary partitions already can not be extended any more. To check this, log into your server and run fdisk -l at the command line.
# fdisk -l

Disk /dev/sda: 187.9 GB, 187904819200 bytes
255 heads, 63 sectors/track, 22844 cylinders
Units = cylinders of 16065 * 512 = 8225280 bytes

Device Boot      Start         End      Blocks   Id  System
/dev/sda1   *           1          25      200781   83  Linux
/dev/sda2              26        2636    20972857+  8e  Linux LVM

If it looks like that, with only 2 partitions, you can safely extend the current hard disk in the Virtual Machine.

However, if it looks like this:
~# fdisk -l

Disk /dev/sda: 187.9 GB, 187904819200 bytes
255 heads, 63 sectors/track, 22844 cylinders
Units = cylinders of 16065 * 512 = 8225280 bytes

Device Boot      Start         End      Blocks   Id  System
/dev/sda1   *           1          25      200781   83  Linux
/dev/sda2              26        2636    20972857+  8e  Linux LVM
/dev/sda3            2637       19581   136110712+  8e  Linux LVM
/dev/sda4           19582       22844    26210047+  8e  Linux LVM

It will show you that there are already 4 primary partitions on the system, and you need to add a new Virtual Disk to your Virtual Machine. You can still use that extra Virtual Disk to increase your LVM size, so don't worry.

2) The "hardware" part, "physically" adding diskspace to your VM

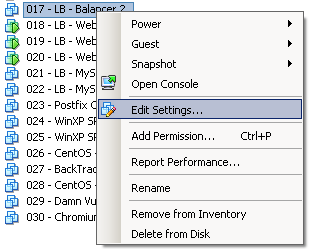
Increasing the disk size can be done via the vSphere Client, by editing the settings of the VM (right click > Settings).

Edit settings
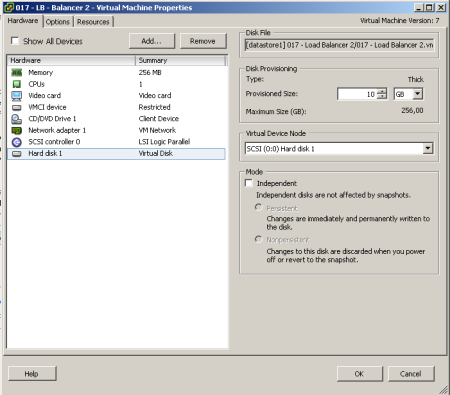
Now, depending on the first step, if there aren't four primary partitions yet, you can increasing the privisioned disk space.

Increase disk size
If the "Provisioned Size" area (top right corner) is greyed out, consider turning off the VM first (if it does not allow "hot adding" of disks/sizes), and check if you have any snapshots made of that VM. You can not increase the disk size, as long as there are available snapshots.
Alternatively, if you already have 4 primary paritions, you can also choose "Add..." to add new Hardware "Virtual Disk" to your VM, with the desired extra space.

3) Partitioning the unallocated space: if you've increased the disk size

Once you've changed the disk's size in VMware, boot up your VM again if you had to shut it down to increase the disk size in vSphere. If you've rebooted the server, you won't have to rescan your SCSI devices as that happens on boot. If you did not reboot your server, rescan your SCSI devices as such.
First, check the name(s) of your scsi devices.
$ ls /sys/class/scsi_device/
0:0:0:0 1:0:0:0  2:0:0:0

Then rescan the scsi bus. Below you can replace the '0\:0\:0\:0' with the actual scsi bus name found with the previous command. Each colon is prefixed with a slash, which is what makes it look weird.
~$ echo 1 > /sys/class/scsi_device/0\:0\:0\:0/device/rescan
That will rescan the current scsi bus and the disk size that has changed will show up.

3) Partitioning the unalloced space: if you've added a new disk

If you've added a new disk on the server, the actions are similar to those described above. But instead of rescanning an already existing scsi bus like show earlier, you have to rescan the host to detect the new scsi bus as you've added a new disk.

$ ls  /sys/class/scsi_host/
total 0
drwxr-xr-x  3 root root 0 Feb 13 02:55 .
drwxr-xr-x 39 root root 0 Feb 13 02:57 ..
drwxr-xr-x  2 root root 0 Feb 13 02:57 host0

Your host device is called 'host0', rescan it as such:
$ echo "- - -" > /sys/class/scsi_host/host0/scan

It won't show any output, but running 'fdisk -l' will show the new disk.

Create the new partition

Once the rescan is done (should only take a few seconds), you can check if the extra space can be seen on the disk.
~$  fdisk -l
 Disk /dev/sda: 10.7 GB, 10737418240 bytes
255 heads, 63 sectors/track, 1305 cylinders
Units = cylinders of 16065 * 512 = 8225280 bytes

Device Boot      Start         End      Blocks   Id  System
/dev/sda1   *           1          13      104391   83  Linux
/dev/sda2              14         391     3036285   8e  Linux LVM

So the server can now see the 10GB hard disk. Let's create a partition, by start fdisk for the /dev/sda device.
~$  fdisk /dev/sda

The number of cylinders for this disk is set to 1305.
There is nothing wrong with that, but this is larger than 1024,
and could in certain setups cause problems with:
1) software that runs at boot time (e.g., old versions of LILO)
2) booting and partitioning software from other OSs
(e.g., DOS FDISK, OS/2 FDISK)

Command (m for help): n
Now enter 'n', to create a new partition.
Command action
e   extended
p   primary partition (1-4)
 p

Now choose "p" to create a new primary partition. Please note, your system can only have 4 primary partitions on this disk! If you've already reached this limit, create an extended partition.
Partition number (1-4): 3

Choose your partition number. Since I already had /dev/sda1 and /dev/sda2, the logical number would be 3.

First cylinder (392-1305, default 392): <enter>
Using default value 392
Last cylinder or +size or +sizeM or +sizeK (392-1305, default 1305): <enter>
Using default value 1305

Note; the cylinder values will vary on your system. It should be safe to just hint enter, as fdisk will give you a default value for the first and last cylinder (and for this, it will use the newly added diskspace).

Command (m for help): t
Partition number (1-4): 3
Hex code (type L to list codes): 8e
Changed system type of partition 3 to 8e (Linux LVM)

Now type t to change the partition type. When prompted, enter the number of the partition you've just created in the previous steps. When you're asked to enter the "Hex code", enter 8e, and confirm by hitting enter.

Command (m for help): w

Once you get back to the main command within fdisk, type w to write your partitions to the disk. You'll get a message about the kernel still using the old partition table, and to reboot to use the new table. The reboot is not needed as you can also rescan for those partitions using partprobe. Run the following to scan for the newly created partition.
~$ partprobe -s

If that does not work for you, you can try to use "partx" to rescan the device and add the new partitions. In the command below, change /dev/sda to the disk on which you've just added a new partition.
~$ partx -v -a /dev/sda

If that still does not show you the newly created partition for you to use, you have to reboot the server. Afterwards, you can see the newly created partition with fdisk.
~$  fdisk -l

Disk /dev/sda: 10.7 GB, 10737418240 bytes
255 heads, 63 sectors/track, 1305 cylinders
Units = cylinders of 16065 * 512 = 8225280 bytes

Device Boot      Start         End      Blocks   Id  System
/dev/sda1   *           1          13      104391   83  Linux
/dev/sda2              14         391     3036285   8e  Linux LVM
/dev/sda3             392        1305     7341705   8e  Linux LVM

3) Extend your Logical Volume with the new partition

Now, create the physical volume as a basis for your LVM. Please replace /dev/sda3 with the newly created partition.
~$  pvcreate /dev/sda3
Physical volume "/dev/sda3" successfully created

Now find out how your Volume Group is called.
~$  vgdisplay
--- Volume group ---
VG Name               VolGroup00
...

Let's extend that Volume Group by adding the newly created physical volume to it.
~$  vgextend VolGroup00 /dev/sda3
Volume group "VolGroup00" successfully extended

With pvscan, we can see our newly added physical volume, and the usable space (7GB in this case).
~$  pvscan
PV /dev/sda2   VG VolGroup00   lvm2 [2.88 GB / 0    free]
PV /dev/sda3   VG VolGroup00   lvm2 [7.00 GB / 7.00 GB free]
Total: 2 [9.88 GB] / in use: 2 [9.88 GB] / in no VG: 0 [0   ]

Now we can extend Logical Volume (as opposed to the Physical Volume we added to the group earlier). The command is "lvextend /dev/VolGroupxx /dev/sdXX".
~$  lvextend /dev/VolGroup00/LogVol00 /dev/sda3
Extending logical volume LogVol00 to 9.38 GB
Logical volume LogVol00 successfully resized

If you're running this on Ubuntu, use the following.
~$  lvextend /dev/mapper/vg-name /dev/sda3

All that remains now, it to resize the file system to the volume group, so we can use the space. Replace the path to the correct /dev device if you're on ubuntu/debian like systems.

~$  resize2fs /dev/VolGroup00/LogVol00
resize2fs 1.39 (29-May-2006)
Filesystem at /dev/VolGroup00/LogVol00 is mounted on /; on-line resizing required
Performing an on-line resize of /dev/VolGroup00/LogVol00 to 2457600 (4k) blocks.
The filesystem on /dev/VolGroup00/LogVol00 is now 2457600 blocks long.

If you got an error like this, it may mean your filesystem is XFS instead of standard ext2/ext3.
$ resize2fs /dev/mapper/centos_sql01-root
resize2fs 1.42.9 (28-Dec-2013)
resize2fs: Bad magic number in super-block while trying to open /dev/mapper/centos_sql01-root
Couldn't find valid filesystem superblock.


For xfs file system use

$ xfs_growfs /

In that case, you'll need to increase the XFS partition. Read here for more details: Increase/Expand an XFS Filesystem in RHEL 7 / CentOS 7.
And we're good to go!

~$  df -h
Filesystem            Size  Used Avail Use% Mounted on
/dev/mapper/VolGroup00-LogVol00 9.1G 1.8G  6.9G  21% /
/dev/sda1              99M   18M   77M  19% /boot
tmpfs                 125M     0  125M   0% /dev/shm


Sunday, July 31, 2016

Centos 7 setup PXE kickstart dhcpd tftpd httpd Server

Centos 7 setup PXE kickstart dhcpd tftpd httpd Server

First install Centos 7 minimal install CentOS-7-x86_64-Minimal-1511.iso.

I am using IP=10.10.10.20/24 gateway=10.10.10.254 DNS=192.168.10.10 for my server setup.

Disable selinux.

vi /etc/sysconfig/selinux

selinux=disabled


reboot

Login.

systemctl disable firewalld
systemctl stop firewalld

yum -y update

reboot


Login.

Create text file of /root/list with package list below in it.
Do not include the --begin list or the --end list lines in the file.

vi /root/list

--begin list   
bind-utils
traceroute
net-tools
ntp*
gcc
glibc
glibc-common
gd
gd-devel
make
net-snmp
openssl-devel
xinetd
unzip
libtool*
make
patch
perl
bison
flex-devel
gcc-c++
ncurses-devel
flex
libtermcap-devel
autoconf*
automake*
autoconf
libxml2-devel
cmake
sqlite*
wget
ntp*
lm_sensors
ncurses-devel
qt-devel
hmaccalc
zlib-devel
binutils-devel
elfutils-libelf-devel
wget
bc
gzip
uuid*
libuuid-devel
jansson*
libxml2*
sqlite*
openssl*
lsof
NetworkManager-tui
mlocate
yum-utils
kernel-devel
nfs-utils
tcpdump

--end list

yum -y install $(cat /root/list)

yum -y groupinstall "Development Tools"

yum -y update

reboot


Login.

Install reguired packes for PXE kickstart dhcpd tftpd httpd Server.

yum -y install dhcp tftp-server tftp syslinux httpd

Create your dhcpd.conf file.
Im using 10.10.10.20/24 for my PXE kickstart dhcpd tftpd httpd server.
Do not include the ---copy txt below or the ---end copy txt below lines in the file.

vi /etc/dhcp/dhcpd.conf

---copy txt below
#
# DHCP Server Configuration file.
#   see /usr/share/doc/dhcp*/dhcpd.conf.example
#   see dhcpd.conf(5) man page
#
allow booting;
allow bootp;
option option-128 code 128 = string;
option option-129 code 129 = text;
next-server 10.10.10.20;
filename "/pxelinux.0";

# specify domain name
option domain-name "whittenberg.domain";

# specify name server's hostname or IP address
option domain-name-servers 192.168.10.1;

# default lease time
default-lease-time 600;

# max lease time
max-lease-time 7200;

# this DHCP server to be declared valid
authoritative;

# specify network address and subnet mask
subnet 10.10.10.0 netmask 255.255.255.0 {
    # specify the range of lease IP address

    range dynamic-bootp 10.10.10.100 10.10.10.200;
    # specify broadcast address

    option broadcast-address 10.10.10.255;
    # specify default gateway

    option routers 10.10.10.254;
}

---end copy txt below

Start the service and check status.

systemctl enable dhcpd
systemctl start dhcpd
systemctl status dhcpd


You should now be able to PXE boot a machine and get an IP for this.
Just an IP though. Now we have to set it up to boot and install the ISO.

Setup PXE Server tftp-server.

mkdir -p /tftpboot
chmod 777 /tftpboot


vi /etc/xinetd.d/tftp and change to

server_args             = -s /tftpboot
disable                 = no


Start your tftp-server and check status.

systemctl enable xinetd.service
systemctl start xinetd.service
systemctl status xinetd.service


Copy syslinux files to tftp-server root directory of /tftpboot.

cp -v /usr/share/syslinux/pxelinux.0 /tftpboot
cp -v /usr/share/syslinux/menu.c32 /tftpboot
cp -v /usr/share/syslinux/memdisk /tftpboot
cp -v /usr/share/syslinux/mboot.c32 /tftpboot
cp -v /usr/share/syslinux/chain.c32 /tftpboot


Verify files are there.

ls -lsa /tftpboot

Start and check your httpd service.

systemctl enable httpd
systemctl start httpd
systemctl status httpd


FTP the Centos 7 CentOS-7-x86_64-Minimal-1511.iso to /root

mkdir /var/www/html/CentOS-7-x86_64-Minimal-1511

mount /root/CentOS-7-x86_64-Minimal-1511.iso /var/www/html/CentOS-7-x86_64-Minimal-1511


Verify files are there.

ls -lsa /var/www/html/CentOS-7-x86_64-Minimal-1511

Make netboot directory and place boot files in it.

mkdir -p /tftpboot/netboot/
cp /var/www/html/CentOS-7-x86_64-Minimal-1511/images/pxeboot/vmlinuz /tftpboot/netboot/
cp /var/www/html/CentOS-7-x86_64-Minimal-1511/images/pxeboot/initrd.img /tftpboot/netboot/


Verify files are there.

ls -lsa /tftpboot/netboot/

Now create the kickstart cfg file in the /var/www/html/ directory.

vi /var/www/html/ks.cfg

#platform=x86, AMD64, or Intel EM64T
#version=DEVEL
# Firewall configuration
firewall --disabled
# Install OS instead of upgrade
install
# Use NFS installation media
url --url="http://10.10.10.20/CentOS-7-x86_64-Minimal-1511/"
# Root password [i used here 000000]
rootpw 000000
# Reboot after installation
reboot
# System authorization information
auth  useshadow  passalgo=sha512
# Use graphical install
graphical
firstboot disabled
# System keyboard
keyboard us
# System language
lang en_US
# SELinux configuration
selinux disabled
# Installation logging level
logging level=info
# System timezone
timezone America/Phoenix
# System bootloader configuration
bootloader location=mbr
clearpart --all --initlabel
part swap --asprimary --fstype="swap" --size=1024
part /boot --fstype xfs --size=200
part pv.01 --size=1 --grow
volgroup rootvg01 pv.01
logvol / --fstype xfs --name=lv01 --vgname=rootvg01 --size=1 --grow

%packages
@core
%end
%post
%end


Now create directory for our PXE menu and create menu.

mkdir /tftpboot/pxelinux.cfg

vi /tftpboot/pxelinux.cfg/default

default menu.c32
prompt 5
timeout 20
MENU TITLE CentOS-7-x86_64-Minimal-1511 PXE Menu

LABEL CentOS-7-x86_64-Minimal-1511
MENU LABEL CentOS-7-x86_64-Minimal-1511
KERNEL /netboot/vmlinuz
APPEND  initrd=/netboot/initrd.img  inst.repo=http://10.10.10.20/CentOS-7-x86_64-Minimal-1511/ ks=http://10.10.10.20/ks.cfg


I now reboot for grins :) and after backup remount the ISO.

mount /root/CentOS-7-x86_64-Minimal-1511.iso /var/www/html/CentOS-7-x86_64-Minimal-1511

Or add this to your  /etc/fstap file. Be sure and not leave any extra lines/spaces after the entry.

/root/CentOS-7-x86_64-Minimal-1511.iso /var/www/html/CentOS-7-x86_64-Minimal-1511 iso9660 loop,ro,auto 0 0

You can test your fstab file with.

mount -a

That's it. You can change hostname, password, and use static IP, add additonal packages, etc. after its rebooted.


Sunday, July 24, 2016

mediawiki-1.27.0 Install

mediawiki-1.27.0 Install


WORK IN PROGRESS

Base centos 7 with just yum updates run up to this point

---------install of php 5.6

For CentOS 7 (including EPEL install)
   
wget http://dl.fedoraproject.org/pub/epel/7/x86_64/e/epel-release-7-5.noarch.rpm
wget http://rpms.famillecollet.com/enterprise/remi-release-7.rpm
rpm -Uvh remi-release-7*.rpm epel-release-7*.rpm

If you already have EPEL installed:
   
wget http://rpms.famillecollet.com/enterprise/remi-release-7.rpm
rpm -Uvh remi-release-7*.rpm

Enabling the Repo

Now we need to make sure the repo is enabled and select which version you want to install. We need to head over to /etc/yum.repos.d you should inside see a file called remi.repo.

Open the file in your favorite editor (Nano, Pico, Vi etc), you’ll see a number of sections. We need to make sure that the first section [remi] is enabled:

[remi]
name=Les RPM de remi pour Enterprise Linux 6 - $basearch
#baseurl=http://rpms.famillecollet.com/enterprise/6/remi/$basearch/
mirrorlist=http://rpms.famillecollet.com/enterprise/6/remi/mirror
enabled=1
gpgcheck=1
gpgkey=file:///etc/pki/rpm-gpg/RPM-GPG-KEY-remi


Note the line enabled=1 make sure this is set! Now technically you can actually go ahead and install PHP, but you will only get PHP 5.4.*. Which might be want to you want is so skip ahead to the next section!

If we want PHP 5.5 or PHP 5.6 we need to do a bit more work, further down in the repo.repo file you will see two additional sections [remi-php55] and [remi-php56], decide which PHP version you want to install and then enable the correct. So for PHP 5.6 we would change to:

[remi-php56]
name=Les RPM de remi de PHP 5.6 pour Enterprise Linux 6 - $basearch
#baseurl=http://rpms.famillecollet.com/enterprise/6/php56/$basearch/
mirrorlist=http://rpms.famillecollet.com/enterprise/6/php56/mirror
# WARNING: If you enable this repository, you must also enable "remi"
enabled=1
gpgcheck=1
gpgkey=file:///etc/pki/rpm-gpg/RPM-GPG-KEY-remi


Installing PHP

yum install php php-gd php-mysql php-mcrypt

So the above assumes you want MySQL, GD and Mcrypt support in your PHP, but you should see something like the below depending on which version of PHP you are trying to install:

================================================================================================================================
 Package                        Arch                   Version                                 Repository                  Size
================================================================================================================================
Installing:
 php                            x86_64                 5.5.20-2.el6.remi                       remi-php55                 2.6 M
 php-gd                         x86_64                 5.5.20-2.el6.remi                       remi-php55                  72 k
 php-mysqlnd                    x86_64                 5.5.20-2.el6.remi                       remi-php55                 3.6 M
Installing for dependencies:
 php-cli                        x86_64                 5.5.20-2.el6.remi                       remi-php55                 3.7 M
 php-common                     x86_64                 5.5.20-2.el6.remi                       remi-php55                 1.0 M
 php-pdo                        x86_64                 5.5.20-2.el6.remi                       remi-php55                 112 k
 php-pear                       noarch                 1:1.9.5-3.el6.remi                      remi                       375 k
 php-pecl-jsonc                 x86_64                 1.3.6-1.el6.remi.5.5.1                  remi-php55                  47 k
 php-pecl-zip                   x86_64                 1.12.4-1.el6.remi.5.5                   remi-php55                 269 k
 php-process                    x86_64                 5.5.20-2.el6.remi                       remi-php55                  57 k
 php-xml                        x86_64                 5.5.20-2.el6.remi                       remi-php55                 208 k

Transaction Summary
================================================================================================================================
Install      11 Package(s)

php -v to check version

As you can see PHP is installing version 5.5.20-2.el6.remi from the remi-php55 repo! Once you have hit Y to confirm the install restart apache and magical unicorns you have a better version of PHP!

You can also change your mind in the future by going back into the remi.repo file and enable a different PHP version and then run yum update and if you have moved from 5.5 to 5.6 it will upgrade PHP for you. If you want to downgrade for any reason you will need to remove PHP (sudo yum remove php*) and then reinstall the PHP modules you want.

---------end install of php 5.6

---------install need php extensions

yum install php-xml
yum install php-mbstring

---------end install need php extensions

---------install maridb and Apache

yum -y install httpd mariadb-server mariadb

systemctl enable httpd.service
systemctl start httpd.service
systemctl status httpd.service

systemctl enable mariadb
systemctl start mariadb
systemctl status mariadb
mysql_secure_installation

Now test apache and php

vi /var/www/html/info.php
<?php phpinfo(); ?>

http://your_server_IP_address/info.php

---------end install maridb and Apache

**********need to add commands here*********

--------create database and db user for user


--------end create database and db user for user


---------Install mediawiki-1.27.0

donwload mediawiki-1.27.0 to pc
unzip to pc desktop
ftp tar fil over to /var/www/html
cd /var/www/html
tar -xvf ./mediawiki-1.27.0.tar

Now run the installer at (replace with your IP)

http://192.168.10.20/mediawiki-1.27.0/mw-config/index.php


---------end Install mediawiki-1.27.0

Friday, July 22, 2016

Centos 7 create vm template

Centos 7 create vm template

Using ESXi 6.0

First create a quest image then convert it to template.

I do a fresh min install using DHCP for interface and EFI for BIOS.

After OS is layed down i do the following.

Disable selinux

vi /etc/sysconfig/selinux
    selinux=diabled
   
reboot   

Disable and turn off firewalld
   
systemctl disable firewalld
systemctl stop firewalld

yum -y update

reboot

---begin if you want to use the old eth0 naming convention       
       
vi /etc/default/grub
            Search for the line “GRUB_CMDLINE_LINUX” and append the following: net.ifnames=0 biosdevname=0

you can also turn off the screensaver for your console by adding consoleblank=0

My line is now:

GRUB_CMDLINE_LINUX="crashkernel=auto rd.lvm.lv=centos_nas/swap rd.lvm.lv=centos_nas/root net.ifnames=0 biosdevname=0 consoleblank=0"

grub2-mkconfig -o /boot/grub2/grub.cfg

grub2-mkconfig -o /boot/efi/EFI/centos/grub.cfg   

mv /etc/sysconfig/network-scripts/ifcfg-enp????? /etc/sysconfig/network-scripts/ifcfg-eth0   

vi /etc/sysconfig/network-scripts/ifcfg-eth0
    NAME=eth0
    DEVICE=eth0

---end     if you want to use the old eth0 naming convention

---turn off NetworkManage     

systemctl stop NetworkManager
systemctl disable NetworkManager
systemctl stop NetworkManager-wait-online
systemctl disable NetworkManager-wait-online
systemctl enable network
chkconfig network on
systemctl start network


reboot

do sanity check

systemctl status NetworkManager
systemctl status network

---end turn off NetworkManager

Create text file /root/list with packge list below in it
do not include the --begin list or the --end list lines in the file

--begin list   
bind-utils
traceroute
net-tools
ntp*
gcc
glibc
glibc-common
gd
gd-devel
make
net-snmp
openssl-devel
xinetd
unzip
libtool*
make
patch
perl
bison
flex-devel
gcc-c++
ncurses-devel
flex
libtermcap-devel
autoconf*
automake*
autoconf
libxml2-devel
cmake
sqlite*
wget
ntp*
lm_sensors
ncurses-devel
qt-devel
hmaccalc
zlib-devel
binutils-devel
elfutils-libelf-devel
wget
bc
gzip
uuid*
libuuid-devel
jansson*
libxml2*
sqlite*
openssl*
lsof
NetworkManager-tui
mlocate
yum-utils
kernel-devel
nfs-utils
tcpdump
--end list

yum -y install $(cat list)

yum -y groupinstall "Development Tools"

yum -y update

reboot

---tune 10Gb CNA if needed

service irqbalance stop
service cpuspeed stop
chkconfig irqbalance off
chkconfig cpuspeed off
systemctl disable irqbalance
systemctl disable cpuspeed

vi /etc/sysconfig/network-scripts/ifcfg-eth???
MTU="9000"

vi /etc/sysctl.conf
# -- tuning -- #
# Increase system file descriptor limit
fs.file-max = 65535

# Increase system IP port range to allow for more concurrent connections
net.ipv4.ip_local_port_range = 1024 65000

# -- 10gbe tuning from Intel ixgb driver README -- #

# turn off selective ACK and timestamps
net.ipv4.tcp_sack = 0
net.ipv4.tcp_timestamps = 0

# memory allocation min/pressure/max.
# read buffer, write buffer, and buffer space
net.ipv4.tcp_rmem = 10000000 10000000 10000000
net.ipv4.tcp_wmem = 10000000 10000000 10000000
net.ipv4.tcp_mem = 10000000 10000000 10000000

net.core.rmem_max = 524287
net.core.wmem_max = 524287
net.core.rmem_default = 524287
net.core.wmem_default = 524287
net.core.optmem_max = 524287
net.core.netdev_max_backlog = 300000

reboot and test speed.

on linux client pointing to server with ip 192.168.90.100

# iperf3 -c 192.168.90.100 -p 5201

on linux server with IP 192.168.90.100

iperf3 -s -p 5201 -B 192.168.90.100

---end tune 10Gb CNA if needed


*********After the image is complete

poweroff

Go to vSphere client and right in image and conver to template

You can now right clik on template and create new image from template

After you create new image from template then

vi /etc/hostname
    make sure your hostname is in there. i use name.domain.com

vi /etc/hosts
    make sure your hotname is in there. I both name and name.domain.com
   
vi /etc/resolv.conf
        search yourdomain.com
        nameserver 192.168.10.1 or what ever you use for DNS
       

Edit your /etc/sysconfig/network-scripts/ifcfg-eth0 file
Remove DHCP and set for static

vi /etc/sysconfig/network-scripts/ifcfg-eth0

CentOS 7 rsyslog Server Setup

CentOS 7 rsyslog Server Setup

I have firewall off and selinux disabled

Install if needed

# yum -y install rsyslog
 
Edit the config file
 
# vi /etc/rsyslog.conf
 
Change to the following
 
# Provides UDP syslog reception
$ModLoad imudp
$UDPServerRun 514
 
# Provides TCP syslog reception
$ModLoad imtcp
$InputTCPServerRun 514
 
Restart service
 
# systemctl restart rsyslog.service 

Now just point your devices to this server on port 514
Default location is /var/log for the files. This can be changed
in the rsyslog.conf file.

Saturday, July 16, 2016

Install KDE Plasma Desktop on CentOS 7

Install KDE Plasma Desktop on CentOS 7

# yum -y groups install "KDE Plasma Workspaces"

# startx

To start in graphic mode automaticly

# systemctl set-default graphical.target

check the setting

# systemctl get-default

Change back to non graphical multi user mode

# systemctl set-default multi-user.target

Other runlevel settings

Runlevel    Target Units                          Description
0           runlevel0.target, poweroff.target     Shut down and power off the system.
1           runlevel1.target, rescue.target       Set up a rescue shell.
2           runlevel2.target, multi-user.target   Set up a non-graphical multi-user system.
3           runlevel3.target, multi-user.target   Set up a non-graphical multi-user system.
4           runlevel4.target, multi-user.target   Set up a non-graphical multi-user system.
5           runlevel5.target, graphical.target    Set up a graphical multi-user system.
6           runlevel6.target, reboot.target       Shut down and reboot the system.

Tuesday, April 26, 2016

CentOS 7 ftp server install and setup with vsftpd

CentOS 7 ftp server install and setup with vsftpd

# yum -y install vsftpd ftp


# vi /etc/vsftpd/vsftpd.conf


Disallow anonymous, unidentified users to access files via FTP; change the 

anonymous_enable setting to NO:
anonymous_enable=NO

Allow local uses to login by changing the local_enable setting to YES:
local_enable=YES

If you want local user to be able to write to a directory, then change the write_enable setting to YES:
write_enable=YES

Local users will be ‘chroot jailed’ and they will be denied access to any other part of the server; change the chroot_local_user setting to YES:
chroot_local_user=YES

# systemctl enable vsftpd 
# systemctl restart vsftpd

# firewall-cmd --permanent --add-port=21/tcp
# firewall-cmd --reload 


Sunday, April 17, 2016

CentOS 7 network interfaces come up out of order

CentOS 7 network interfaces come up out of order

# ifconfig
eth0: flags=4163<UP,BROADCAST,RUNNING,MULTICAST>  mtu 1500
        inet 192.168.10.100  netmask 255.255.255.0  broadcast 192.168.10.255
        inet6 2600:8800:2580:eda:225:90ff:fe5d:a401  prefixlen 64  scopeid 0x0<global>
        inet6 fe80::225:90ff:fe5d:a401  prefixlen 64  scopeid 0x20<link>
        ether 00:25:90:5d:a4:01  txqueuelen 1000  (Ethernet)
        RX packets 5356  bytes 1745688 (1.6 MiB)
        RX errors 0  dropped 4  overruns 0  frame 0
        TX packets 2480  bytes 396936 (387.6 KiB)
        TX errors 0  dropped 0 overruns 0  carrier 0  collisions 0
        device memory 0xdf700000-df77ffff

eth1: flags=4163<UP,BROADCAST,RUNNING,MULTICAST>  mtu 9000
        inet 192.168.80.100  netmask 255.255.255.0  broadcast 192.168.80.255
        inet6 fe80::21b:21ff:febb:7ad0  prefixlen 64  scopeid 0x20<link>
        ether 00:1b:21:bb:7a:d0  txqueuelen 1000  (Ethernet)
        RX packets 1047  bytes 122429 (119.5 KiB)
        RX errors 0  dropped 0  overruns 0  frame 0
        TX packets 1724  bytes 1041752 (1017.3 KiB)
        TX errors 0  dropped 0 overruns 0  carrier 0  collisions 0

lo: flags=73<UP,LOOPBACK,RUNNING>  mtu 65536
        inet 127.0.0.1  netmask 255.0.0.0
        inet6 ::1  prefixlen 128  scopeid 0x10<host>
        loop  txqueuelen 0  (Local Loopback)
        RX packets 3296  bytes 1705774 (1.6 MiB)
        RX errors 0  dropped 0  overruns 0  frame 0
        TX packets 3296  bytes 1705774 (1.6 MiB)
        TX errors 0  dropped 0 overruns 0  carrier 0  collisions 0


I am missing eth2 and eth3 from the ifconfig command above

----came up wrong
# ls -lsa /sys/class/net/
total 0
0 drwxr-xr-x  2 root root 0 Apr 17 08:45 .
0 drwxr-xr-x 52 root root 0 Apr 17 08:45 ..
0 lrwxrwxrwx  1 root root 0 Apr 17 08:46 eth0 -> ../../devices/pci0000:00/0000:00:1b.0/0000:06:00.0/net/eth0
0 lrwxrwxrwx  1 root root 0 Apr 17 08:46 eth1 -> ../../devices/pci0000:00/0000:00:01.0/0000:01:00.0/0000:02:09.0/0000:04:00.0/net/eth1
0 lrwxrwxrwx  1 root root 0 Apr 17 08:46 eth2 -> ../../devices/pci0000:00/0000:00:1f.6/net/eth2
0 lrwxrwxrwx  1 root root 0 Apr 17 08:46 eth3 -> ../../devices/pci0000:00/0000:00:01.0/0000:01:00.0/0000:02:09.0/0000:04:00.1/net/eth3
0 lrwxrwxrwx  1 root root 0 Apr 17 08:45 lo -> ../../devices/virtual/net/lo

----end came up wrong

----came up right
# ls -lsa /sys/class/net/
total 0
0 drwxr-xr-x  2 root root 0 Apr 17 09:51 .
0 drwxr-xr-x 52 root root 0 Apr 17 09:51 ..
0 lrwxrwxrwx  1 root root 0 Apr 17 09:51 eth0 -> ../../devices/pci0000:00/0000:00:1b.0/0000:06:00.0/net/eth0
0 lrwxrwxrwx  1 root root 0 Apr 17 09:51 eth1 -> ../../devices/pci0000:00/0000:00:01.0/0000:01:00.0/0000:02:09.0/0000:04:00.0/net/eth1
0 lrwxrwxrwx  1 root root 0 Apr 17 09:51 eth2 -> ../../devices/pci0000:00/0000:00:01.0/0000:01:00.0/0000:02:09.0/0000:04:00.1/net/eth2
0 lrwxrwxrwx  1 root root 0 Apr 17 09:51 eth3 -> ../../devices/pci0000:00/0000:00:1f.6/net/eth3
0 lrwxrwxrwx  1 root root 0 Apr 17 09:51 lo -> ../../devices/virtual/net/lo

----end came up right

As you can see they are in the /sys/class/net/ with my issue being eth2 and eth3 getting swapped sometimes during a reboot.

The solution is to get udev to ignore these and allow ifup to bring things up  in order

# vi /etc/udev/rules.d/10-local.rules
SUBSYSTEM=="pci", SYSFS{class}=="0x020000", OPTIONS="ignore_device"


Make sure you have the HWADDR= in your ifcfg-ethx files to assign hardware address
Example:
HWADDR=00:25:90:5d:a4:00


Now get that hardware address and additional information on your interfaces

# lspci | grep -i ethernet
00:1f.6 Ethernet controller: Intel Corporation Ethernet Connection (2) I219-V (rev 31)
04:00.0 Ethernet controller: Intel Corporation 82599ES 10-Gigabit SFI/SFP+ Network Connection (rev 01)
04:00.1 Ethernet controller: Intel Corporation 82599ES 10-Gigabit SFI/SFP+ Network Connection (rev 01)
06:00.0 Ethernet controller: Intel Corporation I210 Gigabit Network Connection (rev 03)


Match the PCI address from lspci | grep -i ethernet to the PCI address from ls -lsa /sys/class/net/
Example:
Lets look at 00:1f.6 from the lspci | grep -i ethernet command
We can see this in the ls -lsa /sys/class/net/ command mapped as eth3
Now get some more info on eth3

# ethtool -i eth3
driver: e1000e
version: 3.2.5-k
firmware-version: 0.8-4
bus-info: 0000:00:1f.6
supports-statistics: yes
supports-test: yes
supports-eeprom-access: yes
supports-register-dump: yes
supports-priv-flags: no


And get the physical hardware address we need for the ifcfg-eth3 file

# ethtool -P eth3
Permanent address: 00:25:90:5d:a4:00


Now i can reboot, power reset, etc., and all my interfaces come up correctly now.

# ifconfig
eth0: flags=4163<UP,BROADCAST,RUNNING,MULTICAST>  mtu 1500
        inet 192.168.10.100  netmask 255.255.255.0  broadcast 192.168.10.255
        inet6 2600:8800:2580:eda:225:90ff:fe5d:a401  prefixlen 64  scopeid 0x0<global>
        inet6 fe80::225:90ff:fe5d:a401  prefixlen 64  scopeid 0x20<link>
        ether 00:25:90:5d:a4:01  txqueuelen 1000  (Ethernet)
        RX packets 3303  bytes 1144712 (1.0 MiB)
        RX errors 0  dropped 0  overruns 0  frame 0
        TX packets 1660  bytes 186249 (181.8 KiB)
        TX errors 0  dropped 0 overruns 0  carrier 0  collisions 0
        device memory 0xdf700000-df77ffff

eth1: flags=4163<UP,BROADCAST,RUNNING,MULTICAST>  mtu 9000
        inet 192.168.80.100  netmask 255.255.255.0  broadcast 192.168.80.255
        inet6 fe80::21b:21ff:febb:7ad0  prefixlen 64  scopeid 0x20<link>
        ether 00:1b:21:bb:7a:d0  txqueuelen 1000  (Ethernet)
        RX packets 491  bytes 54845 (53.5 KiB)
        RX errors 0  dropped 0  overruns 0  frame 0
        TX packets 997  bytes 599121 (585.0 KiB)
        TX errors 0  dropped 0 overruns 0  carrier 0  collisions 0

eth2: flags=4163<UP,BROADCAST,RUNNING,MULTICAST>  mtu 9000
        inet 192.168.90.100  netmask 255.255.255.0  broadcast 192.168.90.255
        inet6 fe80::21b:21ff:febb:7ad2  prefixlen 64  scopeid 0x20<link>
        ether 00:1b:21:bb:7a:d2  txqueuelen 1000  (Ethernet)
        RX packets 4152  bytes 729960 (712.8 KiB)
        RX errors 0  dropped 10  overruns 0  frame 0
        TX packets 4663  bytes 1325114 (1.2 MiB)
        TX errors 0  dropped 0 overruns 0  carrier 0  collisions 0

eth3: flags=4099<UP,BROADCAST,MULTICAST>  mtu 1500
        inet 10.10.10.100  netmask 255.255.255.0  broadcast 10.10.10.255
        ether 00:25:90:5d:a4:00  txqueuelen 1000  (Ethernet)
        RX packets 0  bytes 0 (0.0 B)
        RX errors 0  dropped 0  overruns 0  frame 0
        TX packets 0  bytes 0 (0.0 B)
        TX errors 0  dropped 0 overruns 0  carrier 0  collisions 0
        device interrupt 16  memory 0xdf800000-df820000

lo: flags=73<UP,LOOPBACK,RUNNING>  mtu 65536
        inet 127.0.0.1  netmask 255.0.0.0
        inet6 ::1  prefixlen 128  scopeid 0x10<host>
        loop  txqueuelen 0  (Local Loopback)
        RX packets 3138  bytes 1365194 (1.3 MiB)
        RX errors 0  dropped 0  overruns 0  frame 0
        TX packets 3138  bytes 1365194 (1.3 MiB)
        TX errors 0  dropped 0 overruns 0  carrier 0  collisions 0


Enjoy!

Wednesday, April 13, 2016

Asterisk setup for Flowroute SIP trunk

Asterisk setup for Flowroute SIP trunk

At bottom of /etc/asterisk/sip.conf

[100]
type=friend
callerid="Asterisk 100" 100
secret=my_password_here
context=internal
host=dynamic
allow=all
dtmfmode=rfc2833
;
;
;
[flowroute] ;keep this lowercase, do not change format
type=friend
secret=my_secret_here

username=my_username_here
host=sip.flowroute.com
dtmfmode=rfc2833
context=inbound ;change to 'ext-did' or 'from-trunk' for asterisk@home
canreinvite=no
allow=ulaw
;allow=g729 ;uncomment this line if you have G.729 licenses installed.
insecure=port,invite
fromdomain=sip.flowroute.com


At bottom of /etc/asterisk/extensions.conf

[internal]
exten => _1NXXXXXXXXX,1,Dial(SIP/${EXTEN}@flowroute)
;Send NANPA (USA) as 11 digit
exten => _011.,1,Dial(SIP/${EXTEN:3}@flowroute)
;dialing format - SIP/{countrycode}{number}@flowroute


;used to pass extension dialed, 100, to registered phone of 100
exten => 100,1,Dial(SIP/100,20)
exten => 100,n,Playback(vm-goodbye)
exten => 100,n,Hangup


Now from asterisk console (asterisk -r) do:

core reload
sip reload
dialplan reload

sip show peers
sip show registry
sip show channels

Make calls.

enjoy!