Centos 7 with two different networks
I have a vm image with two nics in it. One to my 10Gb 192.168.70.0 network. This network is not on a switch but simply a DAC to my PC. So my PC is 192.168.70.5 and my ESXi is 192.168.70.90.
I also have another network in the vm inage on my 1Gb 192.168.10.0 network. This is my may main network, with a switch, and a route out to internet (192.168.10.1). So my PC is 192.168.10.5, ESXi 192.168.10.90, and router 192.168.10.1.
IP addresses for the vm image itself are:
192.168.10.22
192.168.70.22
Problem is when I have the 192.168.70.22 enabled I am not able to reach the internet. To remedy this I have the folowing /etc/sysconfig/network-scripts ifcfg files:
# cat ifcfg-ens192
TYPE=Ethernet
BOOTPROTO=none
DEFROUTE=yes
IPV4_FAILURE_FATAL=no
IPV6INIT=yes
IPV6_AUTOCONF=yes
IPV6_DEFROUTE=yes
IPV6_FAILURE_FATAL=no
IPV6_ADDR_GEN_MODE=stable-privacy
NAME=ens192
UUID=dcc2277d-a060-48a0-8829-350abf95e269
DEVICE=ens192
ONBOOT=yes
DNS1=192.168.10.1
IPADDR=192.168.70.22
PREFIX=24
#GATEWAY=192.168.70.1
IPV6_PEERDNS=yes
IPV6_PEERROUTES=yes
IPV6_PRIVACY=no
# cat ifcfg-ens224
TYPE=Ethernet
BOOTPROTO=none
DEFROUTE=yes
IPV4_FAILURE_FATAL=no
IPV6INIT=yes
IPV6_AUTOCONF=yes
IPV6_DEFROUTE=yes
IPV6_FAILURE_FATAL=no
IPV6_ADDR_GEN_MODE=stable-privacy
NAME=ens224
UUID=78e2b2a8-d444-4fd2-9751-bb108861392a
DEVICE=ens224
ONBOOT=yes
IPADDR=192.168.10.22
PREFIX=24
GATEWAY=192.168.10.1
DEFROUTE=yes
DNS1=192.168.10.1
IPV6_PEERDNS=yes
IPV6_PEERROUTES=yes
IPV6_PRIVACY=no
I then change the value of rp_filter to loose mode, value 2 with:
# sysctl net.ipv4.conf.all.rp_filter=2
net.ipv4.conf.all.rp_filter = 2
Restart network with:
# systemctl restart network
I can now ping internet (8.8.8.8), all nodes on 192.168.10.0, and all nodes on 192.168.70.0 (ESXi 192.168.70.90, PC 192.168.70.5 and the vm image of 192.168.70.22).
A quick reboot and re test of access and I am good.
I also want to tune the 10Gb interface as Im wanting to to test SSD disk caching on this image and need the fastest I can get. FYI My PC on 192.168.70.5 has m.2 512GB 950 Pro. I am using a 2.5" 512GB 850 Pro for cache on the vm image of 192.168.70.22. This 850 Pro is in the ESXi server.
So now tune the 10Gb image:
---turn off NetworkManage
systemctl stop NetworkManager
systemctl disable NetworkManager
systemctl stop NetworkManager-wait-online
systemctl disable NetworkManager-wait-online
systemctl enable network
chkconfig network on
systemctl start network
reboot and sanity check
systemctl status NetworkManager
systemctl status network
---end turn off NetworkManager
---tune 10Gb CNA
service irqbalance stop
service cpuspeed stop
chkconfig irqbalance off
chkconfig cpuspeed off
systemctl disable irqbalance
systemctl disable cpuspeed
systemctl stop irqbalance
systemctl stop cpuspeed
vi /etc/sysconfig/network-scripts/ifcfg-eth???
MTU="9000"
vi /etc/sysctl.conf
# -- tuning -- #
# Increase system file descriptor limit
fs.file-max = 65535
# Increase system IP port range to allow for more concurrent connections
net.ipv4.ip_local_port_range = 1024 65000
# -- 10gbe tuning from Intel ixgb driver README -- #
# turn off selective ACK and timestamps
net.ipv4.tcp_sack = 0
net.ipv4.tcp_timestamps = 0
# memory allocation min/pressure/max.
# read buffer, write buffer, and buffer space
net.ipv4.tcp_rmem = 10000000 10000000 10000000
net.ipv4.tcp_wmem = 10000000 10000000 10000000
net.ipv4.tcp_mem = 10000000 10000000 10000000
net.core.rmem_max = 524287
net.core.wmem_max = 524287
net.core.rmem_default = 524287
net.core.wmem_default = 524287
net.core.optmem_max = 524287
net.core.netdev_max_backlog = 300000
---end tune 10Gb CNA
Saturday, February 25, 2017

Thursday, February 23, 2017
Asterisk 14 on Centos 7.3
Asterisk 14 on Centos 7.3
After fresh of install of Centos 7.3 minimal.
cd /root
cp /etc/sysconfig/selinux /etc/sysconfig/selinux.bak
sed -i 's/^SELINUX=.*/SELINUX=disabled/g' /etc/sysconfig/selinux
cp /etc/selinux/config /etc/selinux/config.bak
sed -i 's/^SELINUX=.*/SELINUX=disabled/g' /etc/selinux/config
systemctl disable firewalld
systemctl stop firewalld
service iptables stop
service ip6tables stop
chkconfig iptables off
chkconfig ip6tables off
yum -y install bind-utils traceroute net-tools ntp* gcc glibc glibc-common gd gd-devel make net-snmp openssl-devel xinetd unzip libtool* make patch perl bison flex-devel gcc-c++ ncurses-devel flex libtermcap-devel autoconf* automake* autoconf libxml2-devel cmake sqlite* wget ntp* lm_sensors ncurses-devel qt-devel hmaccalc zlib-devel binutils-devel elfutils-libelf-devel wget bc gzip uuid* libuuid-devel jansson* libxml2* sqlite* openssl* lsof NetworkManager-tui mlocate yum-utils kernel-devel nfs-utils tcpdump git vim
yum -y groupinstall "Development Tools"
yum -y update
yum -y upgrade
cd /root
echo ':color desert' > .vimrc
reboot
cd /root
yum -y install epel-release
yum -y install stress htop iftop iotop hddtemp smartmontools iperf3 sysstat mlocate
updatedb
yum -y install gcc gcc-c++ php-xml php php-mysql php-pear php-mbstring mariadb-devel mariadb-server mariadb sqlite-devel lynx bison gmime-devel psmisc tftp-server httpd make ncurses-devel libtermcap-devel sendmail sendmail-cf caching-nameserver sox newt-devel libxml2-devel libtiff-devel audiofile-devel gtk2-devel uuid-devel libtool libuuid-devel subversion kernel-devel kernel-devel-$(uname -r) git subversion kernel-devel php-process crontabs cronie cronie-anacron wget vim
wget http://www.digip.org/jansson/releases/jansson-2.7.tar.gz
tar -xzvf jansson-2.7.tar.gz
cd jansson-2.7
./configure -prefix=/usr
make clean
make && make install
ldconfig
cd /root
wget http://downloads.asterisk.org/pub/telephony/asterisk/asterisk-14-current.tar.gz
tar xvf asterisk-14-current.tar.gz
cd asterisk-14.3.0
./configure -libdir=/usr/lib64
make menuselect
contrib/scripts/get_mp3_source.sh
make
make install
make progdocs
make samples
make config
systemctl restart asterisk
systemctl status asterisk
asterisk -r
After fresh of install of Centos 7.3 minimal.
cd /root
cp /etc/sysconfig/selinux /etc/sysconfig/selinux.bak
sed -i 's/^SELINUX=.*/SELINUX=disabled/g' /etc/sysconfig/selinux
cp /etc/selinux/config /etc/selinux/config.bak
sed -i 's/^SELINUX=.*/SELINUX=disabled/g' /etc/selinux/config
systemctl disable firewalld
systemctl stop firewalld
service iptables stop
service ip6tables stop
chkconfig iptables off
chkconfig ip6tables off
yum -y install bind-utils traceroute net-tools ntp* gcc glibc glibc-common gd gd-devel make net-snmp openssl-devel xinetd unzip libtool* make patch perl bison flex-devel gcc-c++ ncurses-devel flex libtermcap-devel autoconf* automake* autoconf libxml2-devel cmake sqlite* wget ntp* lm_sensors ncurses-devel qt-devel hmaccalc zlib-devel binutils-devel elfutils-libelf-devel wget bc gzip uuid* libuuid-devel jansson* libxml2* sqlite* openssl* lsof NetworkManager-tui mlocate yum-utils kernel-devel nfs-utils tcpdump git vim
yum -y groupinstall "Development Tools"
yum -y update
yum -y upgrade
cd /root
echo ':color desert' > .vimrc
reboot
cd /root
yum -y install epel-release
yum -y install stress htop iftop iotop hddtemp smartmontools iperf3 sysstat mlocate
updatedb
yum -y install gcc gcc-c++ php-xml php php-mysql php-pear php-mbstring mariadb-devel mariadb-server mariadb sqlite-devel lynx bison gmime-devel psmisc tftp-server httpd make ncurses-devel libtermcap-devel sendmail sendmail-cf caching-nameserver sox newt-devel libxml2-devel libtiff-devel audiofile-devel gtk2-devel uuid-devel libtool libuuid-devel subversion kernel-devel kernel-devel-$(uname -r) git subversion kernel-devel php-process crontabs cronie cronie-anacron wget vim
wget http://www.digip.org/jansson/releases/jansson-2.7.tar.gz
tar -xzvf jansson-2.7.tar.gz
cd jansson-2.7
./configure -prefix=/usr
make clean
make && make install
ldconfig
cd /root
wget http://downloads.asterisk.org/pub/telephony/asterisk/asterisk-14-current.tar.gz
tar xvf asterisk-14-current.tar.gz
cd asterisk-14.3.0
./configure -libdir=/usr/lib64
make menuselect
contrib/scripts/get_mp3_source.sh
make
make install
make progdocs
make samples
make config
systemctl restart asterisk
systemctl status asterisk
asterisk -r
Sunday, February 19, 2017
Broadsoft useful commands
Broadsoft useful commands
Backup servers:
bwadmin@ns1.whittenberg.domain$ locate bwBackup.pl
/usr/local/broadworks/NS_Rel_20.sp1_1.606/bin/bwBackup.pl
bwadmin@ns1.whittenberg.domain$ /usr/local/broadworks/NS_Rel_20.sp1_1.606/bin/bwBackup.pl NetworkServer /tmp/NetworkServer.bak
via the cli is:
NS_CLI/Maintenance/Tools> backupdb /tmp/NetworkServer.bak
Also see
bwRestore.pl
NS_CLI/Maintenance/Tools> restoredb
Backup servers:
bwadmin@ns1.whittenberg.domain$ locate bwBackup.pl
/usr/local/broadworks/NS_Rel_20.sp1_1.606/bin/bwBackup.pl
bwadmin@ns1.whittenberg.domain$ /usr/local/broadworks/NS_Rel_20.sp1_1.606/bin/bwBackup.pl NetworkServer /tmp/NetworkServer.bak
via the cli is:
NS_CLI/Maintenance/Tools> backupdb /tmp/NetworkServer.bak
Also see
bwRestore.pl
NS_CLI/Maintenance/Tools> restoredb
owncloud helpful commands
Add a trusted domain.:
http://192.168.80.100/owncloud/index.php/settings/admin?trustDomain=192.168.10.100
Clean trashbin/deleted files:
sudo -u apache /var/www/html/owncloud/occ trashbin:cleanup
sudo -u apache /var/www/html/owncloud/occ trashbin:cleanup user1 user2
Take out of maintenance mode:
vim /var/www/html/owncloud/config/config.php
<?php
$CONFIG = array (
'updatechecker' => false,
'instanceid' => 'oce24qfiihel',
'passwordsalt' => 'Dy+BHYATWwB+F4MYYBjPjYX44iXB3o',
'secret' => 'Bpf9UEgisK4XJecVxrL76ZAwg4n9NnG6RXWO2B4MKzpJNGMz',
'trusted_domains' =>
array (
0 => '192.168.80.100',
1 => '192.168.10.100',
),
'datadirectory' => '/myraid/owncloud/',
'overwrite.cli.url' => 'http://192.168.80.100/owncloud',
'dbtype' => 'sqlite3',
'version' => '9.1.4.2',
'logtimezone' => 'UTC',
'installed' => true,
'maintenance' => false,
'theme' => '',
'loglevel' => 2,
);
http://192.168.80.100/owncloud/index.php/settings/admin?trustDomain=192.168.10.100
Clean trashbin/deleted files:
sudo -u apache /var/www/html/owncloud/occ trashbin:cleanup
sudo -u apache /var/www/html/owncloud/occ trashbin:cleanup user1 user2
Take out of maintenance mode:
vim /var/www/html/owncloud/config/config.php
<?php
$CONFIG = array (
'updatechecker' => false,
'instanceid' => 'oce24qfiihel',
'passwordsalt' => 'Dy+BHYATWwB+F4MYYBjPjYX44iXB3o',
'secret' => 'Bpf9UEgisK4XJecVxrL76ZAwg4n9NnG6RXWO2B4MKzpJNGMz',
'trusted_domains' =>
array (
0 => '192.168.80.100',
1 => '192.168.10.100',
),
'datadirectory' => '/myraid/owncloud/',
'overwrite.cli.url' => 'http://192.168.80.100/owncloud',
'dbtype' => 'sqlite3',
'version' => '9.1.4.2',
'logtimezone' => 'UTC',
'installed' => true,
'maintenance' => false,
'theme' => '',
'loglevel' => 2,
);
Friday, February 17, 2017
owncloud take out of maintenance mode
owncloud take out of maintenance mode
vim /var/www/html/owncloud/config/config.php
<?php
$CONFIG = array (
'updatechecker' => false,
'instanceid' => 'oce24qfiihel',
'passwordsalt' => 'Dy+BHYATWwB+F4MYYBjPjYX44iXB3o',
'secret' => 'Bpf9UEgisK4XJecVxrL76ZAwg4n9NnG6RXWO2B4MKzpJNGMz',
'trusted_domains' =>
array (
0 => '192.168.80.100',
1 => '192.168.10.100',
),
'datadirectory' => '/myraid/owncloud/',
'overwrite.cli.url' => 'http://192.168.80.100/owncloud',
'dbtype' => 'sqlite3',
'version' => '9.1.4.2',
'logtimezone' => 'UTC',
'installed' => true,
'maintenance' => false,
'theme' => '',
'loglevel' => 2,
);
vim /var/www/html/owncloud/config/config.php
<?php
$CONFIG = array (
'updatechecker' => false,
'instanceid' => 'oce24qfiihel',
'passwordsalt' => 'Dy+BHYATWwB+F4MYYBjPjYX44iXB3o',
'secret' => 'Bpf9UEgisK4XJecVxrL76ZAwg4n9NnG6RXWO2B4MKzpJNGMz',
'trusted_domains' =>
array (
0 => '192.168.80.100',
1 => '192.168.10.100',
),
'datadirectory' => '/myraid/owncloud/',
'overwrite.cli.url' => 'http://192.168.80.100/owncloud',
'dbtype' => 'sqlite3',
'version' => '9.1.4.2',
'logtimezone' => 'UTC',
'installed' => true,
'maintenance' => false,
'theme' => '',
'loglevel' => 2,
);
Thursday, February 9, 2017
Install Linux Kernel 4.9 In CentOS
Install Linux Kernel 4.9 In CentOS
Ripped from: https://www.ostechnix.com/install-linux-kernel-4-9-centos-ubuntu/
To install the latest kernel, we need to add ELRepo repository.
First, let us add ELRepo GPG key:
rpm --import https://www.elrepo.org/RPM-GPG-KEY-elrepo.org
Then, add ELRepo in CentOS 7 / RHEL 7 / Scientific Linux 7 using command:
rpm -Uvh http://www.elrepo.org/elrepo-release-7.0-2.el7.elrepo.noarch.rpm
To Install ELRepo for CentOS 6 / RHEL 6 / Scientific Linux 6:
rpm -Uvh http://www.elrepo.org/elrepo-release-6-6.el6.elrepo.noarch.rpm
To Install ELRepo for CentOS 5 / RHEL 5 / Scientific Linux 6:
rpm -Uvh http://www.elrepo.org/elrepo-release-5-5.el5.elrepo.noarch.rpm
Enable ELRepo fastest mirror by installing the following package:
yum install yum-plugin-fastestmirror
Sample output:
[...]
Dependencies Resolved

================================================================================
 Package Arch Version Repository
 Size
================================================================================
Updating:
 yum-plugin-fastestmirror noarch 1.1.31-40.el7 base 32 k

Transaction Summary
================================================================================
Upgrade 1 Package

Total download size: 32 k
Is this ok [y/d/N]: y
Downloading packages:
No Presto metadata available for base
yum-plugin-fastestmirror-1.1.31-40.el7.noarch.rpm | 32 kB 00:02
Running transaction check
Running transaction test
Transaction test succeeded
Running transaction
Warning: RPMDB altered outside of yum.
 Updating : yum-plugin-fastestmirror-1.1.31-40.el7.noarch 1/2
 Cleanup : yum-plugin-fastestmirror-1.1.31-34.el7.noarch 2/2
 Verifying : yum-plugin-fastestmirror-1.1.31-40.el7.noarch 1/2
 Verifying : yum-plugin-fastestmirror-1.1.31-34.el7.noarch 2/2

Updated:
 yum-plugin-fastestmirror.noarch 0:1.1.31-40.el7

Complete!
We have added the ELRepo. Now, it is time to install Linux kernel 4.9.
Let us find out the current version details with command:
uname -r
Sample output:
3.10.0-327.22.2.el7.x86_64
So, the currently installed Linux Kernel version is 3.10.0-327.22.2.el7.x86_64.
Now, let us install Linux Kernel 4.9 by running the following command from Terminal:
yum --enablerepo=elrepo-kernel install kernel-ml
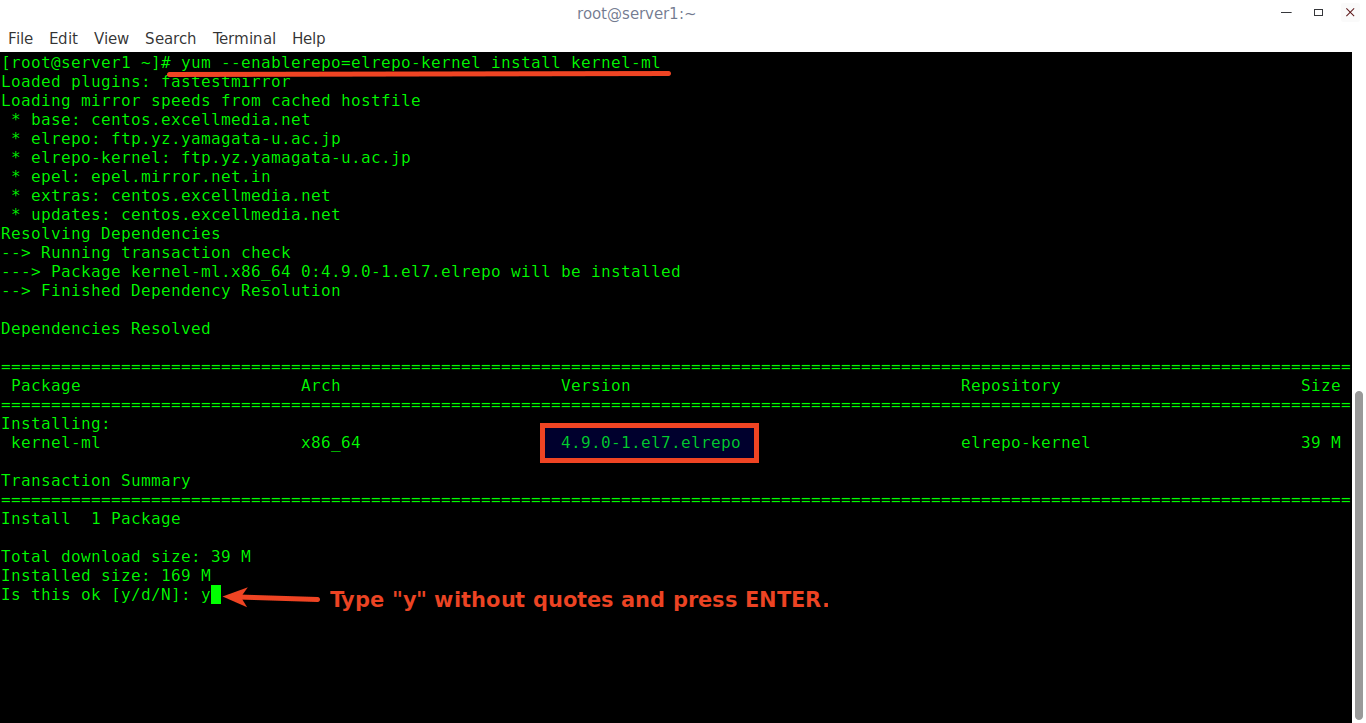
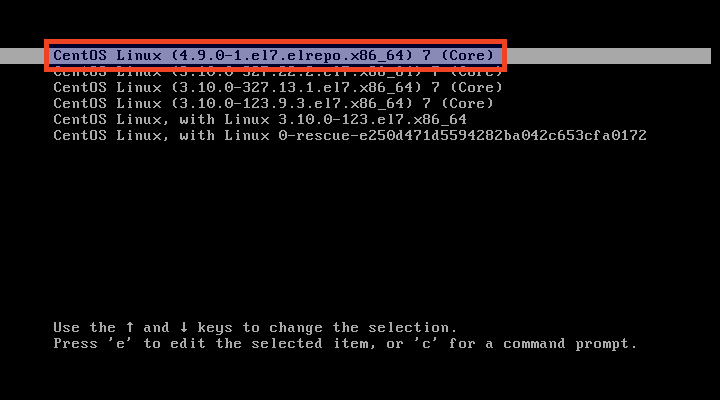
After installing the Kernel, Reboot your system and select the latest Kernel from the Grub boot menu.
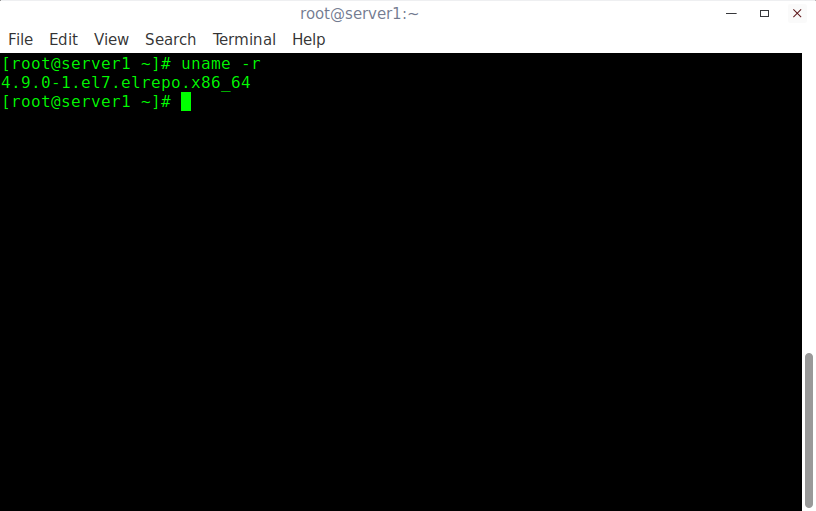
Once you successfully logged-in to the system, run the following command to verify whether latest the latest Linux Kernel has been installed or not:
uname -r
Sample output:
4.9.0-1.el7.elrepo.x86_64
Congratulations! You have successfully updated the Linux Kernel. Now, your system is powered by most recent stable Linux Kernel 4.9 version.
If have encountered with any problems after installing the new Linux Kernel? No worries, reboot your system. Select your previously working Kernel from the Boot menu.
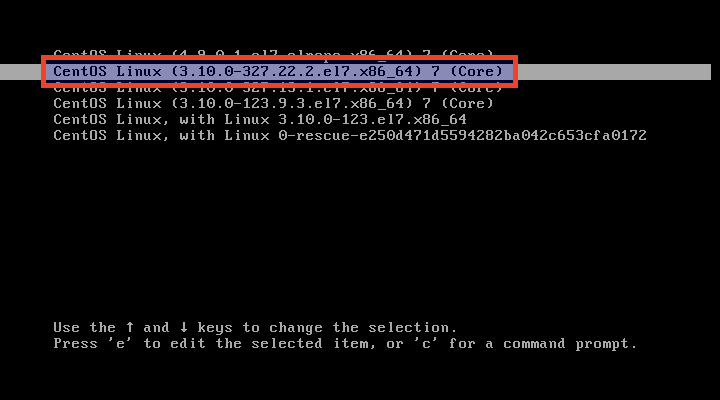
Finally, remove the newly installed Kernel using command:
yum remove kernel-ml
That’s it.
Tuesday, January 17, 2017
ESXi 6 install stuck on “Relocating modules and starting up the kernel…
ESXi 6 install stuck on “Relocating modules and starting up the kernel…”
Admittedly, I do not do much VMWare these days, but on occasion I
have clients that need to use it. Recently I was installing ESXi 6 on
my personal lab to do some testing, when the installation got stuck, the
last message being “Relocating modules and starting up the kernel”

So, what’s happening? Granted this is an older Sun 4170M2 server, but I have installed Oracle VM on the server with no issues. I also have run KVM hypervisors, Windows Hyper-V and Citrix without any issues. Well after a little troubleshooting it looks like VMWare does not like the video subsystem and is getting confused when it is checking to see if the server is headless.
The fix is relatively easy, we have to add a boot parameter to the ESXi kernel. To do this, reboot, and while ESXi is booting hit the tab key

Next, we will add a parameter to disable the headless check “ignoreHeadless=TRUE”

And now reboot and install normally…

Continue the installation normally, but when you get to the end pay attention.

Now reboot, and get ready to hit “Shift O” this time

The add in the ignoreHeadless=TRUE in the boot parameter list, it should look like this

And then hit enter to continue the boot process.
Next, once we are back up we will need to make the ignoreHeadless=TRUE permanent for each reboot.
Log into the ESXi system as root, from the login screen hit F2

Login as root

Arrow down to troubleshooting options to enable the shell

Next enable the ESXi shell

The enter key will toggle the shell state.

Now from the console hit ALT-F2. On ILOMs you will need to use enable the ALT key from the keyboard menu

Then hit F2, to get to the shell login.
Don’t forget to uncheck the alt key from the keyboard dropdown once you are on the shell screen, otherwise you will have issues typing in the password!

next login as root, and we will run a single command

I am a big fan of the concept of “trust, but verify”, so let’s verify that the parameter is correct by getting the parameter with the command
“esxcfg-advcfg –get-kernel ignoreHeadless”

Now we are done. type exit to logout, and then ALT-F2 to go back to the main screen
Hopefully this helps you with getting ESX installed on some older systems.

So, what’s happening? Granted this is an older Sun 4170M2 server, but I have installed Oracle VM on the server with no issues. I also have run KVM hypervisors, Windows Hyper-V and Citrix without any issues. Well after a little troubleshooting it looks like VMWare does not like the video subsystem and is getting confused when it is checking to see if the server is headless.
The fix is relatively easy, we have to add a boot parameter to the ESXi kernel. To do this, reboot, and while ESXi is booting hit the tab key
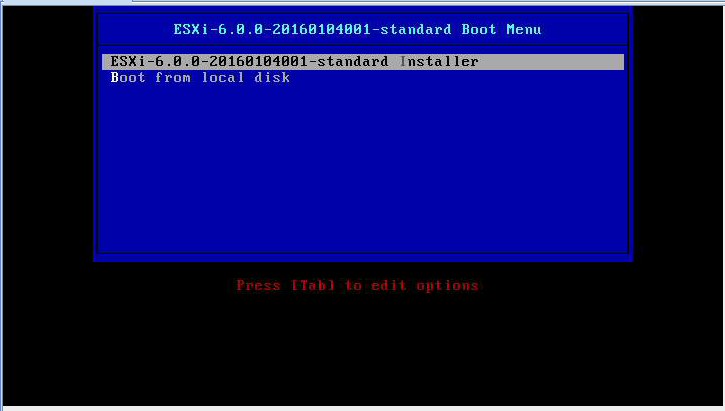
Next, we will add a parameter to disable the headless check “ignoreHeadless=TRUE”
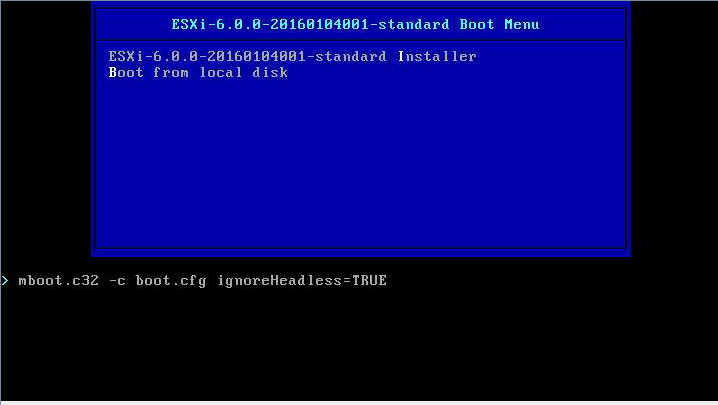
And now reboot and install normally…
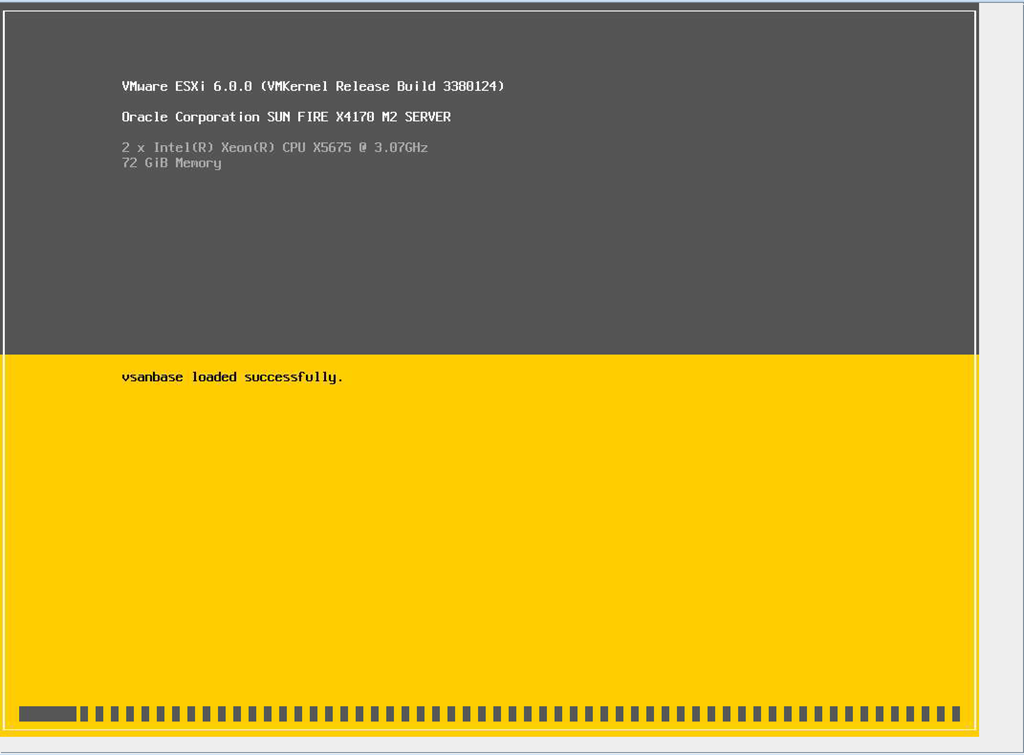
Continue the installation normally, but when you get to the end pay attention.
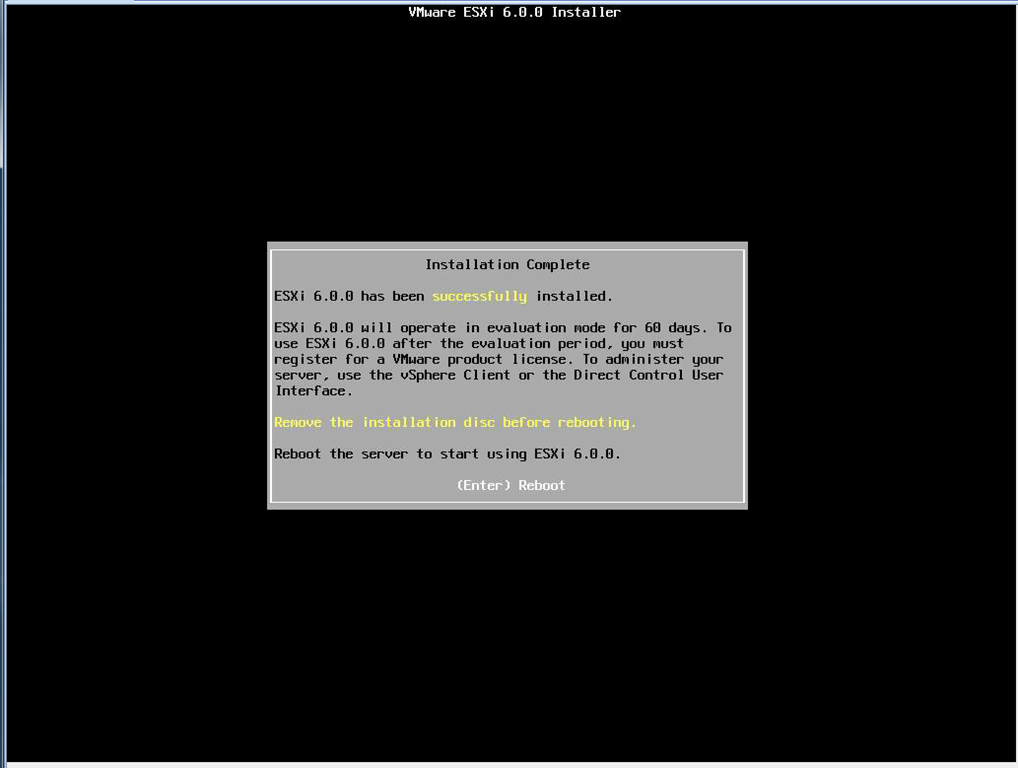
Now reboot, and get ready to hit “Shift O” this time

The add in the ignoreHeadless=TRUE in the boot parameter list, it should look like this
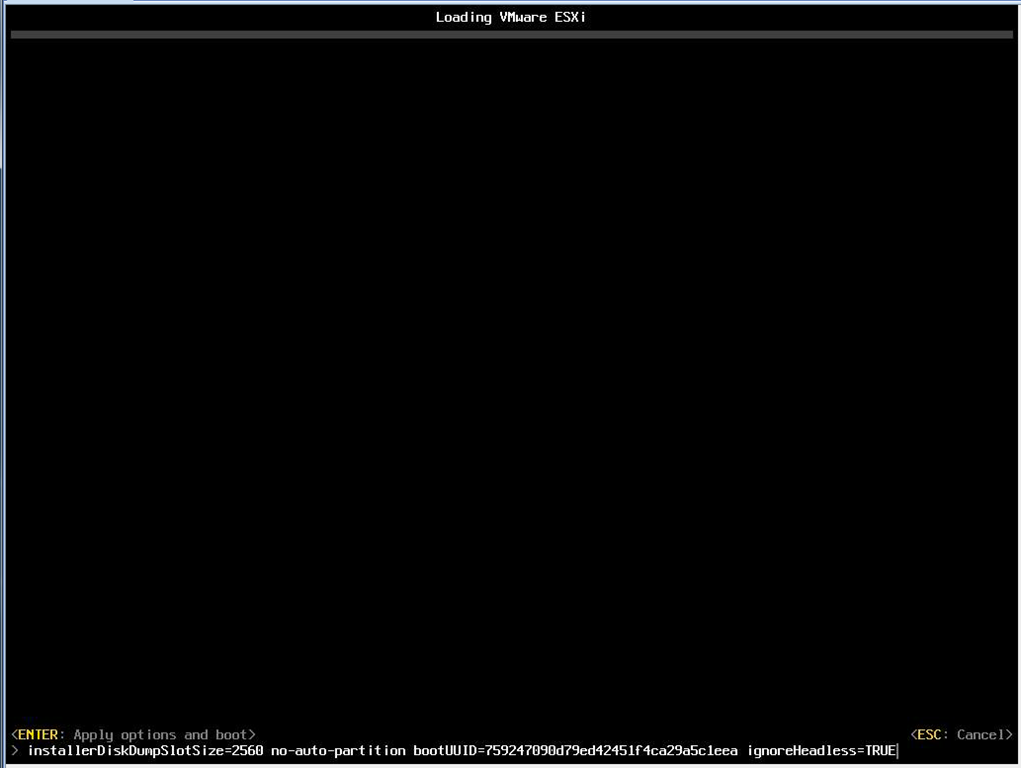
And then hit enter to continue the boot process.
Next, once we are back up we will need to make the ignoreHeadless=TRUE permanent for each reboot.
Log into the ESXi system as root, from the login screen hit F2
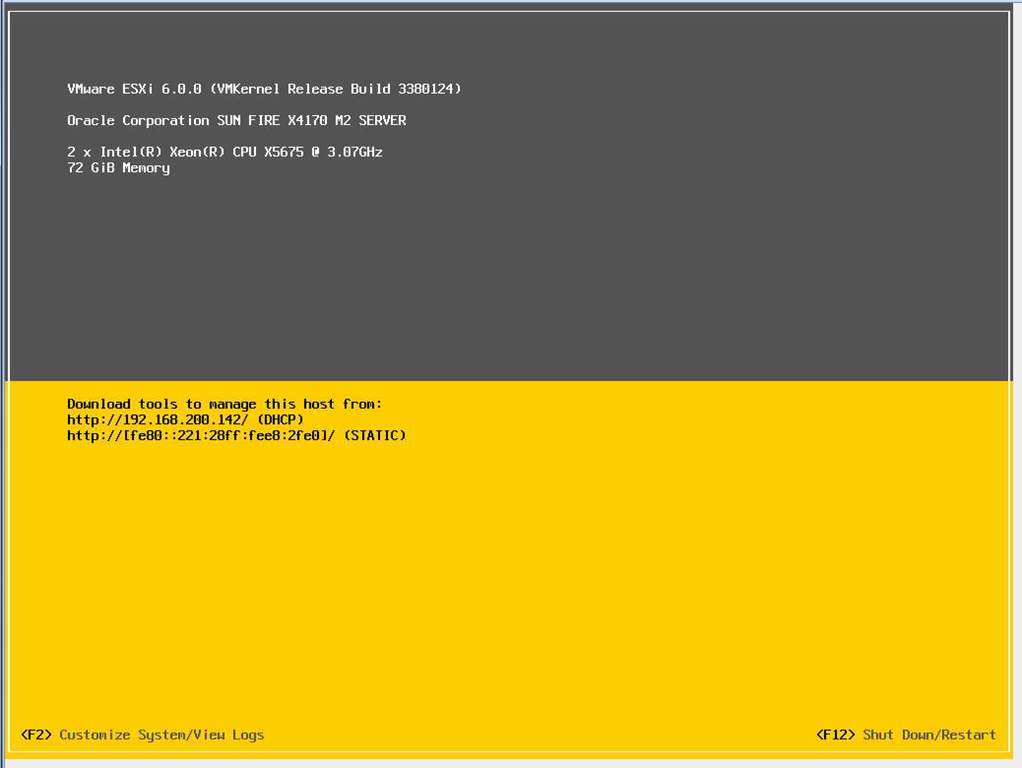
Login as root
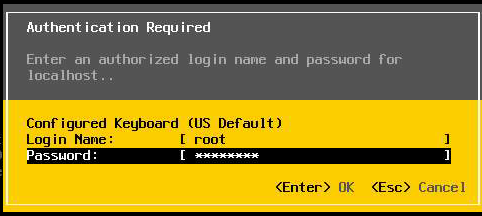
Arrow down to troubleshooting options to enable the shell
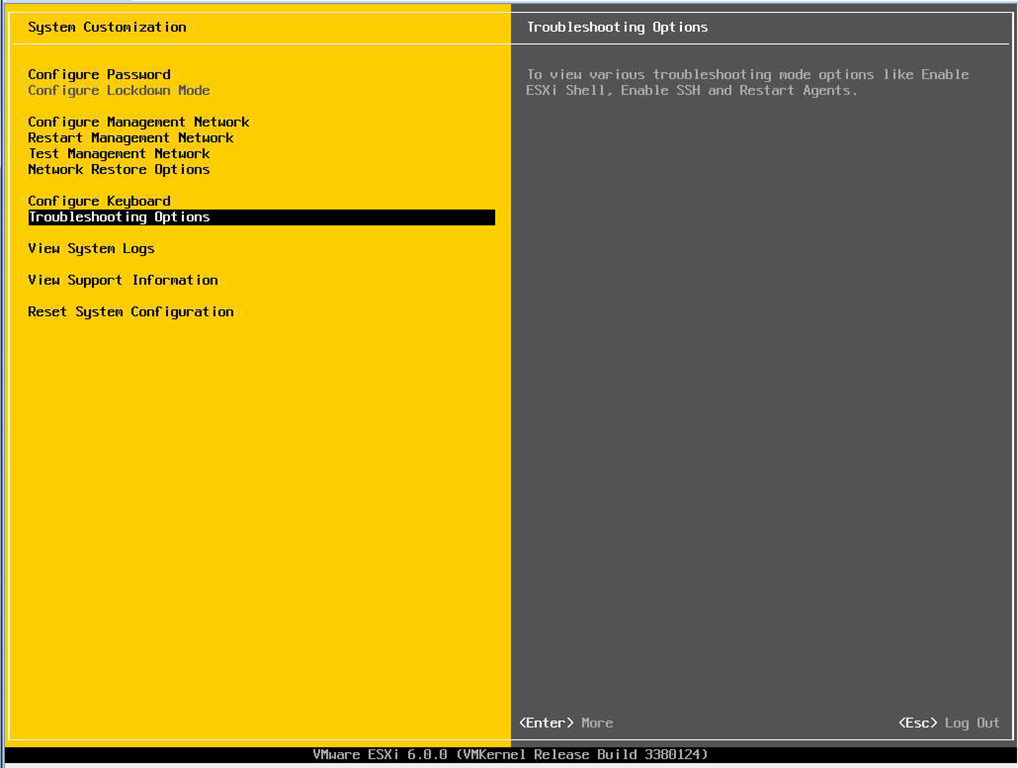
Next enable the ESXi shell
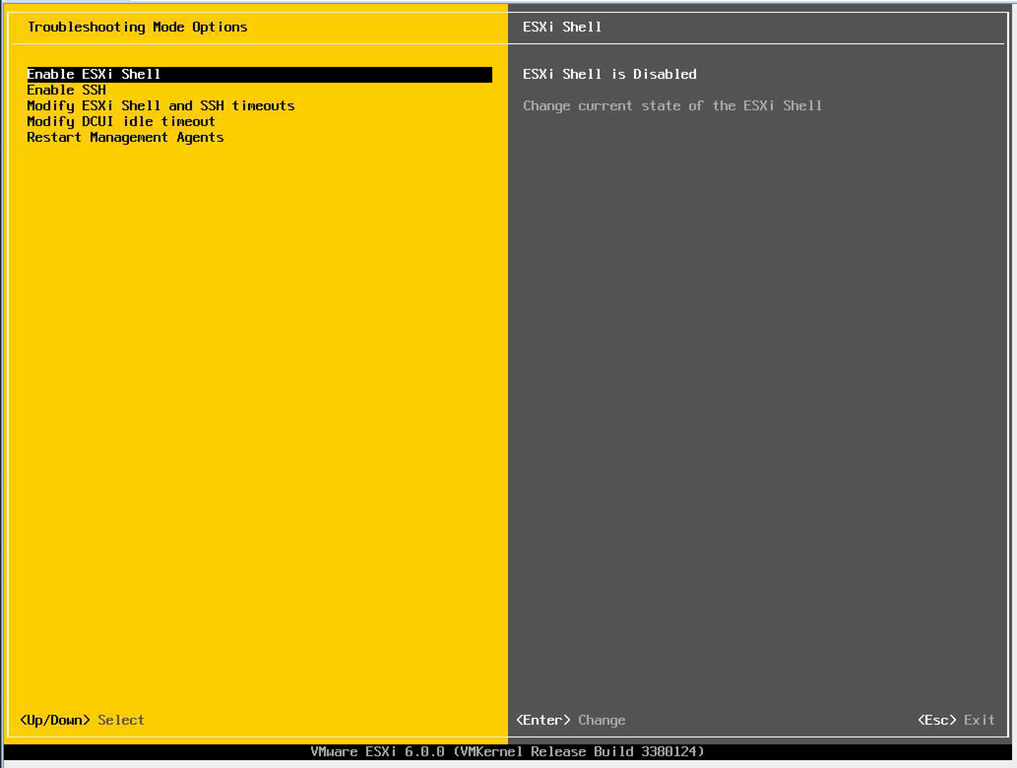
The enter key will toggle the shell state.

Now from the console hit ALT-F2. On ILOMs you will need to use enable the ALT key from the keyboard menu
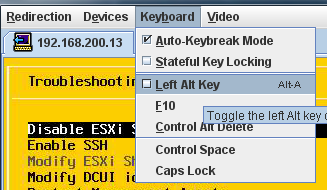
Then hit F2, to get to the shell login.
Don’t forget to uncheck the alt key from the keyboard dropdown once you are on the shell screen, otherwise you will have issues typing in the password!
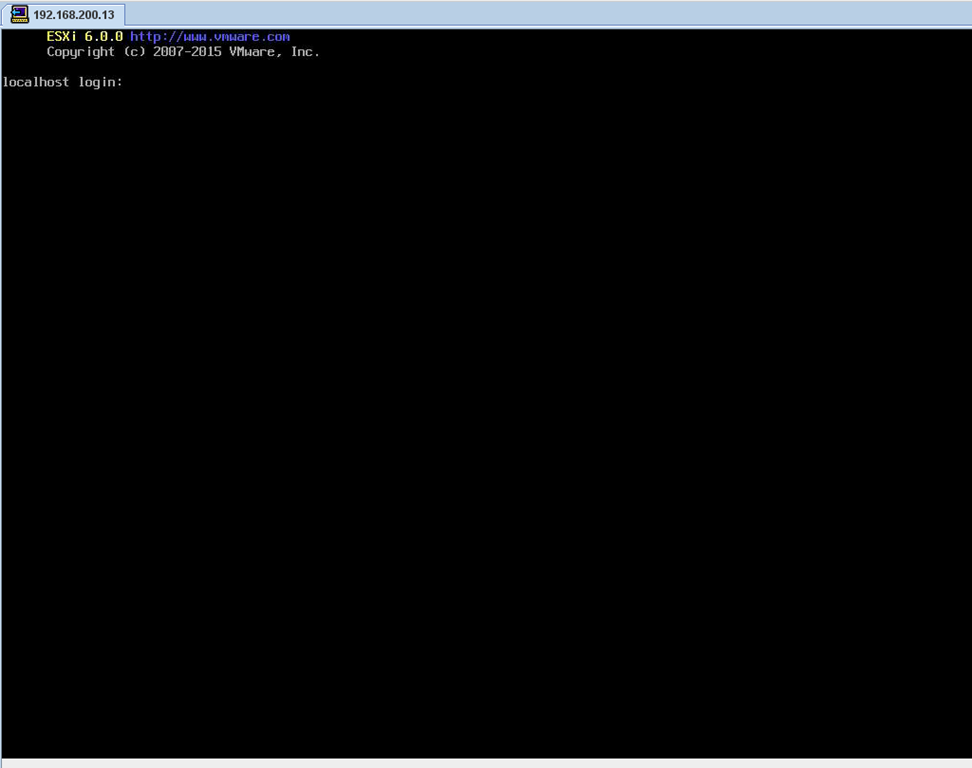
next login as root, and we will run a single command
esxcfg-advcfg --set-kernel "TRUE" ignoreHeadless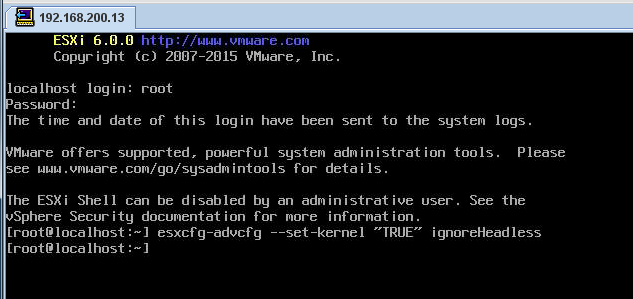
I am a big fan of the concept of “trust, but verify”, so let’s verify that the parameter is correct by getting the parameter with the command
“esxcfg-advcfg –get-kernel ignoreHeadless”
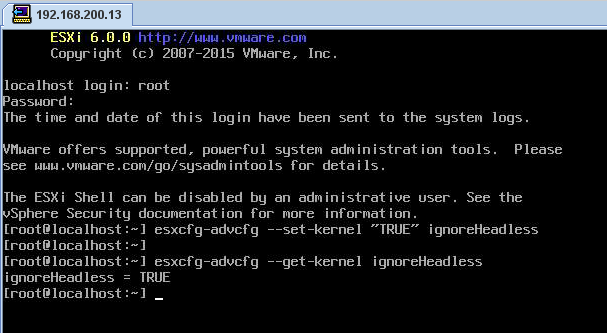
Now we are done. type exit to logout, and then ALT-F2 to go back to the main screen
Hopefully this helps you with getting ESX installed on some older systems.
Tuesday, October 25, 2016
CentOS 7 sshd server to server with no password using trusted keys
CentOS 7 sshd server to server with no password using trusted keys
I have two servers of 192.168.10.28 and 192.168.10.100. On 192.168.10.28 as root:
# ssh-keygen -t rsa
Generating public/private rsa key pair.
Enter file in which to save the key (/root/.ssh/id_rsa):
Enter passphrase (empty for no passphrase):
Enter same passphrase again:
Your identification has been saved in /root/.ssh/id_rsa.
Your public key has been saved in /root/.ssh/id_rsa.pub.
The key fingerprint is:
a3:ba:98:53:bc:8c:c9:b3:d8:3f:73:e2:61:a6:41:f7 root@rhtest.whittenberg.local
The key's randomart image is:
+--[ RSA 2048]----+
| |
| |
| |
| |
| ... S |
| . .o. . . |
| ..=+.E |
| o*B*o. |
|. **=* |
+-----------------+
# ssh-copy-id root@192.168.10.100
/usr/bin/ssh-copy-id: INFO: attempting to log in with the new key(s), to filter out any that are already installed
/usr/bin/ssh-copy-id: INFO: 1 key(s) remain to be installed -- if you are prompted now it is to install the new keys
root@192.168.10.100's password:
Number of key(s) added: 1
Now try logging into the machine, with: "ssh 'root@192.168.10.100'"
and check to make sure that only the key(s) you wanted were added.
# ssh root@192.168.10.100
Last login: Tue Oct 25 20:09:25 2016 from 192.168.10.28
Now do the same on 192.168.10.100 using the ssh-copy-id command to host 192.168.10.28 like the following:
# ssh-keygen -t rsa
Generating public/private rsa key pair.
Enter file in which to save the key (/root/.ssh/id_rsa):
Enter passphrase (empty for no passphrase):
Enter same passphrase again:
Your identification has been saved in /root/.ssh/id_rsa.
Your public key has been saved in /root/.ssh/id_rsa.pub.
The key fingerprint is:
a3:ba:98:53:bc:8c:c9:b3:d8:3f:73:e2:61:a6:41:f7 root@rhtest.whittenberg.local
The key's randomart image is:
+--[ RSA 2048]----+
| |
| |
| |
| |
| ... S |
| . .o. . . |
| ..=+.E |
| o*B*o. |
|. **=* |
+-----------------+
# ssh-copy-id root@192.168.10.28
/usr/bin/ssh-copy-id: INFO: attempting to log in with the new key(s), to filter out any that are already installed
/usr/bin/ssh-copy-id: INFO: 1 key(s) remain to be installed -- if you are prompted now it is to install the new keys
root@192.168.10.100's password:
Number of key(s) added: 1
Now try logging into the machine, with: "ssh 'root@192.168.10.28'"
and check to make sure that only the key(s) you wanted were added.
# ssh root@192.168.10.28
Last login: Tue Oct 25 20:09:25 2016 from 192.168.10.100
There you go. You you no longer need password to use the sshd protocol between your two servers. Try this on either server access the other. I will be on the .28 accessing the .100:
# sftp root@192.168.10.100
Connected to 192.168.10.100.
sftp> ls
anaconda-ks.cfg btrfs-progs dead.letter dump
fio-2.0.9.tar.gz go.sh idle3-tools-0.9.1 idle3-tools-0.9.1.tar
linux-4.7.tar.xz list master.zip mylog.txt
phoronix-test-suite phoronix-test-suite-6.4.0.tar scrub.log sipp-3.5.1
sipp-3.5.1.tar.gz test.sh trantest wd5741x64
zfsstress-master
sftp>
Yup. No password needed. Enjoy!
I have two servers of 192.168.10.28 and 192.168.10.100. On 192.168.10.28 as root:
# ssh-keygen -t rsa
Generating public/private rsa key pair.
Enter file in which to save the key (/root/.ssh/id_rsa):
Enter passphrase (empty for no passphrase):
Enter same passphrase again:
Your identification has been saved in /root/.ssh/id_rsa.
Your public key has been saved in /root/.ssh/id_rsa.pub.
The key fingerprint is:
a3:ba:98:53:bc:8c:c9:b3:d8:3f:73:e2:61:a6:41:f7 root@rhtest.whittenberg.local
The key's randomart image is:
+--[ RSA 2048]----+
| |
| |
| |
| |
| ... S |
| . .o. . . |
| ..=+.E |
| o*B*o. |
|. **=* |
+-----------------+
# ssh-copy-id root@192.168.10.100
/usr/bin/ssh-copy-id: INFO: attempting to log in with the new key(s), to filter out any that are already installed
/usr/bin/ssh-copy-id: INFO: 1 key(s) remain to be installed -- if you are prompted now it is to install the new keys
root@192.168.10.100's password:
Number of key(s) added: 1
Now try logging into the machine, with: "ssh 'root@192.168.10.100'"
and check to make sure that only the key(s) you wanted were added.
# ssh root@192.168.10.100
Last login: Tue Oct 25 20:09:25 2016 from 192.168.10.28
Now do the same on 192.168.10.100 using the ssh-copy-id command to host 192.168.10.28 like the following:
# ssh-keygen -t rsa
Generating public/private rsa key pair.
Enter file in which to save the key (/root/.ssh/id_rsa):
Enter passphrase (empty for no passphrase):
Enter same passphrase again:
Your identification has been saved in /root/.ssh/id_rsa.
Your public key has been saved in /root/.ssh/id_rsa.pub.
The key fingerprint is:
a3:ba:98:53:bc:8c:c9:b3:d8:3f:73:e2:61:a6:41:f7 root@rhtest.whittenberg.local
The key's randomart image is:
+--[ RSA 2048]----+
| |
| |
| |
| |
| ... S |
| . .o. . . |
| ..=+.E |
| o*B*o. |
|. **=* |
+-----------------+
# ssh-copy-id root@192.168.10.28
/usr/bin/ssh-copy-id: INFO: attempting to log in with the new key(s), to filter out any that are already installed
/usr/bin/ssh-copy-id: INFO: 1 key(s) remain to be installed -- if you are prompted now it is to install the new keys
root@192.168.10.100's password:
Number of key(s) added: 1
Now try logging into the machine, with: "ssh 'root@192.168.10.28'"
and check to make sure that only the key(s) you wanted were added.
# ssh root@192.168.10.28
Last login: Tue Oct 25 20:09:25 2016 from 192.168.10.100
There you go. You you no longer need password to use the sshd protocol between your two servers. Try this on either server access the other. I will be on the .28 accessing the .100:
# sftp root@192.168.10.100
Connected to 192.168.10.100.
sftp> ls
anaconda-ks.cfg btrfs-progs dead.letter dump
fio-2.0.9.tar.gz go.sh idle3-tools-0.9.1 idle3-tools-0.9.1.tar
linux-4.7.tar.xz list master.zip mylog.txt
phoronix-test-suite phoronix-test-suite-6.4.0.tar scrub.log sipp-3.5.1
sipp-3.5.1.tar.gz test.sh trantest wd5741x64
zfsstress-master
sftp>
Yup. No password needed. Enjoy!
Saturday, October 22, 2016
CentOS 7 rescue, backup, and restore using ReaR
CentOS 7 rescue, backup, and restore using ReaR
I will be using a server i have already setup as my backup server. The client server we are working on in this post will use the backup server to store its rescue image and tar file on. This backup server is connected via 10Gb Ethernet and has 8 WD 3TB NAS drives in btrfs Raid10 on a Supermicro SAS/SATA controller. The btrfs on this backup server is also replicated to another server. So if a Linux client crashed i have what i need to restore from my backup server. If the back server crashes before i get the client rebuilt i can fall back on the replicated files the other machine. I also have a disaster recovery document for the backup server that allows me to have it fully rebuilt and able to restore files back on to it in less than an hour.
Now on your client machine install files so we can create rescue images. lftp is needed to so we can sftp the image to the backup server if wanted. In this post i will be using nfs as i have this setup already on my backup server.
# yum -y install rear genisoimage syslinux lftp nfs-utils
ReaR is configured in the /etc/rear/local.conf file. Specify the rescue system configuration by
adding these lines:
OUTPUT=output format
OUTPUT_URL=output location
Substitute output format with rescue system format, for example, ISO for an ISO disk image or USB for a bootable USB.
Substitute output location with where it will be put, for example,
file:///mnt/rescue_system/ for a local filesystem directory or
sftp://backupuser:password@192.168.10.100/directory/ for an sftp directory or.
nfs://192.168.10.100/backup_dir/ for a nfs share.
Example1:
OUTPUT=ISO
OUTPUT_URL=sftp://backup:password@192.168.10.100/backup_dir/
Example2:
OUTPUT=ISO
OUTPUT_URL=nfs://192.168.10.100/backup_dir/
In the exmaple2 above i create the rescue ISO image on the server 192.168.10.100 using my nfs share /backup_dir.
Make rescure image with:
# rear -v mkrescue
Now look under /backup_dir on server 192.168.10.100 and you will see the newly created directory of your machine name with the ISO image in it.
If you like you can verify that you can boot from the ISO. Burn it to a CD/DVD, or like me, just create a new vm image and have this as the ISO CD/DVD and set to boot on start.
I can now boot off the rescue ISO but this does not do me much good if lets say i had a drive crash and all my files are gone. So say i have replaced the drive and I will also need to restore them to have a functional system again.
So lets add the option in the /etc/rear/local.conf file to tar a backup file. Our /etc/rear/local.conf file already contains the following:
OUTPUT=ISO
OUTPUT_URL=nfs://192.168.10.100/backup_dir/
Now lets append:
BACKUP=NETFS
BACKUP_PROG=tar
BACKUP_URL=nfs://192.168.10.100/backup_dir/
BACKUP_PROG_COMPRESS_OPTIONS="--gzip"
BACKUP_PROG_COMPRESS_SUFFIX=".gz"
BACKUP_PROG_EXCLUDE=( '/tmp/*' '/dev/shm/*' '/mnt/*' )
BACKUP_OPTIONS="nfsvers=3,nolock"
So the complete file looks like:
OUTPUT=ISO
OUTPUT_URL=nfs://192.168.10.100/backup_dir/
BACKUP=NETFS
BACKUP_PROG=tar
BACKUP_URL=nfs://192.168.10.100/backup_dir/
BACKUP_PROG_COMPRESS_OPTIONS="--gzip"
BACKUP_PROG_COMPRESS_SUFFIX=".gz"
BACKUP_PROG_EXCLUDE=( '/tmp/*' '/dev/shm/*' '/mnt/*' )
BACKUP_OPTIONS="nfsvers=3,nolock"
So i am using tar for my backup program, my backups will stored via nfs share to my backup server under the /backup_dir/, i will gzip the tar with extension .gz, and exclude /tmp/*, /dev/shm/*, and /mnt/* from the backups.
Lets test. Now run:
# rear -v mkbackup
After completed you should see the not only the rescue Image under /backup_dir/ on the backup server, but now the backup.tar.gz file as well.
Now to go through the rescue and restore procedure.
In this example i will use my vSphere ESXi 60 server and create a new image for this. I have uploaded the rescue ISO to a datastore and have the image mount this ISO at boot, so i can boot from it.
After the vm image is booted i am presented with the ReaR menu.
I choose Recover and press enter.
Login as root (no password required).
At the # prompt type in:
# rear recover
If asked if you want to restore your backup say y.
Now reboot server and login.
Enjoy!
I will be using a server i have already setup as my backup server. The client server we are working on in this post will use the backup server to store its rescue image and tar file on. This backup server is connected via 10Gb Ethernet and has 8 WD 3TB NAS drives in btrfs Raid10 on a Supermicro SAS/SATA controller. The btrfs on this backup server is also replicated to another server. So if a Linux client crashed i have what i need to restore from my backup server. If the back server crashes before i get the client rebuilt i can fall back on the replicated files the other machine. I also have a disaster recovery document for the backup server that allows me to have it fully rebuilt and able to restore files back on to it in less than an hour.
Now on your client machine install files so we can create rescue images. lftp is needed to so we can sftp the image to the backup server if wanted. In this post i will be using nfs as i have this setup already on my backup server.
# yum -y install rear genisoimage syslinux lftp nfs-utils
ReaR is configured in the /etc/rear/local.conf file. Specify the rescue system configuration by
adding these lines:
OUTPUT=output format
OUTPUT_URL=output location
Substitute output format with rescue system format, for example, ISO for an ISO disk image or USB for a bootable USB.
Substitute output location with where it will be put, for example,
file:///mnt/rescue_system/ for a local filesystem directory or
sftp://backupuser:password@192.168.10.100/directory/ for an sftp directory or.
nfs://192.168.10.100/backup_dir/ for a nfs share.
Example1:
OUTPUT=ISO
OUTPUT_URL=sftp://backup:password@192.168.10.100/backup_dir/
Example2:
OUTPUT=ISO
OUTPUT_URL=nfs://192.168.10.100/backup_dir/
In the exmaple2 above i create the rescue ISO image on the server 192.168.10.100 using my nfs share /backup_dir.
Make rescure image with:
# rear -v mkrescue
Now look under /backup_dir on server 192.168.10.100 and you will see the newly created directory of your machine name with the ISO image in it.
If you like you can verify that you can boot from the ISO. Burn it to a CD/DVD, or like me, just create a new vm image and have this as the ISO CD/DVD and set to boot on start.
I can now boot off the rescue ISO but this does not do me much good if lets say i had a drive crash and all my files are gone. So say i have replaced the drive and I will also need to restore them to have a functional system again.
So lets add the option in the /etc/rear/local.conf file to tar a backup file. Our /etc/rear/local.conf file already contains the following:
OUTPUT=ISO
OUTPUT_URL=nfs://192.168.10.100/backup_dir/
Now lets append:
BACKUP=NETFS
BACKUP_PROG=tar
BACKUP_URL=nfs://192.168.10.100/backup_dir/
BACKUP_PROG_COMPRESS_OPTIONS="--gzip"
BACKUP_PROG_COMPRESS_SUFFIX=".gz"
BACKUP_PROG_EXCLUDE=( '/tmp/*' '/dev/shm/*' '/mnt/*' )
BACKUP_OPTIONS="nfsvers=3,nolock"
So the complete file looks like:
OUTPUT=ISO
OUTPUT_URL=nfs://192.168.10.100/backup_dir/
BACKUP=NETFS
BACKUP_PROG=tar
BACKUP_URL=nfs://192.168.10.100/backup_dir/
BACKUP_PROG_COMPRESS_OPTIONS="--gzip"
BACKUP_PROG_COMPRESS_SUFFIX=".gz"
BACKUP_PROG_EXCLUDE=( '/tmp/*' '/dev/shm/*' '/mnt/*' )
BACKUP_OPTIONS="nfsvers=3,nolock"
So i am using tar for my backup program, my backups will stored via nfs share to my backup server under the /backup_dir/, i will gzip the tar with extension .gz, and exclude /tmp/*, /dev/shm/*, and /mnt/* from the backups.
Lets test. Now run:
# rear -v mkbackup
After completed you should see the not only the rescue Image under /backup_dir/ on the backup server, but now the backup.tar.gz file as well.
Now to go through the rescue and restore procedure.
In this example i will use my vSphere ESXi 60 server and create a new image for this. I have uploaded the rescue ISO to a datastore and have the image mount this ISO at boot, so i can boot from it.
After the vm image is booted i am presented with the ReaR menu.
I choose Recover and press enter.
Login as root (no password required).
At the # prompt type in:
# rear recover
If asked if you want to restore your backup say y.
Now reboot server and login.
Enjoy!
Friday, October 21, 2016
RHCSA Lab setup using CentOS 7 with ipa server and ipa client
RHCSA Lab setup using CentOS 7 with ipa server and ipa client
This is in preparation of me studying for my RHCSA (Redhat Certified System Administrator)
------------------------------------
Now for the base server installs.
------------------------------------
I will using the CentOS-7-x86_64-Everything.iso for the installs in my VMware vSphere Client 6.0 and ESXi 6.0. Each Server gets 2 Cores, 2GB Ram, 25GB disk, and 1 NIC.
Servers names and IP addresses will be:
rh-ipa.whittenberg.local 192.168.10.30
rh-srv1.whittenberg.local 192.168.10.31
rh-srv2.whittenberg.local 192.168.10.32
My Local LAN router is 192.168.10.1 and i will use this for my gateway out and DNS server.
At the CentOS 7 install I set my Network and Hostname.
Click on Network and Hostname on home screen.
Hostname: rh-ipa.whittenberg.local
Click slider to turn ethernet adapter ON. This gives me an IP from my DHCP server from my local LAN router.
Click the Configure button.
[General]
click on Automatically connect to this network
[IPv4 Settings]
Method: Manual
Addresses, click add button
address: 192.168.10.30
netmask: 24
gateway: 192.168.10.1
DNS server: 192.168.10.1
Click Save button
Click Done button
You should now be able to ping 192.168.10.30 from your workstation on the LAN.
Click on Date & Time from the home screen.
Chose your region and city.
Make sure Network Time slider shows ON.
Click on gears next to slider. Time servers should be green. If red then you are unable to reach them.
Click Done button.
Click on Software Selection from home screen.
Select Minimal Install under Base Environment and nothing under Add-Ons.
Click Done button.
Click on Installation Destination from home screen.
Make sure white check mark on your hard disk.
Select I will configure partitioning.
Click Done button.
Click the + button and setup as follows.
/boot = 500MB
swap = 1024MB
/root = 23.5GB
Click Done button.
Accept Changes.
Now click the Begin Installation button.
Supply root password while the installation is taking place.
When finished click the Reboot button.
Putty/SSH into your server from your workstation.
Disable selinux.
cp /etc/sysconfig/selinux /etc/sysconfig/selinux.bak
sed -i 's/^SELINUX=.*/SELINUX=disabled/g' /etc/sysconfig/selinux
cat /etc/sysconfig/selinux
reboot
Disable and turn off firewalld.
systemctl disable firewalld
systemctl stop firewalld
cat or edit your /etc/hostname file and add the following entree if not there already.
ipa.whittenberg.local
cat or edit your /etc/hosts file and add the following entries if not there already.
192.168.10.30 ipa.whittenberg.local ipa
cat or edit your /etc/resolv.conf file and add the following entries if not there already.
search whittenberg.local
nameserver 192.168.10.1
Install additional packages I need on normal basis.
yum -y install bind-utils traceroute net-tools ntp* gcc glibc glibc-common gd gd-devel make net-snmp openssl-devel xinetd unzip libtool* make patch perl bison flex-devel gcc-c++ ncurses-devel flex libtermcap-devel autoconf* automake* autoconf libxml2-devel cmake sqlite* wget ntp* lm_sensors ncurses-devel qt-devel hmaccalc zlib-devel binutils-devel elfutils-libelf-devel wget bc gzip uuid* libuuid-devel jansson* libxml2* sqlite* openssl* lsof NetworkManager-tui mlocate yum-utils kernel-devel nfs-utils tcpdump git
yum -y groupinstall "Development Tools"
Now update the server.
yum -y update
reboot
**Optional - Install of GNOME Desktop.
yum -y groups install "GNOME Desktop"
yum -y update
systemctl set-default graphical.target
systemctl get-default
reboot and make sure GNOME Desktop starts.
**END Optional - Install of GNOME Desktop.
**Optional - Turn off console screen saver and display all boot messages.
vi /etc/default/grub and on the line starting with GRUB_CMDLINE_LINUX= remove 'rhgb' and 'quiet'. Now add 'consoleblank=0' just before the last " on the line. DO NOT include the ' in the 'consoleblank=0' add.
Now make a new grub.cfg using the line below.
grub2-mkconfig -o /boot/grub2/grub.cfg
If using efi then use this line to make new grub.cfg
grub2-mkconfig -o /boot/efi/EFI/centos/grub.cfg
Now when you boot your server you will see all the boot messages.
**END Optional - Turn off console screen saver and display all boot messages.
NOW REPEAT all the steps above under base server installs for the other two server of rh-srv1 and rh-srv2, of course using the correct IP and hostname for each server.
------------------------------------
Now for the ipa server install
------------------------------------
Now its time to setup ipa on the ipa server and we will user srv1 as our first client.
On your ipa server.
# yum -y install ipa-server bind-dyndb-ldap ipa-server-dns
# ipa-server-install --setup-dns
The log file for this installation can be found in /var/log/ipaserver-install.log
==============================================================================
This program will set up the IPA Server.
This includes:
* Configure a stand-alone CA (dogtag) for certificate management
* Configure the Network Time Daemon (ntpd)
* Create and configure an instance of Directory Server
* Create and configure a Kerberos Key Distribution Center (KDC)
* Configure Apache (httpd)
* Configure DNS (bind)
To accept the default shown in brackets, press the Enter key.
WARNING: conflicting time&date synchronization service 'chronyd' will be disabled
in favor of ntpd
Enter the fully qualified domain name of the computer
on which you're setting up server software. Using the form
<hostname>.<domainname>
Example: master.example.com.
Server host name [rh-ipa.whittenberg.local]:
Warning: skipping DNS resolution of host rh-ipa.whittenberg.local
The domain name has been determined based on the host name.
Please confirm the domain name [whittenberg.local]:
The kerberos protocol requires a Realm name to be defined.
This is typically the domain name converted to uppercase.
Please provide a realm name [WHITTENBERG.LOCAL]:
Certain directory server operations require an administrative user.
This user is referred to as the Directory Manager and has full access
to the Directory for system management tasks and will be added to the
instance of directory server created for IPA.
The password must be at least 8 characters long.
Directory Manager password:
Password (confirm):
The IPA server requires an administrative user, named 'admin'.
This user is a regular system account used for IPA server administration.
IPA admin password:
Password (confirm):
Existing BIND configuration detected, overwrite? [no]: yes
Do you want to configure DNS forwarders? [yes]:
Enter an IP address for a DNS forwarder, or press Enter to skip: 8.8.8.8
DNS forwarder 8.8.8.8 added. You may add another.
Enter an IP address for a DNS forwarder, or press Enter to skip:
Checking DNS forwarders, please wait ...
Do you want to configure the reverse zone? [yes]:
Please specify the reverse zone name [10.168.192.in-addr.arpa.]:
Using reverse zone(s) 10.168.192.in-addr.arpa.
The IPA Master Server will be configured with:
Hostname: rh-ipa.whittenberg.local
IP address(es): 192.168.10.30
Domain name: whittenberg.local
Realm name: WHITTENBERG.LOCAL
BIND DNS server will be configured to serve IPA domain with:
Forwarders: 8.8.8.8
Reverse zone(s): 10.168.192.in-addr.arpa.
Continue to configure the system with these values? [no]: yes
Install info scrolls by then at the end we see.
Setup complete
Next steps:
1. You must make sure these network ports are open:
TCP Ports:
* 80, 443: HTTP/HTTPS
* 389, 636: LDAP/LDAPS
* 88, 464: kerberos
* 53: bind
UDP Ports:
* 88, 464: kerberos
* 53: bind
* 123: ntp
2. You can now obtain a kerberos ticket using the command: 'kinit admin'
This ticket will allow you to use the IPA tools (e.g., ipa user-add)
and the web user interface.
Be sure to back up the CA certificates stored in /root/cacert.p12
These files are required to create replicas. The password for these
files is the Directory Manager password
# kinit admin
Password for admin@WHITTENBERG.LOCAL:
# ipa user-find admin
--------------
1 user matched
--------------
User login: admin
Last name: Administrator
Home directory: /home/admin
Login shell: /bin/bash
UID: 1546000000
GID: 1546000000
Account disabled: False
Password: True
Kerberos keys available: True
----------------------------
Number of entries returned 1
----------------------------
# ipa user-add
First name: ldapuser1
Last name: ldapuser1
User login [lldapuser1]: ldapuser1
----------------------
Added user "ldapuser1"
----------------------
User login: ldapuser1
First name: ldapuser1
Last name: ldapuser1
Full name: ldapuser1 ldapuser1
Display name: ldapuser1 ldapuser1
Initials: ll
Home directory: /home/ldapuser1
GECOS: ldapuser1 ldapuser1
Login shell: /bin/sh
Kerberos principal: ldapuser1@WHITTENBERG.LOCAL
Email address: ldapuser1@whittenberg.local
UID: 1546000001
GID: 1546000001
Password: False
Member of groups: ipausers
Kerberos keys available: False
# ls -lsa /etc/ipa/
total 24
0 drwxr-xr-x. 6 root root 89 Oct 20 20:02 .
12 drwxr-xr-x. 147 root root 8192 Oct 20 20:02 ..
4 -r--r--r--. 1 root root 1337 Oct 20 20:01 ca.crt
4 -rw-r--r--. 1 root root 321 Oct 20 20:00 default.conf
0 drwxr-xr-x. 2 root root 76 Oct 20 20:02 dnssec
4 drwxr-xr-x. 2 root root 4096 Oct 20 19:52 html
0 drwxr-xr-x. 2 root root 51 Oct 20 20:01 kdcproxy
0 drwxr-xr-x. 2 root root 69 Oct 20 20:02 nssdb
# cat /etc/ipa/ca.crt
-----BEGIN CERTIFICATE-----
MIIDoDCCAoigAwIBAgIBATANBgkqhkiG9w0BAQsFADA8MRowGAYDVQQKDBFXSElU
VEVOQkVSRy5MT0NBTDEeMBwGA1UEAwwVQ2VydGlmaWNhdGUgQXV0aG9yaXR5MB4X
DTE2MTAyMTAzMDAwNFoXDTM2MTAyMTAzMDAwNFowPDEaMBgGA1UECgwRV0hJVFRF
TkJFUkcuTE9DQUwxHjAcBgNVBAMMFUNlcnRpZmljYXRlIEF1dGhvcml0eTCCASIw
DQYJKoZIhvcNAQEBBQADggEPADCCAQoCggEBANC2wYqkiEwRY/YUY5cyDTEh+OaK
tU8KtPEeyAOhE8COugNYUZhx8bvoJyM7c7KGzxU/nuY4MAYF6sMOslIcaAHR7S4A
Wi+1URBFI8xsCoO7YktVoyTkV0sNY93dUlK+dpKNnL7P1oDJlcqDWflne/BG0h4i
gq5NRRdWQvh33yJAriBNSw2AIYvuQMiMQ1kdFqQ/T5VjQUU+L20QGE2Ox7AnHkYd
Tovn+Alok8FIqbDNqIn4VNsz0Zy010eHC7zmRK/kiWrnauf+r/JHi3zGz9GVKtUE
3swEE4dXejA7SAd03ZnmF2oruJ+o5u3ZwK4bN8S9dKuZZTaXxjSbT+FbM3MCAwEA
AaOBrDCBqTAfBgNVHSMEGDAWgBRO+0W/EXt3Qbkun00PARxow2PUvjAPBgNVHRMB
Af8EBTADAQH/MA4GA1UdDwEB/wQEAwIBxjAdBgNVHQ4EFgQUTvtFvxF7d0G5Lp9N
DwEcaMNj1L4wRgYIKwYBBQUHAQEEOjA4MDYGCCsGAQUFBzABhipodHRwOi8vcmgt
aXBhLndoaXR0ZW5iZXJnLmxvY2FsOjgwL2NhL29jc3AwDQYJKoZIhvcNAQELBQAD
ggEBAGGiKMrGrcCAtRVfKdA2f4Ko1FpIKKUsEMG4yyBxio//HxDja8X0MUzG7RWQ
3xKvkcNO08zFNd5/5YCiboy5RRrz4N/fIVFZDjJhLjwT9UQx1nktETLl/oirVSp4
e3z7Tc6m+4gpPABM7ryVNkQfdNCka82rLnzny5+U/YsZ2mGcl86MQ6T2U/0RXBHj
9QZVmVRJe7mTJzNW62rSsh6D7u2RBffZIQ7I/Huk5HFiDI9mogtizpb1Miwr5Vhb
uy+bVmPaHJfy/bHbVv8Vg3m0dKbP6bhS0lafnfWXF1iCmako0n0v2+T7IzwScW2Y
G94EkYeftqGg9LiFAogEEKZnuGg=
-----END CERTIFICATE-----
# klist
Ticket cache: KEYRING:persistent:0:0
Default principal: admin@WHITTENBERG.LOCAL
Valid starting Expires Service principal
10/20/2016 20:09:13 10/21/2016 20:07:42 HTTP/rh-ipa.whittenberg.local@WHITTENBERG.LOCAL
10/20/2016 20:07:48 10/21/2016 20:07:42 krbtgt/WHITTENBERG.LOCAL@WHITTENBERG.LOCAL
# cat /etc/resolv.conf
search whittenberg.local
nameserver 127.0.0.1
vi /etc/resolv.conf (change to nameserver 192.168.10.30)
# cat /etc/resolv.conf
search whittenberg.local
nameserver 192.168.10.30
Next you can use the Firefox browser on your ipa server and browse the server.
https://rh-ipa.whittenberg.local
Supply username and password. User name is admin.
Click on Network Services then DNS->DNS Zones, then click on whittenberg.local.
Click Add button. Add your servers here like rh-srv1 and rh-srv2. include name, IP address, and select Create Reverse. Like:
name = rh-srv1
Address = 192.168.10.31
Check mark on Create Reverse
and
name = rh-srv2
Address = 192.168.10.32
Check mark on Create Reverse
------------------------------------
Now for the ipa client installs
------------------------------------
On rh-srv1.whittenberg.local server.
[root@rh-srv1 ~]# cat /etc/hostname
rh-srv1.whittenberg.local
[root@rh-srv1 ~]# cat /etc/hosts
127.0.0.1 localhost localhost.localdomain localhost4 localhost4.localdomain4
::1 localhost localhost.localdomain localhost6 localhost6.localdomain6
192.168.10.31 rh-srv1.whittenberg.local rh-srv1
[root@rh-srv1 ~]# cat /etc/resolv.conf
# Generated by NetworkManager
search whittenberg.local
nameserver 192.168.10.1
nameserver 2001:578:3f::30
nameserver 2001:578:3f:1::30
Now change the nameserver in /etc/resolv.conf from 192.168.10.1, as shown above, to 192.168.10.30, as shown below.
[root@rh-srv1 ~]# cat /etc/resolv.conf
# Generated by NetworkManager
search whittenberg.local
nameserver 192.168.10.30
nameserver 2001:578:3f::30
nameserver 2001:578:3f:1::30
Install the ipa client.
[root@rh-srv1 ~]# yum -y install ipa-client
Now run the install/setup of the ipa client.
[root@rh-srv1 ~]# ipa-client-install
WARNING: ntpd time&date synchronization service will not be configured as
conflicting service (chronyd) is enabled
Use --force-ntpd option to disable it and force configuration of ntpd
Discovery was successful!
Client hostname: rh-srv1.whittenberg.local
Realm: WHITTENBERG.LOCAL
DNS Domain: whittenberg.local
IPA Server: rh-ipa.whittenberg.local
BaseDN: dc=whittenberg,dc=local
Continue to configure the system with these values? [no]: yes
Skipping synchronizing time with NTP server.
User authorized to enroll computers: admin
Password for admin@WHITTENBERG.LOCAL:
Successfully retrieved CA cert
Subject: CN=Certificate Authority,O=WHITTENBERG.LOCAL
Issuer: CN=Certificate Authority,O=WHITTENBERG.LOCAL
Valid From: Fri Oct 21 03:00:04 2016 UTC
Valid Until: Tue Oct 21 03:00:04 2036 UTC
Enrolled in IPA realm WHITTENBERG.LOCAL
Created /etc/ipa/default.conf
New SSSD config will be created
Configured sudoers in /etc/nsswitch.conf
Configured /etc/sssd/sssd.conf
Configured /etc/krb5.conf for IPA realm WHITTENBERG.LOCAL
trying https://rh-ipa.whittenberg.local/ipa/json
Forwarding 'ping' to json server 'https://rh-ipa.whittenberg.local/ipa/json'
Forwarding 'ca_is_enabled' to json server 'https://rh-ipa.whittenberg.local/ipa/json'
Systemwide CA database updated.
Added CA certificates to the default NSS database.
Adding SSH public key from /etc/ssh/ssh_host_rsa_key.pub
Adding SSH public key from /etc/ssh/ssh_host_ecdsa_key.pub
Adding SSH public key from /etc/ssh/ssh_host_ed25519_key.pub
Forwarding 'host_mod' to json server 'https://rh-ipa.whittenberg.local/ipa/json'
SSSD enabled
Configured /etc/openldap/ldap.conf
Configured /etc/ssh/ssh_config
Configured /etc/ssh/sshd_config
Configuring whittenberg.local as NIS domain.
Client configuration complete.
Setup the server to auto create home directories for ipa users when first login from the server.
[root@rh-srv1 ~]# authconfig --enablemkhomedir --update
getsebool: SELinux is disabled
Now logout as local user root and back in as ipa user admin.
[root@rh-srv1 ~]# logout
login as: admin
admin@192.168.10.31's password:
Creating home directory for admin.
[admin@rh-srv1 ~]$
[admin@rh-srv1 ~]$ pwd
/home/admin
[admin@rh-srv1 ~]$ whoami
admin
[admin@rh-srv1 ~]$ ping rh-ipa
PING rh-ipa.whittenberg.local (192.168.10.30) 56(84) bytes of data.
64 bytes from rh-ipa.whittenberg.local (192.168.10.30): icmp_seq=1 ttl=64 time=0.084 ms
64 bytes from rh-ipa.whittenberg.local (192.168.10.30): icmp_seq=2 ttl=64 time=0.084 ms
^C
--- rh-ipa.whittenberg.local ping statistics ---
2 packets transmitted, 2 received, 0% packet loss, time 999ms
rtt min/avg/max/mdev = 0.084/0.084/0.084/0.000 ms
Now you should be able to ssh into the rh-ipa server without supplying credentials if still login as admin on rh-srv1.
[admin@rh-srv1 ~]$ ssh rh-ipa
Could not chdir to home directory /home/admin: No such file or directory
-bash-4.2$
It worked! Looks like we have home dir issue for ipa user admin on the ipa server though. Lets try and take care of that. First exit back to rh-srv1.
-bash-4.2$ exit
logout
Connection to rh-ipa closed.
[admin@rh-srv1 ~]$
Now ssh to rh-ipa as local user root.
[admin@rh-srv1 ~]$ ssh root@rh-ipa
root@rh-ipa's password:
Last failed login: Fri Oct 21 22:40:19 MST 2016 from 192.168.10.31 on ssh:notty
There was 1 failed login attempt since the last successful login.
Last login: Thu Oct 20 21:19:20 2016 from 192.168.10.5
[root@rh-ipa ~]#
Setup the server to auto create home directories for ipa users when first login from the server.
[root@rh-srv1 ~]# authconfig --enablemkhomedir --update
Now exit back to rh-srv1.
[root@rh-ipa ~]# exit
logout
Connection to rh-ipa closed.
[admin@rh-srv1 ~]$
Now ssh back in to rh-ipa as ipa user admin.
[admin@rh-srv1 ~]$ ssh rh-ipa
Creating home directory for admin.
Last login: Fri Oct 21 22:36:53 2016 from 192.168.10.31
[admin@rh-ipa ~]$ pwd
/home/admin
[admin@rh-ipa ~]$
That solved the problem!!
NOW REPEAT all the steps above in ipa client install section for rh-srv2, of course using the correct IP and hostname for each server.
Thats it folks. Enjoy!
This is in preparation of me studying for my RHCSA (Redhat Certified System Administrator)
------------------------------------
Now for the base server installs.
------------------------------------
I will using the CentOS-7-x86_64-Everything.iso for the installs in my VMware vSphere Client 6.0 and ESXi 6.0. Each Server gets 2 Cores, 2GB Ram, 25GB disk, and 1 NIC.
Servers names and IP addresses will be:
rh-ipa.whittenberg.local 192.168.10.30
rh-srv1.whittenberg.local 192.168.10.31
rh-srv2.whittenberg.local 192.168.10.32
My Local LAN router is 192.168.10.1 and i will use this for my gateway out and DNS server.
At the CentOS 7 install I set my Network and Hostname.
Click on Network and Hostname on home screen.
Hostname: rh-ipa.whittenberg.local
Click slider to turn ethernet adapter ON. This gives me an IP from my DHCP server from my local LAN router.
Click the Configure button.
[General]
click on Automatically connect to this network
[IPv4 Settings]
Method: Manual
Addresses, click add button
address: 192.168.10.30
netmask: 24
gateway: 192.168.10.1
DNS server: 192.168.10.1
Click Save button
Click Done button
You should now be able to ping 192.168.10.30 from your workstation on the LAN.
Click on Date & Time from the home screen.
Chose your region and city.
Make sure Network Time slider shows ON.
Click on gears next to slider. Time servers should be green. If red then you are unable to reach them.
Click Done button.
Click on Software Selection from home screen.
Select Minimal Install under Base Environment and nothing under Add-Ons.
Click Done button.
Click on Installation Destination from home screen.
Make sure white check mark on your hard disk.
Select I will configure partitioning.
Click Done button.
Click the + button and setup as follows.
/boot = 500MB
swap = 1024MB
/root = 23.5GB
Click Done button.
Accept Changes.
Now click the Begin Installation button.
Supply root password while the installation is taking place.
When finished click the Reboot button.
Putty/SSH into your server from your workstation.
Disable selinux.
cp /etc/sysconfig/selinux /etc/sysconfig/selinux.bak
sed -i 's/^SELINUX=.*/SELINUX=disabled/g' /etc/sysconfig/selinux
cat /etc/sysconfig/selinux
reboot
Disable and turn off firewalld.
systemctl disable firewalld
systemctl stop firewalld
cat or edit your /etc/hostname file and add the following entree if not there already.
ipa.whittenberg.local
cat or edit your /etc/hosts file and add the following entries if not there already.
192.168.10.30 ipa.whittenberg.local ipa
cat or edit your /etc/resolv.conf file and add the following entries if not there already.
search whittenberg.local
nameserver 192.168.10.1
Install additional packages I need on normal basis.
yum -y install bind-utils traceroute net-tools ntp* gcc glibc glibc-common gd gd-devel make net-snmp openssl-devel xinetd unzip libtool* make patch perl bison flex-devel gcc-c++ ncurses-devel flex libtermcap-devel autoconf* automake* autoconf libxml2-devel cmake sqlite* wget ntp* lm_sensors ncurses-devel qt-devel hmaccalc zlib-devel binutils-devel elfutils-libelf-devel wget bc gzip uuid* libuuid-devel jansson* libxml2* sqlite* openssl* lsof NetworkManager-tui mlocate yum-utils kernel-devel nfs-utils tcpdump git
yum -y groupinstall "Development Tools"
Now update the server.
yum -y update
reboot
**Optional - Install of GNOME Desktop.
yum -y groups install "GNOME Desktop"
yum -y update
systemctl set-default graphical.target
systemctl get-default
reboot and make sure GNOME Desktop starts.
**END Optional - Install of GNOME Desktop.
**Optional - Turn off console screen saver and display all boot messages.
vi /etc/default/grub and on the line starting with GRUB_CMDLINE_LINUX= remove 'rhgb' and 'quiet'. Now add 'consoleblank=0' just before the last " on the line. DO NOT include the ' in the 'consoleblank=0' add.
Now make a new grub.cfg using the line below.
grub2-mkconfig -o /boot/grub2/grub.cfg
If using efi then use this line to make new grub.cfg
grub2-mkconfig -o /boot/efi/EFI/centos/grub.cfg
Now when you boot your server you will see all the boot messages.
**END Optional - Turn off console screen saver and display all boot messages.
NOW REPEAT all the steps above under base server installs for the other two server of rh-srv1 and rh-srv2, of course using the correct IP and hostname for each server.
------------------------------------
Now for the ipa server install
------------------------------------
Now its time to setup ipa on the ipa server and we will user srv1 as our first client.
On your ipa server.
# yum -y install ipa-server bind-dyndb-ldap ipa-server-dns
# ipa-server-install --setup-dns
The log file for this installation can be found in /var/log/ipaserver-install.log
==============================================================================
This program will set up the IPA Server.
This includes:
* Configure a stand-alone CA (dogtag) for certificate management
* Configure the Network Time Daemon (ntpd)
* Create and configure an instance of Directory Server
* Create and configure a Kerberos Key Distribution Center (KDC)
* Configure Apache (httpd)
* Configure DNS (bind)
To accept the default shown in brackets, press the Enter key.
WARNING: conflicting time&date synchronization service 'chronyd' will be disabled
in favor of ntpd
Enter the fully qualified domain name of the computer
on which you're setting up server software. Using the form
<hostname>.<domainname>
Example: master.example.com.
Server host name [rh-ipa.whittenberg.local]:
Warning: skipping DNS resolution of host rh-ipa.whittenberg.local
The domain name has been determined based on the host name.
Please confirm the domain name [whittenberg.local]:
The kerberos protocol requires a Realm name to be defined.
This is typically the domain name converted to uppercase.
Please provide a realm name [WHITTENBERG.LOCAL]:
Certain directory server operations require an administrative user.
This user is referred to as the Directory Manager and has full access
to the Directory for system management tasks and will be added to the
instance of directory server created for IPA.
The password must be at least 8 characters long.
Directory Manager password:
Password (confirm):
The IPA server requires an administrative user, named 'admin'.
This user is a regular system account used for IPA server administration.
IPA admin password:
Password (confirm):
Existing BIND configuration detected, overwrite? [no]: yes
Do you want to configure DNS forwarders? [yes]:
Enter an IP address for a DNS forwarder, or press Enter to skip: 8.8.8.8
DNS forwarder 8.8.8.8 added. You may add another.
Enter an IP address for a DNS forwarder, or press Enter to skip:
Checking DNS forwarders, please wait ...
Do you want to configure the reverse zone? [yes]:
Please specify the reverse zone name [10.168.192.in-addr.arpa.]:
Using reverse zone(s) 10.168.192.in-addr.arpa.
The IPA Master Server will be configured with:
Hostname: rh-ipa.whittenberg.local
IP address(es): 192.168.10.30
Domain name: whittenberg.local
Realm name: WHITTENBERG.LOCAL
BIND DNS server will be configured to serve IPA domain with:
Forwarders: 8.8.8.8
Reverse zone(s): 10.168.192.in-addr.arpa.
Continue to configure the system with these values? [no]: yes
Install info scrolls by then at the end we see.
Setup complete
Next steps:
1. You must make sure these network ports are open:
TCP Ports:
* 80, 443: HTTP/HTTPS
* 389, 636: LDAP/LDAPS
* 88, 464: kerberos
* 53: bind
UDP Ports:
* 88, 464: kerberos
* 53: bind
* 123: ntp
2. You can now obtain a kerberos ticket using the command: 'kinit admin'
This ticket will allow you to use the IPA tools (e.g., ipa user-add)
and the web user interface.
Be sure to back up the CA certificates stored in /root/cacert.p12
These files are required to create replicas. The password for these
files is the Directory Manager password
# kinit admin
Password for admin@WHITTENBERG.LOCAL:
# ipa user-find admin
--------------
1 user matched
--------------
User login: admin
Last name: Administrator
Home directory: /home/admin
Login shell: /bin/bash
UID: 1546000000
GID: 1546000000
Account disabled: False
Password: True
Kerberos keys available: True
----------------------------
Number of entries returned 1
----------------------------
# ipa user-add
First name: ldapuser1
Last name: ldapuser1
User login [lldapuser1]: ldapuser1
----------------------
Added user "ldapuser1"
----------------------
User login: ldapuser1
First name: ldapuser1
Last name: ldapuser1
Full name: ldapuser1 ldapuser1
Display name: ldapuser1 ldapuser1
Initials: ll
Home directory: /home/ldapuser1
GECOS: ldapuser1 ldapuser1
Login shell: /bin/sh
Kerberos principal: ldapuser1@WHITTENBERG.LOCAL
Email address: ldapuser1@whittenberg.local
UID: 1546000001
GID: 1546000001
Password: False
Member of groups: ipausers
Kerberos keys available: False
# ls -lsa /etc/ipa/
total 24
0 drwxr-xr-x. 6 root root 89 Oct 20 20:02 .
12 drwxr-xr-x. 147 root root 8192 Oct 20 20:02 ..
4 -r--r--r--. 1 root root 1337 Oct 20 20:01 ca.crt
4 -rw-r--r--. 1 root root 321 Oct 20 20:00 default.conf
0 drwxr-xr-x. 2 root root 76 Oct 20 20:02 dnssec
4 drwxr-xr-x. 2 root root 4096 Oct 20 19:52 html
0 drwxr-xr-x. 2 root root 51 Oct 20 20:01 kdcproxy
0 drwxr-xr-x. 2 root root 69 Oct 20 20:02 nssdb
# cat /etc/ipa/ca.crt
-----BEGIN CERTIFICATE-----
MIIDoDCCAoigAwIBAgIBATANBgkqhkiG9w0BAQsFADA8MRowGAYDVQQKDBFXSElU
VEVOQkVSRy5MT0NBTDEeMBwGA1UEAwwVQ2VydGlmaWNhdGUgQXV0aG9yaXR5MB4X
DTE2MTAyMTAzMDAwNFoXDTM2MTAyMTAzMDAwNFowPDEaMBgGA1UECgwRV0hJVFRF
TkJFUkcuTE9DQUwxHjAcBgNVBAMMFUNlcnRpZmljYXRlIEF1dGhvcml0eTCCASIw
DQYJKoZIhvcNAQEBBQADggEPADCCAQoCggEBANC2wYqkiEwRY/YUY5cyDTEh+OaK
tU8KtPEeyAOhE8COugNYUZhx8bvoJyM7c7KGzxU/nuY4MAYF6sMOslIcaAHR7S4A
Wi+1URBFI8xsCoO7YktVoyTkV0sNY93dUlK+dpKNnL7P1oDJlcqDWflne/BG0h4i
gq5NRRdWQvh33yJAriBNSw2AIYvuQMiMQ1kdFqQ/T5VjQUU+L20QGE2Ox7AnHkYd
Tovn+Alok8FIqbDNqIn4VNsz0Zy010eHC7zmRK/kiWrnauf+r/JHi3zGz9GVKtUE
3swEE4dXejA7SAd03ZnmF2oruJ+o5u3ZwK4bN8S9dKuZZTaXxjSbT+FbM3MCAwEA
AaOBrDCBqTAfBgNVHSMEGDAWgBRO+0W/EXt3Qbkun00PARxow2PUvjAPBgNVHRMB
Af8EBTADAQH/MA4GA1UdDwEB/wQEAwIBxjAdBgNVHQ4EFgQUTvtFvxF7d0G5Lp9N
DwEcaMNj1L4wRgYIKwYBBQUHAQEEOjA4MDYGCCsGAQUFBzABhipodHRwOi8vcmgt
aXBhLndoaXR0ZW5iZXJnLmxvY2FsOjgwL2NhL29jc3AwDQYJKoZIhvcNAQELBQAD
ggEBAGGiKMrGrcCAtRVfKdA2f4Ko1FpIKKUsEMG4yyBxio//HxDja8X0MUzG7RWQ
3xKvkcNO08zFNd5/5YCiboy5RRrz4N/fIVFZDjJhLjwT9UQx1nktETLl/oirVSp4
e3z7Tc6m+4gpPABM7ryVNkQfdNCka82rLnzny5+U/YsZ2mGcl86MQ6T2U/0RXBHj
9QZVmVRJe7mTJzNW62rSsh6D7u2RBffZIQ7I/Huk5HFiDI9mogtizpb1Miwr5Vhb
uy+bVmPaHJfy/bHbVv8Vg3m0dKbP6bhS0lafnfWXF1iCmako0n0v2+T7IzwScW2Y
G94EkYeftqGg9LiFAogEEKZnuGg=
-----END CERTIFICATE-----
# klist
Ticket cache: KEYRING:persistent:0:0
Default principal: admin@WHITTENBERG.LOCAL
Valid starting Expires Service principal
10/20/2016 20:09:13 10/21/2016 20:07:42 HTTP/rh-ipa.whittenberg.local@WHITTENBERG.LOCAL
10/20/2016 20:07:48 10/21/2016 20:07:42 krbtgt/WHITTENBERG.LOCAL@WHITTENBERG.LOCAL
# cat /etc/resolv.conf
search whittenberg.local
nameserver 127.0.0.1
vi /etc/resolv.conf (change to nameserver 192.168.10.30)
# cat /etc/resolv.conf
search whittenberg.local
nameserver 192.168.10.30
Next you can use the Firefox browser on your ipa server and browse the server.
https://rh-ipa.whittenberg.local
Supply username and password. User name is admin.
Click on Network Services then DNS->DNS Zones, then click on whittenberg.local.
Click Add button. Add your servers here like rh-srv1 and rh-srv2. include name, IP address, and select Create Reverse. Like:
name = rh-srv1
Address = 192.168.10.31
Check mark on Create Reverse
and
name = rh-srv2
Address = 192.168.10.32
Check mark on Create Reverse
------------------------------------
Now for the ipa client installs
------------------------------------
On rh-srv1.whittenberg.local server.
[root@rh-srv1 ~]# cat /etc/hostname
rh-srv1.whittenberg.local
[root@rh-srv1 ~]# cat /etc/hosts
127.0.0.1 localhost localhost.localdomain localhost4 localhost4.localdomain4
::1 localhost localhost.localdomain localhost6 localhost6.localdomain6
192.168.10.31 rh-srv1.whittenberg.local rh-srv1
[root@rh-srv1 ~]# cat /etc/resolv.conf
# Generated by NetworkManager
search whittenberg.local
nameserver 192.168.10.1
nameserver 2001:578:3f::30
nameserver 2001:578:3f:1::30
Now change the nameserver in /etc/resolv.conf from 192.168.10.1, as shown above, to 192.168.10.30, as shown below.
[root@rh-srv1 ~]# cat /etc/resolv.conf
# Generated by NetworkManager
search whittenberg.local
nameserver 192.168.10.30
nameserver 2001:578:3f::30
nameserver 2001:578:3f:1::30
Install the ipa client.
[root@rh-srv1 ~]# yum -y install ipa-client
Now run the install/setup of the ipa client.
[root@rh-srv1 ~]# ipa-client-install
WARNING: ntpd time&date synchronization service will not be configured as
conflicting service (chronyd) is enabled
Use --force-ntpd option to disable it and force configuration of ntpd
Discovery was successful!
Client hostname: rh-srv1.whittenberg.local
Realm: WHITTENBERG.LOCAL
DNS Domain: whittenberg.local
IPA Server: rh-ipa.whittenberg.local
BaseDN: dc=whittenberg,dc=local
Continue to configure the system with these values? [no]: yes
Skipping synchronizing time with NTP server.
User authorized to enroll computers: admin
Password for admin@WHITTENBERG.LOCAL:
Successfully retrieved CA cert
Subject: CN=Certificate Authority,O=WHITTENBERG.LOCAL
Issuer: CN=Certificate Authority,O=WHITTENBERG.LOCAL
Valid From: Fri Oct 21 03:00:04 2016 UTC
Valid Until: Tue Oct 21 03:00:04 2036 UTC
Enrolled in IPA realm WHITTENBERG.LOCAL
Created /etc/ipa/default.conf
New SSSD config will be created
Configured sudoers in /etc/nsswitch.conf
Configured /etc/sssd/sssd.conf
Configured /etc/krb5.conf for IPA realm WHITTENBERG.LOCAL
trying https://rh-ipa.whittenberg.local/ipa/json
Forwarding 'ping' to json server 'https://rh-ipa.whittenberg.local/ipa/json'
Forwarding 'ca_is_enabled' to json server 'https://rh-ipa.whittenberg.local/ipa/json'
Systemwide CA database updated.
Added CA certificates to the default NSS database.
Adding SSH public key from /etc/ssh/ssh_host_rsa_key.pub
Adding SSH public key from /etc/ssh/ssh_host_ecdsa_key.pub
Adding SSH public key from /etc/ssh/ssh_host_ed25519_key.pub
Forwarding 'host_mod' to json server 'https://rh-ipa.whittenberg.local/ipa/json'
SSSD enabled
Configured /etc/openldap/ldap.conf
Configured /etc/ssh/ssh_config
Configured /etc/ssh/sshd_config
Configuring whittenberg.local as NIS domain.
Client configuration complete.
Setup the server to auto create home directories for ipa users when first login from the server.
[root@rh-srv1 ~]# authconfig --enablemkhomedir --update
getsebool: SELinux is disabled
Now logout as local user root and back in as ipa user admin.
[root@rh-srv1 ~]# logout
login as: admin
admin@192.168.10.31's password:
Creating home directory for admin.
[admin@rh-srv1 ~]$
[admin@rh-srv1 ~]$ pwd
/home/admin
[admin@rh-srv1 ~]$ whoami
admin
[admin@rh-srv1 ~]$ ping rh-ipa
PING rh-ipa.whittenberg.local (192.168.10.30) 56(84) bytes of data.
64 bytes from rh-ipa.whittenberg.local (192.168.10.30): icmp_seq=1 ttl=64 time=0.084 ms
64 bytes from rh-ipa.whittenberg.local (192.168.10.30): icmp_seq=2 ttl=64 time=0.084 ms
^C
--- rh-ipa.whittenberg.local ping statistics ---
2 packets transmitted, 2 received, 0% packet loss, time 999ms
rtt min/avg/max/mdev = 0.084/0.084/0.084/0.000 ms
Now you should be able to ssh into the rh-ipa server without supplying credentials if still login as admin on rh-srv1.
[admin@rh-srv1 ~]$ ssh rh-ipa
Could not chdir to home directory /home/admin: No such file or directory
-bash-4.2$
It worked! Looks like we have home dir issue for ipa user admin on the ipa server though. Lets try and take care of that. First exit back to rh-srv1.
-bash-4.2$ exit
logout
Connection to rh-ipa closed.
[admin@rh-srv1 ~]$
Now ssh to rh-ipa as local user root.
[admin@rh-srv1 ~]$ ssh root@rh-ipa
root@rh-ipa's password:
Last failed login: Fri Oct 21 22:40:19 MST 2016 from 192.168.10.31 on ssh:notty
There was 1 failed login attempt since the last successful login.
Last login: Thu Oct 20 21:19:20 2016 from 192.168.10.5
[root@rh-ipa ~]#
Setup the server to auto create home directories for ipa users when first login from the server.
[root@rh-srv1 ~]# authconfig --enablemkhomedir --update
Now exit back to rh-srv1.
[root@rh-ipa ~]# exit
logout
Connection to rh-ipa closed.
[admin@rh-srv1 ~]$
Now ssh back in to rh-ipa as ipa user admin.
[admin@rh-srv1 ~]$ ssh rh-ipa
Creating home directory for admin.
Last login: Fri Oct 21 22:36:53 2016 from 192.168.10.31
[admin@rh-ipa ~]$ pwd
/home/admin
[admin@rh-ipa ~]$
That solved the problem!!
NOW REPEAT all the steps above in ipa client install section for rh-srv2, of course using the correct IP and hostname for each server.
Thats it folks. Enjoy!
RHCSA Lab setup using CentOS 7 with ipa server and ipa client
RHCSA Lab setup using CentOS 7 with ipa server and ipa client
This is in preparation of me studying for my RHCSA (Redhat Certified System Administrator)
------------------------------------
Now for the base server installs.
------------------------------------
I will using the CentOS-7-x86_64-Everything.iso for the installs in my VMware vSphere Client 6.0 and ESXi 6.0. Each Server gets 2 Cores, 2GB Ram, 25GB disk, and 1 NIC.
Servers names and IP addresses will be:
rh-ipa.whittenberg.local 192.168.10.30
rh-srv1.whittenberg.local 192.168.10.31
rh-srv2.whittenberg.local 192.168.10.32
My Local LAN router is 192.168.10.1 and i will use this for my gateway out and DNS server.
At the CentOS 7 install I set my Network and Hostname.
Click on Network and Hostname on home screen.
Hostname: rh-ipa.whittenberg.local
Click slider to turn ethernet adapter ON. This gives me an IP from my DHCP server from my local LAN router.
Click the Configure button.
[General]
click on Automatically connect to this network
[IPv4 Settings]
Method: Manual
Addresses, click add button
address: 192.168.10.30
netmask: 24
gateway: 192.168.10.1
DNS server: 192.168.10.1
Click Save button
Click Done button
You should now be able to ping 192.168.10.30 from your workstation on the LAN.
Click on Date & Time from the home screen.
Chose your region and city.
Make sure Network Time slider shows ON.
Click on gears next to slider. Time servers should be green. If red then you are unable to reach them.
Click Done button.
Click on Software Selection from home screen.
Select Minimal Install under Base Environment and nothing under Add-Ons.
Click Done button.
Click on Installation Destination from home screen.
Make sure white check mark on your hard disk.
Select I will configure partitioning.
Click Done button.
Click the + button and setup as follows.
/boot = 500MB
swap = 1024MB
/root = 23.5GB
Click Done button.
Accept Changes.
Now click the Begin Installation button.
Supply root password while the installation is taking place.
When finished click the Reboot button.
Putty/SSH into your server from your workstation.
Disable selinux.
cp /etc/sysconfig/selinux /etc/sysconfig/selinux.bak
sed -i 's/^SELINUX=.*/SELINUX=disabled/g' /etc/sysconfig/selinux
cat /etc/sysconfig/selinux
reboot
Disable and turn off firewalld.
systemctl disable firewalld
systemctl stop firewalld
cat or edit your /etc/hostname file and add the following entree if not there already.
ipa.whittenberg.local
cat or edit your /etc/hosts file and add the following entries if not there already.
192.168.10.30 ipa.whittenberg.local ipa
cat or edit your /etc/resolv.conf file and add the following entries if not there already.
search whittenberg.local
nameserver 192.168.10.1
Install additional packages I need on normal basis.
yum -y install bind-utils traceroute net-tools ntp* gcc glibc glibc-common gd gd-devel make net-snmp openssl-devel xinetd unzip libtool* make patch perl bison flex-devel gcc-c++ ncurses-devel flex libtermcap-devel autoconf* automake* autoconf libxml2-devel cmake sqlite* wget ntp* lm_sensors ncurses-devel qt-devel hmaccalc zlib-devel binutils-devel elfutils-libelf-devel wget bc gzip uuid* libuuid-devel jansson* libxml2* sqlite* openssl* lsof NetworkManager-tui mlocate yum-utils kernel-devel nfs-utils tcpdump git
yum -y groupinstall "Development Tools"
Now update the server.
yum -y update
reboot
**Optional - Install of GNOME Desktop.
yum -y groups install "GNOME Desktop"
yum -y update
systemctl set-default graphical.target
systemctl get-default
reboot and make sure GNOME Desktop starts.
**END Optional - Install of GNOME Desktop.
**Optional - Turn off console screen saver and display all boot messages.
vi /etc/default/grub and on the line starting with GRUB_CMDLINE_LINUX= remove 'rhgb' and 'quiet'. Now add 'consoleblank=0' just before the last " on the line. DO NOT include the ' in the 'consoleblank=0' add.
Now make a new grub.cfg using the line below.
grub2-mkconfig -o /boot/grub2/grub.cfg
If using efi then use this line to make new grub.cfg
grub2-mkconfig -o /boot/efi/EFI/centos/grub.cfg
Now when you boot your server you will see all the boot messages.
**END Optional - Turn off console screen saver and display all boot messages.
NOW REPEAT all the steps above under base server installs for the other two server of rh-srv1 and rh-srv2, of course using the correct IP and hostname for each server.
------------------------------------
Now for the ipa server install
------------------------------------
Now its time to setup ipa on the ipa server and we will user srv1 as our first client.
On your ipa server.
# yum -y install ipa-server bind-dyndb-ldap ipa-server-dns
# ipa-server-install --setup-dns
The log file for this installation can be found in /var/log/ipaserver-install.log
==============================================================================
This program will set up the IPA Server.
This includes:
* Configure a stand-alone CA (dogtag) for certificate management
* Configure the Network Time Daemon (ntpd)
* Create and configure an instance of Directory Server
* Create and configure a Kerberos Key Distribution Center (KDC)
* Configure Apache (httpd)
* Configure DNS (bind)
To accept the default shown in brackets, press the Enter key.
WARNING: conflicting time&date synchronization service 'chronyd' will be disabled
in favor of ntpd
Enter the fully qualified domain name of the computer
on which you're setting up server software. Using the form
<hostname>.<domainname>
Example: master.example.com.
Server host name [rh-ipa.whittenberg.local]:
Warning: skipping DNS resolution of host rh-ipa.whittenberg.local
The domain name has been determined based on the host name.
Please confirm the domain name [whittenberg.local]:
The kerberos protocol requires a Realm name to be defined.
This is typically the domain name converted to uppercase.
Please provide a realm name [WHITTENBERG.LOCAL]:
Certain directory server operations require an administrative user.
This user is referred to as the Directory Manager and has full access
to the Directory for system management tasks and will be added to the
instance of directory server created for IPA.
The password must be at least 8 characters long.
Directory Manager password:
Password (confirm):
The IPA server requires an administrative user, named 'admin'.
This user is a regular system account used for IPA server administration.
IPA admin password:
Password (confirm):
Existing BIND configuration detected, overwrite? [no]: yes
Do you want to configure DNS forwarders? [yes]:
Enter an IP address for a DNS forwarder, or press Enter to skip: 8.8.8.8
DNS forwarder 8.8.8.8 added. You may add another.
Enter an IP address for a DNS forwarder, or press Enter to skip:
Checking DNS forwarders, please wait ...
Do you want to configure the reverse zone? [yes]:
Please specify the reverse zone name [10.168.192.in-addr.arpa.]:
Using reverse zone(s) 10.168.192.in-addr.arpa.
The IPA Master Server will be configured with:
Hostname: rh-ipa.whittenberg.local
IP address(es): 192.168.10.30
Domain name: whittenberg.local
Realm name: WHITTENBERG.LOCAL
BIND DNS server will be configured to serve IPA domain with:
Forwarders: 8.8.8.8
Reverse zone(s): 10.168.192.in-addr.arpa.
Continue to configure the system with these values? [no]: yes
Install info scrolls by then at the end we see.
Setup complete
Next steps:
1. You must make sure these network ports are open:
TCP Ports:
* 80, 443: HTTP/HTTPS
* 389, 636: LDAP/LDAPS
* 88, 464: kerberos
* 53: bind
UDP Ports:
* 88, 464: kerberos
* 53: bind
* 123: ntp
2. You can now obtain a kerberos ticket using the command: 'kinit admin'
This ticket will allow you to use the IPA tools (e.g., ipa user-add)
and the web user interface.
Be sure to back up the CA certificates stored in /root/cacert.p12
These files are required to create replicas. The password for these
files is the Directory Manager password
# kinit admin
Password for admin@WHITTENBERG.LOCAL:
# ipa user-find admin
--------------
1 user matched
--------------
User login: admin
Last name: Administrator
Home directory: /home/admin
Login shell: /bin/bash
UID: 1546000000
GID: 1546000000
Account disabled: False
Password: True
Kerberos keys available: True
----------------------------
Number of entries returned 1
----------------------------
# ipa user-add
First name: ldapuser1
Last name: ldapuser1
User login [lldapuser1]: ldapuser1
----------------------
Added user "ldapuser1"
----------------------
User login: ldapuser1
First name: ldapuser1
Last name: ldapuser1
Full name: ldapuser1 ldapuser1
Display name: ldapuser1 ldapuser1
Initials: ll
Home directory: /home/ldapuser1
GECOS: ldapuser1 ldapuser1
Login shell: /bin/sh
Kerberos principal: ldapuser1@WHITTENBERG.LOCAL
Email address: ldapuser1@whittenberg.local
UID: 1546000001
GID: 1546000001
Password: False
Member of groups: ipausers
Kerberos keys available: False
# ls -lsa /etc/ipa/
total 24
0 drwxr-xr-x. 6 root root 89 Oct 20 20:02 .
12 drwxr-xr-x. 147 root root 8192 Oct 20 20:02 ..
4 -r--r--r--. 1 root root 1337 Oct 20 20:01 ca.crt
4 -rw-r--r--. 1 root root 321 Oct 20 20:00 default.conf
0 drwxr-xr-x. 2 root root 76 Oct 20 20:02 dnssec
4 drwxr-xr-x. 2 root root 4096 Oct 20 19:52 html
0 drwxr-xr-x. 2 root root 51 Oct 20 20:01 kdcproxy
0 drwxr-xr-x. 2 root root 69 Oct 20 20:02 nssdb
# cat /etc/ipa/ca.crt
-----BEGIN CERTIFICATE-----
MIIDoDCCAoigAwIBAgIBATANBgkqhkiG9w0BAQsFADA8MRowGAYDVQQKDBFXSElU
VEVOQkVSRy5MT0NBTDEeMBwGA1UEAwwVQ2VydGlmaWNhdGUgQXV0aG9yaXR5MB4X
DTE2MTAyMTAzMDAwNFoXDTM2MTAyMTAzMDAwNFowPDEaMBgGA1UECgwRV0hJVFRF
TkJFUkcuTE9DQUwxHjAcBgNVBAMMFUNlcnRpZmljYXRlIEF1dGhvcml0eTCCASIw
DQYJKoZIhvcNAQEBBQADggEPADCCAQoCggEBANC2wYqkiEwRY/YUY5cyDTEh+OaK
tU8KtPEeyAOhE8COugNYUZhx8bvoJyM7c7KGzxU/nuY4MAYF6sMOslIcaAHR7S4A
Wi+1URBFI8xsCoO7YktVoyTkV0sNY93dUlK+dpKNnL7P1oDJlcqDWflne/BG0h4i
gq5NRRdWQvh33yJAriBNSw2AIYvuQMiMQ1kdFqQ/T5VjQUU+L20QGE2Ox7AnHkYd
Tovn+Alok8FIqbDNqIn4VNsz0Zy010eHC7zmRK/kiWrnauf+r/JHi3zGz9GVKtUE
3swEE4dXejA7SAd03ZnmF2oruJ+o5u3ZwK4bN8S9dKuZZTaXxjSbT+FbM3MCAwEA
AaOBrDCBqTAfBgNVHSMEGDAWgBRO+0W/EXt3Qbkun00PARxow2PUvjAPBgNVHRMB
Af8EBTADAQH/MA4GA1UdDwEB/wQEAwIBxjAdBgNVHQ4EFgQUTvtFvxF7d0G5Lp9N
DwEcaMNj1L4wRgYIKwYBBQUHAQEEOjA4MDYGCCsGAQUFBzABhipodHRwOi8vcmgt
aXBhLndoaXR0ZW5iZXJnLmxvY2FsOjgwL2NhL29jc3AwDQYJKoZIhvcNAQELBQAD
ggEBAGGiKMrGrcCAtRVfKdA2f4Ko1FpIKKUsEMG4yyBxio//HxDja8X0MUzG7RWQ
3xKvkcNO08zFNd5/5YCiboy5RRrz4N/fIVFZDjJhLjwT9UQx1nktETLl/oirVSp4
e3z7Tc6m+4gpPABM7ryVNkQfdNCka82rLnzny5+U/YsZ2mGcl86MQ6T2U/0RXBHj
9QZVmVRJe7mTJzNW62rSsh6D7u2RBffZIQ7I/Huk5HFiDI9mogtizpb1Miwr5Vhb
uy+bVmPaHJfy/bHbVv8Vg3m0dKbP6bhS0lafnfWXF1iCmako0n0v2+T7IzwScW2Y
G94EkYeftqGg9LiFAogEEKZnuGg=
-----END CERTIFICATE-----
# klist
Ticket cache: KEYRING:persistent:0:0
Default principal: admin@WHITTENBERG.LOCAL
Valid starting Expires Service principal
10/20/2016 20:09:13 10/21/2016 20:07:42 HTTP/rh-ipa.whittenberg.local@WHITTENBERG.LOCAL
10/20/2016 20:07:48 10/21/2016 20:07:42 krbtgt/WHITTENBERG.LOCAL@WHITTENBERG.LOCAL
# cat /etc/resolv.conf
search whittenberg.local
nameserver 127.0.0.1
vi /etc/resolv.conf (change to nameserver 192.168.10.30)
# cat /etc/resolv.conf
search whittenberg.local
nameserver 192.168.10.30
Next you can use the Firefox browser on your ipa server and browse the server.
https://rh-ipa.whittenberg.local
Supply username and password. User name is admin.
Click on Network Services then DNS->DNS Zones, then click on whittenberg.local.
Click Add button. Add your servers here like rh-srv1 and rh-srv2. include name, IP address, and select Create Reverse. Like:
name = rh-srv1
Address = 192.168.10.31
Check mark on Create Reverse
and
name = rh-srv2
Address = 192.168.10.32
Check mark on Create Reverse
------------------------------------
Now for the ipa client installs
------------------------------------
On rh-srv1.whittenberg.local server.
[root@rh-srv1 ~]# cat /etc/hostname
rh-srv1.whittenberg.local
[root@rh-srv1 ~]# cat /etc/hosts
127.0.0.1 localhost localhost.localdomain localhost4 localhost4.localdomain4
::1 localhost localhost.localdomain localhost6 localhost6.localdomain6
192.168.10.31 rh-srv1.whittenberg.local rh-srv1
[root@rh-srv1 ~]# cat /etc/resolv.conf
# Generated by NetworkManager
search whittenberg.local
nameserver 192.168.10.1
nameserver 2001:578:3f::30
nameserver 2001:578:3f:1::30
Now change the nameserver in /etc/resolv.conf from 192.168.10.1, as shown above, to 192.168.10.30, as shown below.
[root@rh-srv1 ~]# cat /etc/resolv.conf
# Generated by NetworkManager
search whittenberg.local
nameserver 192.168.10.30
nameserver 2001:578:3f::30
nameserver 2001:578:3f:1::30
Install the ipa client.
[root@rh-srv1 ~]# yum -y install ipa-client
Now run the install/setup of the ipa client.
[root@rh-srv1 ~]# ipa-client-install
WARNING: ntpd time&date synchronization service will not be configured as
conflicting service (chronyd) is enabled
Use --force-ntpd option to disable it and force configuration of ntpd
Discovery was successful!
Client hostname: rh-srv1.whittenberg.local
Realm: WHITTENBERG.LOCAL
DNS Domain: whittenberg.local
IPA Server: rh-ipa.whittenberg.local
BaseDN: dc=whittenberg,dc=local
Continue to configure the system with these values? [no]: yes
Skipping synchronizing time with NTP server.
User authorized to enroll computers: admin
Password for admin@WHITTENBERG.LOCAL:
Successfully retrieved CA cert
Subject: CN=Certificate Authority,O=WHITTENBERG.LOCAL
Issuer: CN=Certificate Authority,O=WHITTENBERG.LOCAL
Valid From: Fri Oct 21 03:00:04 2016 UTC
Valid Until: Tue Oct 21 03:00:04 2036 UTC
Enrolled in IPA realm WHITTENBERG.LOCAL
Created /etc/ipa/default.conf
New SSSD config will be created
Configured sudoers in /etc/nsswitch.conf
Configured /etc/sssd/sssd.conf
Configured /etc/krb5.conf for IPA realm WHITTENBERG.LOCAL
trying https://rh-ipa.whittenberg.local/ipa/json
Forwarding 'ping' to json server 'https://rh-ipa.whittenberg.local/ipa/json'
Forwarding 'ca_is_enabled' to json server 'https://rh-ipa.whittenberg.local/ipa/json'
Systemwide CA database updated.
Added CA certificates to the default NSS database.
Adding SSH public key from /etc/ssh/ssh_host_rsa_key.pub
Adding SSH public key from /etc/ssh/ssh_host_ecdsa_key.pub
Adding SSH public key from /etc/ssh/ssh_host_ed25519_key.pub
Forwarding 'host_mod' to json server 'https://rh-ipa.whittenberg.local/ipa/json'
SSSD enabled
Configured /etc/openldap/ldap.conf
Configured /etc/ssh/ssh_config
Configured /etc/ssh/sshd_config
Configuring whittenberg.local as NIS domain.
Client configuration complete.
Setup the server to auto create home directories for ipa users when first login from the server.
[root@rh-srv1 ~]# authconfig --enablemkhomedir --update
getsebool: SELinux is disabled
Now logout as local user root and back in as ipa user admin.
[root@rh-srv1 ~]# logout
login as: admin
admin@192.168.10.31's password:
Creating home directory for admin.
[admin@rh-srv1 ~]$
[admin@rh-srv1 ~]$ pwd
/home/admin
[admin@rh-srv1 ~]$ whoami
admin
[admin@rh-srv1 ~]$ ping rh-ipa
PING rh-ipa.whittenberg.local (192.168.10.30) 56(84) bytes of data.
64 bytes from rh-ipa.whittenberg.local (192.168.10.30): icmp_seq=1 ttl=64 time=0.084 ms
64 bytes from rh-ipa.whittenberg.local (192.168.10.30): icmp_seq=2 ttl=64 time=0.084 ms
^C
--- rh-ipa.whittenberg.local ping statistics ---
2 packets transmitted, 2 received, 0% packet loss, time 999ms
rtt min/avg/max/mdev = 0.084/0.084/0.084/0.000 ms
Now you should be able to ssh into the rh-ipa server without supplying credentials if still login as admin on rh-srv1.
[admin@rh-srv1 ~]$ ssh rh-ipa
Could not chdir to home directory /home/admin: No such file or directory
-bash-4.2$
It worked! Looks like we have home dir issue for ipa user admin on the ipa server though. Lets try and take care of that. First exit back to rh-srv1.
-bash-4.2$ exit
logout
Connection to rh-ipa closed.
[admin@rh-srv1 ~]$
Now ssh to rh-ipa as local user root.
[admin@rh-srv1 ~]$ ssh root@rh-ipa
root@rh-ipa's password:
Last failed login: Fri Oct 21 22:40:19 MST 2016 from 192.168.10.31 on ssh:notty
There was 1 failed login attempt since the last successful login.
Last login: Thu Oct 20 21:19:20 2016 from 192.168.10.5
[root@rh-ipa ~]#
Setup the server to auto create home directories for ipa users when first login from the server.
[root@rh-srv1 ~]# authconfig --enablemkhomedir --update
Now exit back to rh-srv1.
[root@rh-ipa ~]# exit
logout
Connection to rh-ipa closed.
[admin@rh-srv1 ~]$
Now ssh back in to rh-ipa as ipa user admin.
[admin@rh-srv1 ~]$ ssh rh-ipa
Creating home directory for admin.
Last login: Fri Oct 21 22:36:53 2016 from 192.168.10.31
[admin@rh-ipa ~]$ pwd
/home/admin
[admin@rh-ipa ~]$
That solved the problem!!
NOW REPEAT all the steps above in ipa client install section for rh-srv2, of course using the correct IP and hostname for each server.
Thats it folks. Enjoy!
This is in preparation of me studying for my RHCSA (Redhat Certified System Administrator)
------------------------------------
Now for the base server installs.
------------------------------------
I will using the CentOS-7-x86_64-Everything.iso for the installs in my VMware vSphere Client 6.0 and ESXi 6.0. Each Server gets 2 Cores, 2GB Ram, 25GB disk, and 1 NIC.
Servers names and IP addresses will be:
rh-ipa.whittenberg.local 192.168.10.30
rh-srv1.whittenberg.local 192.168.10.31
rh-srv2.whittenberg.local 192.168.10.32
My Local LAN router is 192.168.10.1 and i will use this for my gateway out and DNS server.
At the CentOS 7 install I set my Network and Hostname.
Click on Network and Hostname on home screen.
Hostname: rh-ipa.whittenberg.local
Click slider to turn ethernet adapter ON. This gives me an IP from my DHCP server from my local LAN router.
Click the Configure button.
[General]
click on Automatically connect to this network
[IPv4 Settings]
Method: Manual
Addresses, click add button
address: 192.168.10.30
netmask: 24
gateway: 192.168.10.1
DNS server: 192.168.10.1
Click Save button
Click Done button
You should now be able to ping 192.168.10.30 from your workstation on the LAN.
Click on Date & Time from the home screen.
Chose your region and city.
Make sure Network Time slider shows ON.
Click on gears next to slider. Time servers should be green. If red then you are unable to reach them.
Click Done button.
Click on Software Selection from home screen.
Select Minimal Install under Base Environment and nothing under Add-Ons.
Click Done button.
Click on Installation Destination from home screen.
Make sure white check mark on your hard disk.
Select I will configure partitioning.
Click Done button.
Click the + button and setup as follows.
/boot = 500MB
swap = 1024MB
/root = 23.5GB
Click Done button.
Accept Changes.
Now click the Begin Installation button.
Supply root password while the installation is taking place.
When finished click the Reboot button.
Putty/SSH into your server from your workstation.
Disable selinux.
cp /etc/sysconfig/selinux /etc/sysconfig/selinux.bak
sed -i 's/^SELINUX=.*/SELINUX=disabled/g' /etc/sysconfig/selinux
cat /etc/sysconfig/selinux
reboot
Disable and turn off firewalld.
systemctl disable firewalld
systemctl stop firewalld
cat or edit your /etc/hostname file and add the following entree if not there already.
ipa.whittenberg.local
cat or edit your /etc/hosts file and add the following entries if not there already.
192.168.10.30 ipa.whittenberg.local ipa
cat or edit your /etc/resolv.conf file and add the following entries if not there already.
search whittenberg.local
nameserver 192.168.10.1
Install additional packages I need on normal basis.
yum -y install bind-utils traceroute net-tools ntp* gcc glibc glibc-common gd gd-devel make net-snmp openssl-devel xinetd unzip libtool* make patch perl bison flex-devel gcc-c++ ncurses-devel flex libtermcap-devel autoconf* automake* autoconf libxml2-devel cmake sqlite* wget ntp* lm_sensors ncurses-devel qt-devel hmaccalc zlib-devel binutils-devel elfutils-libelf-devel wget bc gzip uuid* libuuid-devel jansson* libxml2* sqlite* openssl* lsof NetworkManager-tui mlocate yum-utils kernel-devel nfs-utils tcpdump git
yum -y groupinstall "Development Tools"
Now update the server.
yum -y update
reboot
**Optional - Install of GNOME Desktop.
yum -y groups install "GNOME Desktop"
yum -y update
systemctl set-default graphical.target
systemctl get-default
reboot and make sure GNOME Desktop starts.
**END Optional - Install of GNOME Desktop.
**Optional - Turn off console screen saver and display all boot messages.
vi /etc/default/grub and on the line starting with GRUB_CMDLINE_LINUX= remove 'rhgb' and 'quiet'. Now add 'consoleblank=0' just before the last " on the line. DO NOT include the ' in the 'consoleblank=0' add.
Now make a new grub.cfg using the line below.
grub2-mkconfig -o /boot/grub2/grub.cfg
If using efi then use this line to make new grub.cfg
grub2-mkconfig -o /boot/efi/EFI/centos/grub.cfg
Now when you boot your server you will see all the boot messages.
**END Optional - Turn off console screen saver and display all boot messages.
NOW REPEAT all the steps above under base server installs for the other two server of rh-srv1 and rh-srv2, of course using the correct IP and hostname for each server.
------------------------------------
Now for the ipa server install
------------------------------------
Now its time to setup ipa on the ipa server and we will user srv1 as our first client.
On your ipa server.
# yum -y install ipa-server bind-dyndb-ldap ipa-server-dns
# ipa-server-install --setup-dns
The log file for this installation can be found in /var/log/ipaserver-install.log
==============================================================================
This program will set up the IPA Server.
This includes:
* Configure a stand-alone CA (dogtag) for certificate management
* Configure the Network Time Daemon (ntpd)
* Create and configure an instance of Directory Server
* Create and configure a Kerberos Key Distribution Center (KDC)
* Configure Apache (httpd)
* Configure DNS (bind)
To accept the default shown in brackets, press the Enter key.
WARNING: conflicting time&date synchronization service 'chronyd' will be disabled
in favor of ntpd
Enter the fully qualified domain name of the computer
on which you're setting up server software. Using the form
<hostname>.<domainname>
Example: master.example.com.
Server host name [rh-ipa.whittenberg.local]:
Warning: skipping DNS resolution of host rh-ipa.whittenberg.local
The domain name has been determined based on the host name.
Please confirm the domain name [whittenberg.local]:
The kerberos protocol requires a Realm name to be defined.
This is typically the domain name converted to uppercase.
Please provide a realm name [WHITTENBERG.LOCAL]:
Certain directory server operations require an administrative user.
This user is referred to as the Directory Manager and has full access
to the Directory for system management tasks and will be added to the
instance of directory server created for IPA.
The password must be at least 8 characters long.
Directory Manager password:
Password (confirm):
The IPA server requires an administrative user, named 'admin'.
This user is a regular system account used for IPA server administration.
IPA admin password:
Password (confirm):
Existing BIND configuration detected, overwrite? [no]: yes
Do you want to configure DNS forwarders? [yes]:
Enter an IP address for a DNS forwarder, or press Enter to skip: 8.8.8.8
DNS forwarder 8.8.8.8 added. You may add another.
Enter an IP address for a DNS forwarder, or press Enter to skip:
Checking DNS forwarders, please wait ...
Do you want to configure the reverse zone? [yes]:
Please specify the reverse zone name [10.168.192.in-addr.arpa.]:
Using reverse zone(s) 10.168.192.in-addr.arpa.
The IPA Master Server will be configured with:
Hostname: rh-ipa.whittenberg.local
IP address(es): 192.168.10.30
Domain name: whittenberg.local
Realm name: WHITTENBERG.LOCAL
BIND DNS server will be configured to serve IPA domain with:
Forwarders: 8.8.8.8
Reverse zone(s): 10.168.192.in-addr.arpa.
Continue to configure the system with these values? [no]: yes
Install info scrolls by then at the end we see.
Setup complete
Next steps:
1. You must make sure these network ports are open:
TCP Ports:
* 80, 443: HTTP/HTTPS
* 389, 636: LDAP/LDAPS
* 88, 464: kerberos
* 53: bind
UDP Ports:
* 88, 464: kerberos
* 53: bind
* 123: ntp
2. You can now obtain a kerberos ticket using the command: 'kinit admin'
This ticket will allow you to use the IPA tools (e.g., ipa user-add)
and the web user interface.
Be sure to back up the CA certificates stored in /root/cacert.p12
These files are required to create replicas. The password for these
files is the Directory Manager password
# kinit admin
Password for admin@WHITTENBERG.LOCAL:
# ipa user-find admin
--------------
1 user matched
--------------
User login: admin
Last name: Administrator
Home directory: /home/admin
Login shell: /bin/bash
UID: 1546000000
GID: 1546000000
Account disabled: False
Password: True
Kerberos keys available: True
----------------------------
Number of entries returned 1
----------------------------
# ipa user-add
First name: ldapuser1
Last name: ldapuser1
User login [lldapuser1]: ldapuser1
----------------------
Added user "ldapuser1"
----------------------
User login: ldapuser1
First name: ldapuser1
Last name: ldapuser1
Full name: ldapuser1 ldapuser1
Display name: ldapuser1 ldapuser1
Initials: ll
Home directory: /home/ldapuser1
GECOS: ldapuser1 ldapuser1
Login shell: /bin/sh
Kerberos principal: ldapuser1@WHITTENBERG.LOCAL
Email address: ldapuser1@whittenberg.local
UID: 1546000001
GID: 1546000001
Password: False
Member of groups: ipausers
Kerberos keys available: False
# ls -lsa /etc/ipa/
total 24
0 drwxr-xr-x. 6 root root 89 Oct 20 20:02 .
12 drwxr-xr-x. 147 root root 8192 Oct 20 20:02 ..
4 -r--r--r--. 1 root root 1337 Oct 20 20:01 ca.crt
4 -rw-r--r--. 1 root root 321 Oct 20 20:00 default.conf
0 drwxr-xr-x. 2 root root 76 Oct 20 20:02 dnssec
4 drwxr-xr-x. 2 root root 4096 Oct 20 19:52 html
0 drwxr-xr-x. 2 root root 51 Oct 20 20:01 kdcproxy
0 drwxr-xr-x. 2 root root 69 Oct 20 20:02 nssdb
# cat /etc/ipa/ca.crt
-----BEGIN CERTIFICATE-----
MIIDoDCCAoigAwIBAgIBATANBgkqhkiG9w0BAQsFADA8MRowGAYDVQQKDBFXSElU
VEVOQkVSRy5MT0NBTDEeMBwGA1UEAwwVQ2VydGlmaWNhdGUgQXV0aG9yaXR5MB4X
DTE2MTAyMTAzMDAwNFoXDTM2MTAyMTAzMDAwNFowPDEaMBgGA1UECgwRV0hJVFRF
TkJFUkcuTE9DQUwxHjAcBgNVBAMMFUNlcnRpZmljYXRlIEF1dGhvcml0eTCCASIw
DQYJKoZIhvcNAQEBBQADggEPADCCAQoCggEBANC2wYqkiEwRY/YUY5cyDTEh+OaK
tU8KtPEeyAOhE8COugNYUZhx8bvoJyM7c7KGzxU/nuY4MAYF6sMOslIcaAHR7S4A
Wi+1URBFI8xsCoO7YktVoyTkV0sNY93dUlK+dpKNnL7P1oDJlcqDWflne/BG0h4i
gq5NRRdWQvh33yJAriBNSw2AIYvuQMiMQ1kdFqQ/T5VjQUU+L20QGE2Ox7AnHkYd
Tovn+Alok8FIqbDNqIn4VNsz0Zy010eHC7zmRK/kiWrnauf+r/JHi3zGz9GVKtUE
3swEE4dXejA7SAd03ZnmF2oruJ+o5u3ZwK4bN8S9dKuZZTaXxjSbT+FbM3MCAwEA
AaOBrDCBqTAfBgNVHSMEGDAWgBRO+0W/EXt3Qbkun00PARxow2PUvjAPBgNVHRMB
Af8EBTADAQH/MA4GA1UdDwEB/wQEAwIBxjAdBgNVHQ4EFgQUTvtFvxF7d0G5Lp9N
DwEcaMNj1L4wRgYIKwYBBQUHAQEEOjA4MDYGCCsGAQUFBzABhipodHRwOi8vcmgt
aXBhLndoaXR0ZW5iZXJnLmxvY2FsOjgwL2NhL29jc3AwDQYJKoZIhvcNAQELBQAD
ggEBAGGiKMrGrcCAtRVfKdA2f4Ko1FpIKKUsEMG4yyBxio//HxDja8X0MUzG7RWQ
3xKvkcNO08zFNd5/5YCiboy5RRrz4N/fIVFZDjJhLjwT9UQx1nktETLl/oirVSp4
e3z7Tc6m+4gpPABM7ryVNkQfdNCka82rLnzny5+U/YsZ2mGcl86MQ6T2U/0RXBHj
9QZVmVRJe7mTJzNW62rSsh6D7u2RBffZIQ7I/Huk5HFiDI9mogtizpb1Miwr5Vhb
uy+bVmPaHJfy/bHbVv8Vg3m0dKbP6bhS0lafnfWXF1iCmako0n0v2+T7IzwScW2Y
G94EkYeftqGg9LiFAogEEKZnuGg=
-----END CERTIFICATE-----
# klist
Ticket cache: KEYRING:persistent:0:0
Default principal: admin@WHITTENBERG.LOCAL
Valid starting Expires Service principal
10/20/2016 20:09:13 10/21/2016 20:07:42 HTTP/rh-ipa.whittenberg.local@WHITTENBERG.LOCAL
10/20/2016 20:07:48 10/21/2016 20:07:42 krbtgt/WHITTENBERG.LOCAL@WHITTENBERG.LOCAL
# cat /etc/resolv.conf
search whittenberg.local
nameserver 127.0.0.1
vi /etc/resolv.conf (change to nameserver 192.168.10.30)
# cat /etc/resolv.conf
search whittenberg.local
nameserver 192.168.10.30
Next you can use the Firefox browser on your ipa server and browse the server.
https://rh-ipa.whittenberg.local
Supply username and password. User name is admin.
Click on Network Services then DNS->DNS Zones, then click on whittenberg.local.
Click Add button. Add your servers here like rh-srv1 and rh-srv2. include name, IP address, and select Create Reverse. Like:
name = rh-srv1
Address = 192.168.10.31
Check mark on Create Reverse
and
name = rh-srv2
Address = 192.168.10.32
Check mark on Create Reverse
------------------------------------
Now for the ipa client installs
------------------------------------
On rh-srv1.whittenberg.local server.
[root@rh-srv1 ~]# cat /etc/hostname
rh-srv1.whittenberg.local
[root@rh-srv1 ~]# cat /etc/hosts
127.0.0.1 localhost localhost.localdomain localhost4 localhost4.localdomain4
::1 localhost localhost.localdomain localhost6 localhost6.localdomain6
192.168.10.31 rh-srv1.whittenberg.local rh-srv1
[root@rh-srv1 ~]# cat /etc/resolv.conf
# Generated by NetworkManager
search whittenberg.local
nameserver 192.168.10.1
nameserver 2001:578:3f::30
nameserver 2001:578:3f:1::30
Now change the nameserver in /etc/resolv.conf from 192.168.10.1, as shown above, to 192.168.10.30, as shown below.
[root@rh-srv1 ~]# cat /etc/resolv.conf
# Generated by NetworkManager
search whittenberg.local
nameserver 192.168.10.30
nameserver 2001:578:3f::30
nameserver 2001:578:3f:1::30
Install the ipa client.
[root@rh-srv1 ~]# yum -y install ipa-client
Now run the install/setup of the ipa client.
[root@rh-srv1 ~]# ipa-client-install
WARNING: ntpd time&date synchronization service will not be configured as
conflicting service (chronyd) is enabled
Use --force-ntpd option to disable it and force configuration of ntpd
Discovery was successful!
Client hostname: rh-srv1.whittenberg.local
Realm: WHITTENBERG.LOCAL
DNS Domain: whittenberg.local
IPA Server: rh-ipa.whittenberg.local
BaseDN: dc=whittenberg,dc=local
Continue to configure the system with these values? [no]: yes
Skipping synchronizing time with NTP server.
User authorized to enroll computers: admin
Password for admin@WHITTENBERG.LOCAL:
Successfully retrieved CA cert
Subject: CN=Certificate Authority,O=WHITTENBERG.LOCAL
Issuer: CN=Certificate Authority,O=WHITTENBERG.LOCAL
Valid From: Fri Oct 21 03:00:04 2016 UTC
Valid Until: Tue Oct 21 03:00:04 2036 UTC
Enrolled in IPA realm WHITTENBERG.LOCAL
Created /etc/ipa/default.conf
New SSSD config will be created
Configured sudoers in /etc/nsswitch.conf
Configured /etc/sssd/sssd.conf
Configured /etc/krb5.conf for IPA realm WHITTENBERG.LOCAL
trying https://rh-ipa.whittenberg.local/ipa/json
Forwarding 'ping' to json server 'https://rh-ipa.whittenberg.local/ipa/json'
Forwarding 'ca_is_enabled' to json server 'https://rh-ipa.whittenberg.local/ipa/json'
Systemwide CA database updated.
Added CA certificates to the default NSS database.
Adding SSH public key from /etc/ssh/ssh_host_rsa_key.pub
Adding SSH public key from /etc/ssh/ssh_host_ecdsa_key.pub
Adding SSH public key from /etc/ssh/ssh_host_ed25519_key.pub
Forwarding 'host_mod' to json server 'https://rh-ipa.whittenberg.local/ipa/json'
SSSD enabled
Configured /etc/openldap/ldap.conf
Configured /etc/ssh/ssh_config
Configured /etc/ssh/sshd_config
Configuring whittenberg.local as NIS domain.
Client configuration complete.
Setup the server to auto create home directories for ipa users when first login from the server.
[root@rh-srv1 ~]# authconfig --enablemkhomedir --update
getsebool: SELinux is disabled
Now logout as local user root and back in as ipa user admin.
[root@rh-srv1 ~]# logout
login as: admin
admin@192.168.10.31's password:
Creating home directory for admin.
[admin@rh-srv1 ~]$
[admin@rh-srv1 ~]$ pwd
/home/admin
[admin@rh-srv1 ~]$ whoami
admin
[admin@rh-srv1 ~]$ ping rh-ipa
PING rh-ipa.whittenberg.local (192.168.10.30) 56(84) bytes of data.
64 bytes from rh-ipa.whittenberg.local (192.168.10.30): icmp_seq=1 ttl=64 time=0.084 ms
64 bytes from rh-ipa.whittenberg.local (192.168.10.30): icmp_seq=2 ttl=64 time=0.084 ms
^C
--- rh-ipa.whittenberg.local ping statistics ---
2 packets transmitted, 2 received, 0% packet loss, time 999ms
rtt min/avg/max/mdev = 0.084/0.084/0.084/0.000 ms
Now you should be able to ssh into the rh-ipa server without supplying credentials if still login as admin on rh-srv1.
[admin@rh-srv1 ~]$ ssh rh-ipa
Could not chdir to home directory /home/admin: No such file or directory
-bash-4.2$
It worked! Looks like we have home dir issue for ipa user admin on the ipa server though. Lets try and take care of that. First exit back to rh-srv1.
-bash-4.2$ exit
logout
Connection to rh-ipa closed.
[admin@rh-srv1 ~]$
Now ssh to rh-ipa as local user root.
[admin@rh-srv1 ~]$ ssh root@rh-ipa
root@rh-ipa's password:
Last failed login: Fri Oct 21 22:40:19 MST 2016 from 192.168.10.31 on ssh:notty
There was 1 failed login attempt since the last successful login.
Last login: Thu Oct 20 21:19:20 2016 from 192.168.10.5
[root@rh-ipa ~]#
Setup the server to auto create home directories for ipa users when first login from the server.
[root@rh-srv1 ~]# authconfig --enablemkhomedir --update
Now exit back to rh-srv1.
[root@rh-ipa ~]# exit
logout
Connection to rh-ipa closed.
[admin@rh-srv1 ~]$
Now ssh back in to rh-ipa as ipa user admin.
[admin@rh-srv1 ~]$ ssh rh-ipa
Creating home directory for admin.
Last login: Fri Oct 21 22:36:53 2016 from 192.168.10.31
[admin@rh-ipa ~]$ pwd
/home/admin
[admin@rh-ipa ~]$
That solved the problem!!
NOW REPEAT all the steps above in ipa client install section for rh-srv2, of course using the correct IP and hostname for each server.
Thats it folks. Enjoy!
Thursday, October 20, 2016
RHCSA Lab setup using CentOS 7
RHCSA Lab setup using CentOS 7
I will using the CentOS-7-x86_64-Everything.iso for the installs in my VMware vSphere Client 6.0 and ESXi 6.0. Each Server gets 2 Cores, 2GB Ram, 25GB disk, and 1 NIC.
Servers names and IP addresses will be:
ipa.whittenberg.local 192.168.10.39
srv1.whittenberg.local 192.168.10.40
srv2.whittenberg.local 192.168.10.41
My Local LAN router is 192.168.10.1 and i will use this for my gateway out and DNS server.
At the CentOS 7 install I set my Network and Hostname.
Click on Network and Hostname on home screen.
Hostname: rh-ipa.whittenberg.local
Click slider to turn ethernet adapter ON. This gives me an IP from my DHCP server from my local LAN router.
Click the Configure button.
[General]
click on Automatically connect to this network
[IPv4 Settings]
Method: Manual
Addresses, click add button
address: 192.168.10.39
netmask: 24
gateway: 192.168.10.1
DNS server: 192.168.10.1
Click Save button
Click Done button
You should now be able to ping 192.168.10.39 from your workstation on the LAN.
Click on Date & Time from the home screen.
Chose your region and city.
Make sure Network Time slider shows ON.
Click on gears next to slider. Time servers should be green. If red then you are unable to reach them.
Click Done button.
Click on Software Selection from home screen.
Select Minimal Install under Base Environment and nothing under Add-Ons.
Click Done button.
Click on Installation Destination from home screen.
Make sure white check mark on your hard disk.
Select I will configure partitioning.
Click Done button.
Click the + button and setup as follows.
/boot = 512MB
swap = 1024MB
/root = 24.5GB
Click Done button.
Accept Changes.
Now click the Begin Installation button.
Supply root password while the installation is taking place.
When finished click the Reboot button.
Putty/SSH into your server from your workstation.
Disable selinux.
cp /etc/sysconfig/selinux /etc/sysconfig/selinux.bak
sed -i 's/^SELINUX=.*/SELINUX=disabled/g' /etc/sysconfig/selinux
cat /etc/sysconfig/selinux
reboot
Disable and turn off firewalld.
systemctl disable firewalld
systemctl stop firewalld
cat or edit your /etc/hostname file and add the following entree if not there already.
ipa.whittenberg.local
cat or edit your /etc/hosts file and add the following entries if not there already.
192.168.10.39 ipa.whittenberg.local ipa
cat or edit your /etc/resolv.conf file and add the following entries if not there already.
search whittenberg.local
nameserver 192.168.10.1
Install additional packages I need on normal basis.
yum -y install bind-utils traceroute net-tools ntp* gcc glibc glibc-common gd gd-devel make net-snmp openssl-devel xinetd unzip libtool* make patch perl bison flex-devel gcc-c++ ncurses-devel flex libtermcap-devel autoconf* automake* autoconf libxml2-devel cmake sqlite* wget ntp* lm_sensors ncurses-devel qt-devel hmaccalc zlib-devel binutils-devel elfutils-libelf-devel wget bc gzip uuid* libuuid-devel jansson* libxml2* sqlite* openssl* lsof NetworkManager-tui mlocate yum-utils kernel-devel nfs-utils tcpdump git
yum -y groupinstall "Development Tools"
Now update the server.
yum -y update
reboot
**Optional - Install of GNOME Desktop.
yum -y groups install "GNOME Desktop"
yum -y update
systemctl set-default graphical.target
systemctl get-default
reboot and make sure GNOME Desktop starts.
**END Optional - Install of GNOME Desktop.
**Optional - Turn off console screen saver and display all boot messages.
vi /etc/default/grub and on the line starting with GRUB_CMDLINE_LINUX= remove 'rhgb' and 'quiet'. Now add 'consoleblank=0' just before the last " on the line. DO NOT include the ' in the 'consoleblank=0' add.
Now make a new grub.cfg using the line below.
grub2-mkconfig -o /boot/grub2/grub.cfg
If using efi then use this line to make new grub.cfg
grub2-mkconfig -o /boot/efi/EFI/centos/grub.cfg
Now when you boot your server you will see all the boot messages.
**END Optional - Turn off console screen saver and display all boot messages.
NOW REPEAT all the steps above for the other two servers, of course using the correct IP and hostname for each server.
Now its time to setup ipa on the ipa server and we will user srv1 as our first client. TO BE CONTINUED.
I will using the CentOS-7-x86_64-Everything.iso for the installs in my VMware vSphere Client 6.0 and ESXi 6.0. Each Server gets 2 Cores, 2GB Ram, 25GB disk, and 1 NIC.
Servers names and IP addresses will be:
ipa.whittenberg.local 192.168.10.39
srv1.whittenberg.local 192.168.10.40
srv2.whittenberg.local 192.168.10.41
My Local LAN router is 192.168.10.1 and i will use this for my gateway out and DNS server.
At the CentOS 7 install I set my Network and Hostname.
Click on Network and Hostname on home screen.
Hostname: rh-ipa.whittenberg.local
Click slider to turn ethernet adapter ON. This gives me an IP from my DHCP server from my local LAN router.
Click the Configure button.
[General]
click on Automatically connect to this network
[IPv4 Settings]
Method: Manual
Addresses, click add button
address: 192.168.10.39
netmask: 24
gateway: 192.168.10.1
DNS server: 192.168.10.1
Click Save button
Click Done button
You should now be able to ping 192.168.10.39 from your workstation on the LAN.
Click on Date & Time from the home screen.
Chose your region and city.
Make sure Network Time slider shows ON.
Click on gears next to slider. Time servers should be green. If red then you are unable to reach them.
Click Done button.
Click on Software Selection from home screen.
Select Minimal Install under Base Environment and nothing under Add-Ons.
Click Done button.
Click on Installation Destination from home screen.
Make sure white check mark on your hard disk.
Select I will configure partitioning.
Click Done button.
Click the + button and setup as follows.
/boot = 512MB
swap = 1024MB
/root = 24.5GB
Click Done button.
Accept Changes.
Now click the Begin Installation button.
Supply root password while the installation is taking place.
When finished click the Reboot button.
Putty/SSH into your server from your workstation.
Disable selinux.
cp /etc/sysconfig/selinux /etc/sysconfig/selinux.bak
sed -i 's/^SELINUX=.*/SELINUX=disabled/g' /etc/sysconfig/selinux
cat /etc/sysconfig/selinux
reboot
Disable and turn off firewalld.
systemctl disable firewalld
systemctl stop firewalld
cat or edit your /etc/hostname file and add the following entree if not there already.
ipa.whittenberg.local
cat or edit your /etc/hosts file and add the following entries if not there already.
192.168.10.39 ipa.whittenberg.local ipa
cat or edit your /etc/resolv.conf file and add the following entries if not there already.
search whittenberg.local
nameserver 192.168.10.1
Install additional packages I need on normal basis.
yum -y install bind-utils traceroute net-tools ntp* gcc glibc glibc-common gd gd-devel make net-snmp openssl-devel xinetd unzip libtool* make patch perl bison flex-devel gcc-c++ ncurses-devel flex libtermcap-devel autoconf* automake* autoconf libxml2-devel cmake sqlite* wget ntp* lm_sensors ncurses-devel qt-devel hmaccalc zlib-devel binutils-devel elfutils-libelf-devel wget bc gzip uuid* libuuid-devel jansson* libxml2* sqlite* openssl* lsof NetworkManager-tui mlocate yum-utils kernel-devel nfs-utils tcpdump git
yum -y groupinstall "Development Tools"
Now update the server.
yum -y update
reboot
**Optional - Install of GNOME Desktop.
yum -y groups install "GNOME Desktop"
yum -y update
systemctl set-default graphical.target
systemctl get-default
reboot and make sure GNOME Desktop starts.
**END Optional - Install of GNOME Desktop.
**Optional - Turn off console screen saver and display all boot messages.
vi /etc/default/grub and on the line starting with GRUB_CMDLINE_LINUX= remove 'rhgb' and 'quiet'. Now add 'consoleblank=0' just before the last " on the line. DO NOT include the ' in the 'consoleblank=0' add.
Now make a new grub.cfg using the line below.
grub2-mkconfig -o /boot/grub2/grub.cfg
If using efi then use this line to make new grub.cfg
grub2-mkconfig -o /boot/efi/EFI/centos/grub.cfg
Now when you boot your server you will see all the boot messages.
**END Optional - Turn off console screen saver and display all boot messages.
NOW REPEAT all the steps above for the other two servers, of course using the correct IP and hostname for each server.
Now its time to setup ipa on the ipa server and we will user srv1 as our first client. TO BE CONTINUED.
CentOS 7 clear cache
CentOS 7 clear cache
Clear dentries and inodes.
# sync; echo 2 > /proc/sys/vm/drop_caches
Clear PageCache, dentries and inodes.
# sync; echo 3 > /proc/sys/vm/drop_caches
Clear dentries and inodes.
# sync; echo 2 > /proc/sys/vm/drop_caches
Clear PageCache, dentries and inodes.
# sync; echo 3 > /proc/sys/vm/drop_caches
Wednesday, October 19, 2016
CentOS 7 tigervnc install
CentOS 7 tigervnc install
This will get you basic remote access to your GUI desktop as user root.
# yum -y install tigervnc-server
Now run vncserver and supply the password you will use.
# vncserver
You will require a password to access your desktops.
Password:
Verify:
xauth: file /root/.Xauthority does not exist
New 'server1.example.com:1 (root)' desktop is server1.example.com:1
Creating default startup script /root/.vnc/xstartup
Starting applications specified in /root/.vnc/xstartup
Log file is /root/.vnc/server1.example.com:1.log
Now from your client run your VNC viewer and use like the following for the server address
192.168.1.15:1
This will get you basic remote access to your GUI desktop as user root.
# yum -y install tigervnc-server
Now run vncserver and supply the password you will use.
# vncserver
You will require a password to access your desktops.
Password:
Verify:
xauth: file /root/.Xauthority does not exist
New 'server1.example.com:1 (root)' desktop is server1.example.com:1
Creating default startup script /root/.vnc/xstartup
Starting applications specified in /root/.vnc/xstartup
Log file is /root/.vnc/server1.example.com:1.log
Now from your client run your VNC viewer and use like the following for the server address
192.168.1.15:1
Saturday, October 15, 2016
CentOS 7 kernel upgrade using ELRepo. 4.8.1 as of 10/15/2016
CentOS 7 kernel upgrade using ELRepo. 4.8.1 as of 10/15/2016
AS root install the elrepo public key and RPM
rpm --import https://www.elrepo.org/RPM-GPG-KEY-elrepo.org
rpm -Uvh http://www.elrepo.org/elrepo-release-7.0-2.el7.elrepo.noarch.rpm
Enable the elrepo-kerenel
yum --enablerepo=elrepo-kernel
Install new kerenel
yum install kernel-ml
Reboot and run uname -r to see if on new kernel-ml
# uname -r
3.10.0-327.28.2.el7.x86_64
If still on old kernel, like above, make sure your default menu entry is on the correct entry.
Change default menu entry.
cat /boot/grub2/grub.cfg | grep menuentry
or
cat /boot/efi/EFI/centos/grub.cfg | grep menuentry (if using EFI)
And look for your 4.7 entry. My menu entry is the first one (or 0) so set it to that.
grub2-set-default 0
reboot
Now check version.
# uname -r
4.8.1-1.el7.elrepo.x86_64
If using btrfs remember to upgrade your btrfs-progs to current version as well
First check current version
# btrfs --version
btrfs-progs v3.19.1
Your btrfs-progs should match your kernel.
Uninstall you current btrfs-progs
yum -y remove btrfs-progs
Now install packages for new btrfs-progs
yum install libuuid-devel libattr-devel zlib-devel libacl-devel e2fsprogs-devel libblkid-devel lzo2-devel lzo-devel asciidoc xmlto git
yum -y groupinstall "Development Tools"
Now download, compile, and install new btrfs-progs
cd /root
git clone git://git.kernel.org/pub/scm/linux/kernel/git/kdave/btrfs-progs.git
cd btrfs-progs
./autogen.sh
./configure && make
make install
Now reboot and check versions
# uname -r
4.8.1-1.el7.elrepo.x86_64
# btrfs --version
btrfs-progs v4.8.1
AS root install the elrepo public key and RPM
rpm --import https://www.elrepo.org/RPM-GPG-KEY-elrepo.org
rpm -Uvh http://www.elrepo.org/elrepo-release-7.0-2.el7.elrepo.noarch.rpm
Enable the elrepo-kerenel
yum --enablerepo=elrepo-kernel
Install new kerenel
yum install kernel-ml
Reboot and run uname -r to see if on new kernel-ml
# uname -r
3.10.0-327.28.2.el7.x86_64
If still on old kernel, like above, make sure your default menu entry is on the correct entry.
Change default menu entry.
cat /boot/grub2/grub.cfg | grep menuentry
or
cat /boot/efi/EFI/centos/grub.cfg | grep menuentry (if using EFI)
And look for your 4.7 entry. My menu entry is the first one (or 0) so set it to that.
grub2-set-default 0
reboot
Now check version.
# uname -r
4.8.1-1.el7.elrepo.x86_64
If using btrfs remember to upgrade your btrfs-progs to current version as well
First check current version
# btrfs --version
btrfs-progs v3.19.1
Your btrfs-progs should match your kernel.
Uninstall you current btrfs-progs
yum -y remove btrfs-progs
Now install packages for new btrfs-progs
yum install libuuid-devel libattr-devel zlib-devel libacl-devel e2fsprogs-devel libblkid-devel lzo2-devel lzo-devel asciidoc xmlto git
yum -y groupinstall "Development Tools"
Now download, compile, and install new btrfs-progs
cd /root
git clone git://git.kernel.org/pub/scm/linux/kernel/git/kdave/btrfs-progs.git
cd btrfs-progs
./autogen.sh
./configure && make
make install
Now reboot and check versions
# uname -r
4.8.1-1.el7.elrepo.x86_64
# btrfs --version
btrfs-progs v4.8.1
Subscribe to:
Posts (Atom)